BookApp - Service Booking Flutter App
BookApp is a production-ready, fully functional and API-integrated Service Booking application built with Flutter. It ships with a large set of polished screens and reusable widgets, a clean feature-based architecture, and batteries-included integrations (auth, payments, push notifications, maps, localization, theming) so you can launch service-based apps quickly with confidence on both Android and iOS.
What you get out of the box
- End-to-end booking flow: browse services, view details, select staff/time/date, confirm booking, pay, and track appointments.
- Modern UI patterns: bottom navigation, lists/grids, filters, search, onboarding, authentication (sign in/up/forgot), account/profile, notifications, wishlist, orders, and more.
- Optimized UX: responsive layouts, performant lists (staggered/animated), placeholders (shimmer), cached images, and graceful offline handling.
Architecture at a glance (feature-first)
lib/app: application layer and cross-cutting concernslocalization/andflutter_localizations/intlfor i18nproviders/shared/global state and controllersroutes/central navigation and typed route helpers- Core app files (e.g.,
app_colors.dart,app_theme_data.dart,assets_path.dart,app_strings.dart,app_constants.dart,theme_controller.dart,urls.dart)
lib/features: domain modules with clear boundariesauth/: login, signup, reset password screens and logichome/: home feed, sections, and featured content (data/models,providers,ui/screens,ui/widgets)services/: listing, details, filtering, shared widgets (data/models/utils,providers,ui)services_booking/: booking flow, scheduling, andlogic/payment_controllers/(Stripe, Razorpay)appointments/: list and detail views for booked servicesaccount/: profile, edit profile, change password, settingswishlist/andcommon/: reusable UI, utilities, and shared providers
lib/network_service: API client and integrationscore/HTTP utilities, interceptors, error handling, connectivity checkspgw_services/payment-gateway helpers and endpoints- Centralized endpoints in
lib/app/urls.dart(base URL + resource paths)
lib/utils: helpers (formatting, mappers, extensions) shared across features
Key integrations
- State management with
getandproviderwhere it fits best per module. - Networking with
http, caching withcached_network_image, connectivity withconnectivity_plus. - Payments via
flutter_stripeandrazorpay_flutter(wired throughservices_booking/logic/payment_controllers). - Push notifications using
firebase_messagingand local notifications viaflutter_local_notifications. - Maps & location using
flutter_map,latlong2, andgeolocator. - Web content (
webview_flutter) and rich text rendering (flutter_html).
Branding and theming
- Primary and secondary theme colors, as well as primary logos (including splash), are fetched from the Admin Panel at runtime.
- Accent/supporting colors and fallback assets are optional overrides in code (
app_colors.dart,app_theme_data.dart,assets_path.dart).
The result is a maintainable, scalable codebase that adheres to Flutter best practices and promotes reuse. You can customize typography, colors, layouts, assets, and module-level behavior without fighting the structure—making it faster to ship features and iterate.
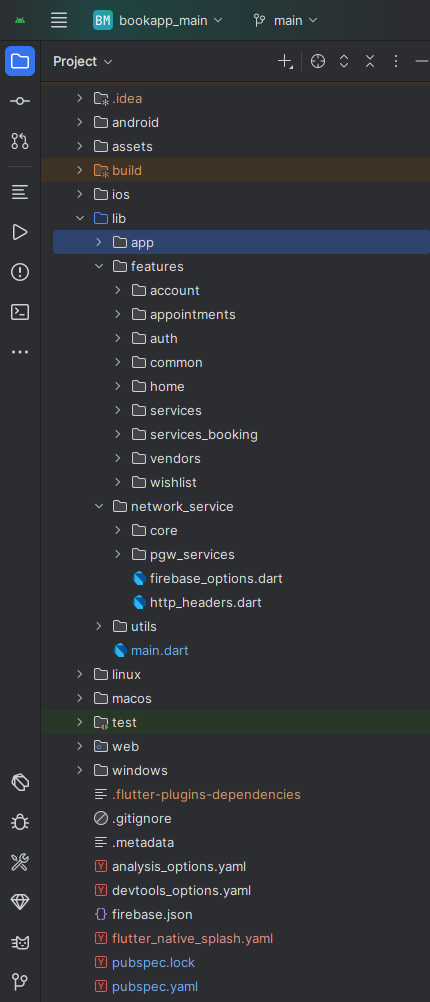
Folder Structure
All you need to follow the lib(Library) Folder for any logical and UI changes in this project.
lib
├── app
│   ├── localization
│   ├── providers
│   ├── routes
├── features
│   ├── account
│   │   ├── models
│   │   ├── providers
│   │   └── ui
│   │       ├── screens
│   │       └── widgets
│   ├── appointments
│   │   ├── models
│   │   ├── providers
│   │   └── ui
│   │       └── screens
│   ├── auth
│   │   ├── providers
│   │   └── ui
│   │       └── screens
│   ├── common
│   │   ├── providers
│   │   └── ui
│   │       ├── screens
│   │       └── widgets
│   ├── home
│   │   ├── data
│   │   │   └── models
│   │   ├── providers
│   │   └── ui
│   │       ├── screens
│   │       └── widgets
│   ├── services
│   │   ├── data
│   │   │   ├── models
│   │   │   └── utils
│   │   ├── providers
│   │   └── ui
│   │       ├── screens
│   │       └── widgets
│   │           ├── all_services_widgets
│   │           └── s_details_widgets
│   ├── services_booking
│   │   ├── data
│   │   ├── logic
│   │   │   ├── payment_controllers
│   │   ├── providers
│   │   └── ui
│   │       ├── screens
│   │       └── widgets
│   ├── vendors
│   │   ├── models
│   │   ├── providers
│   │   └── ui
│   │       ├── screens
│   │       └── widgets
│   └── wishlist
│       ├── data
│       │   ├── models
│       │   └── ui
│       │       ├── screens
│       │       └── widgets
│       ├── providers
│       └── ui
│           ├── screens
│           └── widgets
├── network_service
│   ├── core
│   └── pgw_services
└── utils
Screens
Customer App Screens:
1. Splash Screen
2. Sign In Screen
3. Sign Up Screen
4. Home Screen
5. Services Screen
6. Services Details Screen
7. Services Booking Staff Selection Screen
8. Services Booking Time & Date Selection Screen
9. Services Booking Login Screen
10. Services Booking Billing Screen
11. Services Booking Payment Method Selection Screen
12. Booking Confirmation Screen
13. Vendors Screen
14. Vendor Details Screen
15. Appointments Screen
16. Appointments Details Screen
17. Notification Screen
18. Account Screen
19. Edit Profile Screen
20. Dashboard Screen
21. My wishlist Screen
22. Product Orders Screen
23. Orders Details Screen
24. Change Password Screen
25. Settings Screen
Requirements
Download and install Any one from these IDE(Android studio, Vs Code) on your computer.
- Source Android Studio: https://developer.android.com/studio
- Source Android Studio: https://code.visualstudio.com/download
Setup Flutter and Dart SDK in your computer if you want to modify the source code
- Source Android Studio: https://docs.flutter.dev/get-started/install
Must installed Flutter and dart plugin on your IDE
Install Flutter on Windows
Install Flutter on Mac
Installation
After downloading file from CodeCanyon you will get a zip file. Extracting the zip file you will get Documentation Folder, website-api.zip and installable.zip included in there:
- Unzip the installable.zip and open it in your IDE.
- On your IDE find for pubspecs.yaml file then click on pub get on top right side your IDE.
- Please make sure you are using Flutter version minimum 3.30.0
- Open an emulator or connect a real device and then click on Run Button for compile the project.
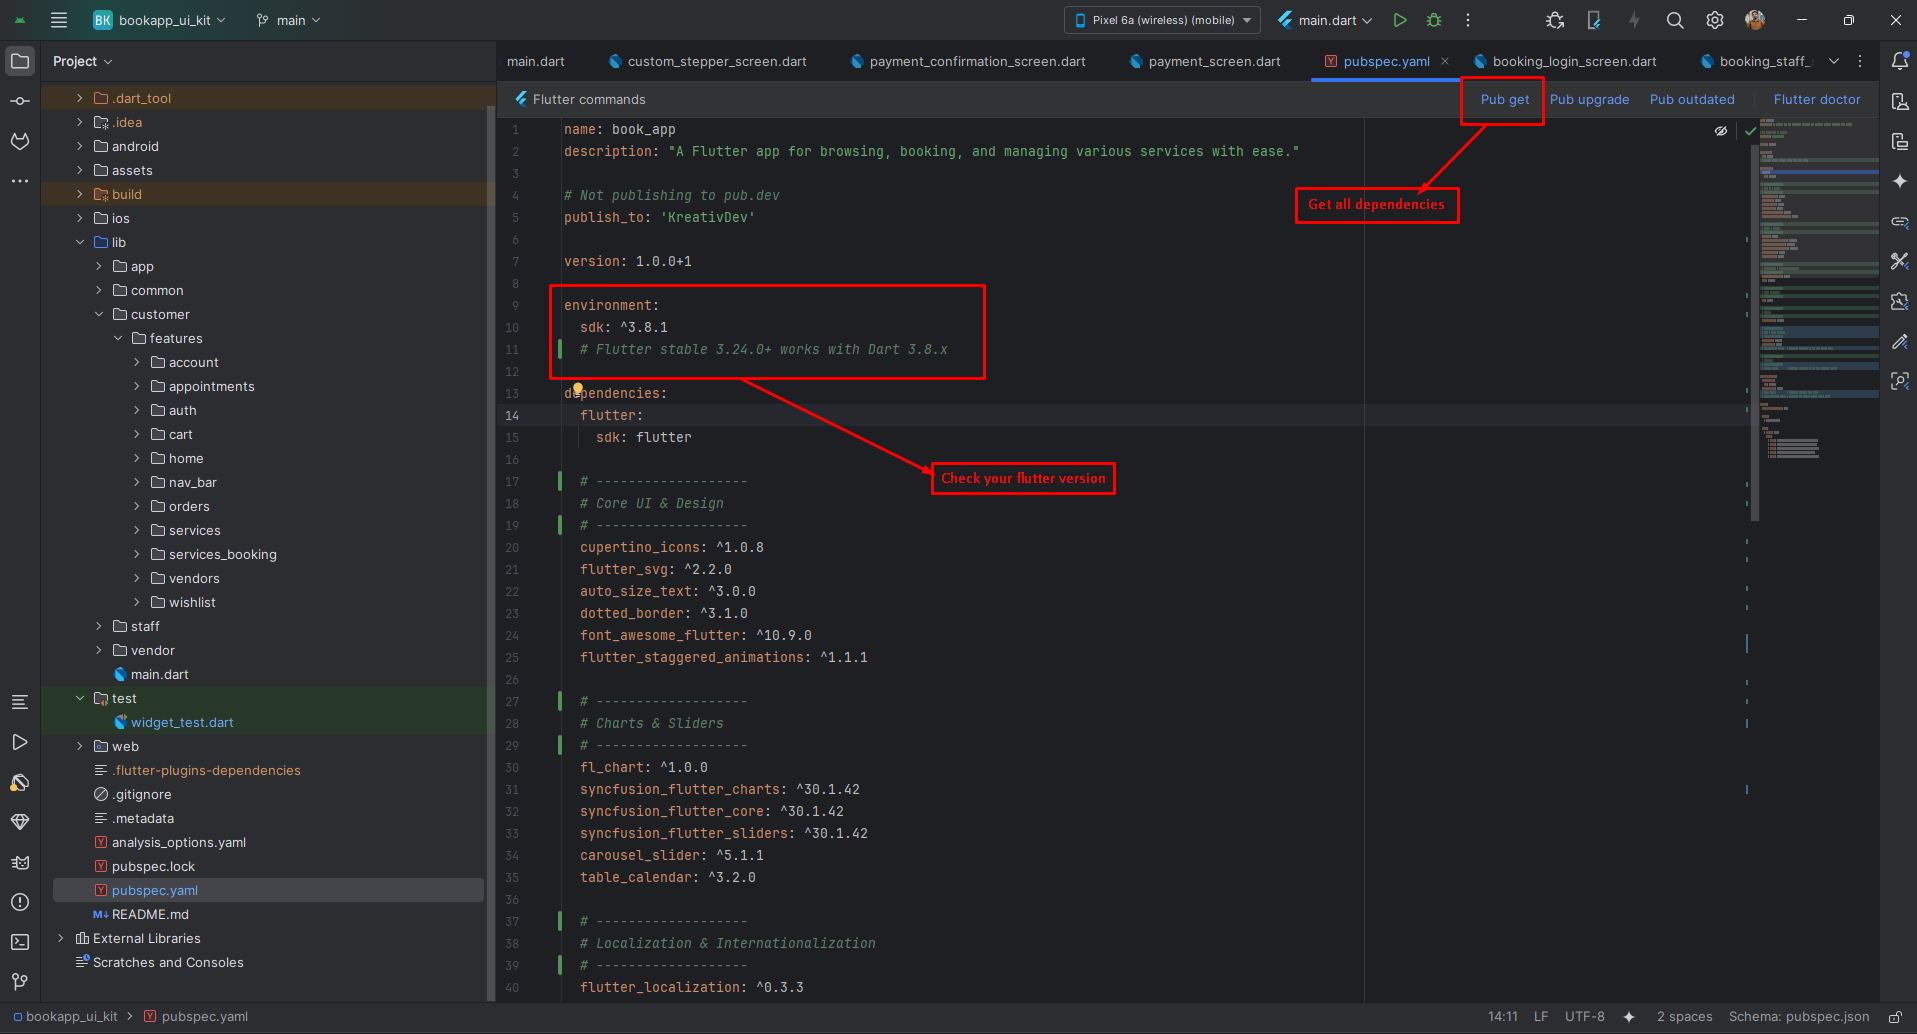
Flutter Packages
Core UI & Design
📁 cupertino_icons >> iOS-style icon set for Cupertino widgets
📁 flutter_svg >> Render SVG assets in Flutter
📁 font_awesome_flutter >> Font Awesome icon widgets
📁 flutter_staggered_animations >> Easy staggered list/grid animations
📁 shimmer >> Shimmer loading placeholders
📁 pinput >> Beautiful PIN/OTP input fields
📁 flutter_staggered_grid_view >> Masonry/staggered grid layouts
📁 flutter_html >> Render HTML content in widgets
📁 carousel_slider >> Image/content carousel slider
📁 table_calendar >> Powerful and customizable calendar widget
Localization
📁 flutter_localizations >> Built-in Flutter localizations
📁 intl >> Date/number formatting and i18n utilities
State Management
📁 get >> Lightweight state management and navigation
📁 provider >> Officially recommended state management
Networking & Data
📁 http >> HTTP client for REST APIs
📁 shared_preferences >> Persistent key-value storage
📁 cached_network_image >> Network images with caching and placeholders
📁 connectivity_plus >> Network connectivity status
📁 webview_flutter >> In-app WebView rendering
📁 flutter_map >> OpenStreetMap map widget
📁 latlong2 >> Lat/Long utilities for maps
📁 geolocator >> Device geolocation (GPS)
📁 logger >> Pretty logging for Dart/Flutter
File & Image Handling
📁 image_picker >> Capture/select images from camera or gallery
Payments
📁 flutter_stripe >> Stripe payments integration
📁 razorpay_flutter >> Razorpay payments integration
Notifications & Permissions
📁 flutter_local_notifications >> Local notifications
📁 firebase_core >> Core Firebase initialization
📁 firebase_messaging >> Push notifications (FCM)
📁 permission_handler >> Runtime permission handling
📁 app_settings >> Open platform settings screens
📁 flutter_native_splash >> Generate native splash screens
API Upload
⚙️ Important: This setup process requires BookApp version 3.0 or higher. Please make sure your project is updated before proceeding.
After downloading the files from Envato and extracting them, you will find a
website-api.zip file.
You need to extract the website-api.zip file. Inside it, you will find
two .zip files and one .php file.
The names of the folders and the file are listed below:
api.zip [Folder]config.zip [Folder]api.php [File]
Extract both folders into your project and replace the existing
api.php file as instructed below.
Extraction and Replacement Locations:
-
api.zip extraction path:
app/Http/Controllers -
config.zip extraction path:
Project Root Directory -
api.php replacement path:
Project Root Directory/routes
Here is also a video guide:
Setup Application
Change App Name
Android
- Open
<project>/android/app/src/main/AndroidManifest.xml - Update the
android:labelvalue inside the<application>tag:
<application
    android:label="My App"
    android:icon="@mipmap/ic_launcher">

</application>
iOS
- Open
<project>/ios/Runner/Info.plist - Change
CFBundleName:
<key>CFBundleName</key>
<string>My App</string>
Optional: Some setups also use CFBundleDisplayName for the home screen name.
Reinstall after rename
- Uninstall the previously installed app from the device/emulator, then rebuild and run.
- Optional (Android): uninstall via package id:
Change App Launcher Icons (flutter_launcher_icons:)
- Update the
flutter_launcher_iconsconfig in yourpubspec.yaml(package already added):
flutter_launcher_icons:
  android: true
  ios: true
  image_path: "assets/icons/icon.png"
  adaptive_icon_foreground: "assets/icons/icon.png"
  adaptive_icon_background: "assets/icons/background.png"
- Place your icons at:
assets/icons/icon.png(square, 1024x1024 recommended)assets/icons/background.png(solid/simple background for Android adaptive icon)
- Generate icons:
- Rebuild the app. If icons don’t update, clear build caches and run again.
Notes
- Android uses adaptive icons; prefer a simple, solid background and a centered foreground with padding.
- iOS uses a single raster icon automatically generated from
image_path(adaptive fields are ignored on iOS). - The runtime splash logo is loaded from the Admin Panel via API; launcher icons remain static and are generated with this package.
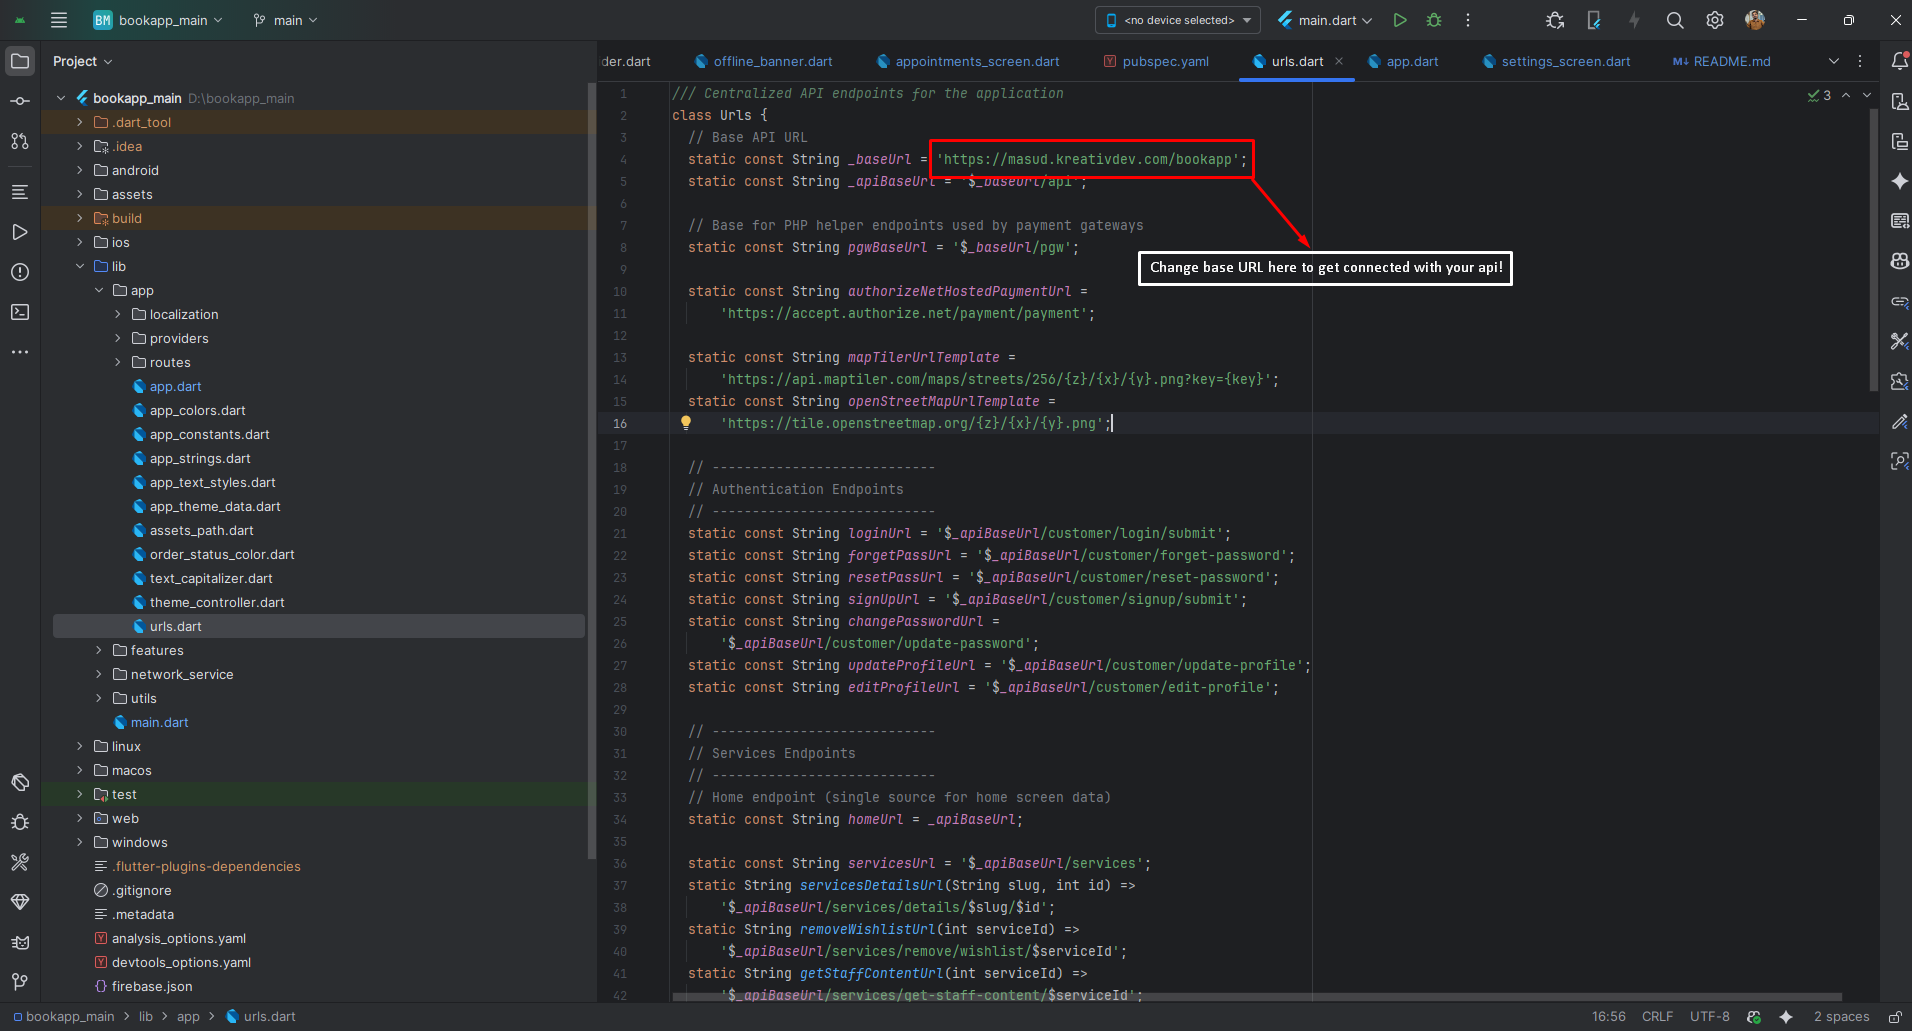
Change API URL
- Open
lib/app/urls.dart - Update the base URL constant to your server URL (no trailing slash):
class Urls {
  // Base API URL
  static const String _baseUrl = 'https://your-domain.com/bookapp'; // ← no trailing slash
  static const String _apiBaseUrl = '$_baseUrl/api';

  // ...other endpoints
}
- Do not add a trailing
/to_baseUrl(it’s appended in_apiBaseUrl). - If your API path is different (e.g.,
/v1), adjust_apiBaseUrlaccordingly. - After changing the URL, restart the app. If you still see old data, clear app storage or log out to refresh tokens.
App Logo & Branding
- Primary App Logos & Splash: Managed from the Admin Panel (recommended). The app fetches and displays the latest logo variants automatically, including the Splash Screen logo shown at runtime. No code change is required.
- Supporting assets (optional): You may override fallback and auxiliary images in code if
needed:
- Asset references: update
lib/app/assets_path.dart(classAssetsPath). Common entries you can swap:- App Branding:
topBgPng,opsPng,errPng - Common Icons:
notificationIconSvg,searchIconSvg,markerSvg,backIconSvg,cancelSvg,filterSvg,reservationsSvg,orderHistorySvg,languageSvg,clockSvg,walletSvg - Home / Navigation:
homeSvg,serviceSvg,appointmentSvg,accountSvg - User & Profile:
userEdit,userPlaceholderPng,defaultVendor - Dashboard / Menu:
wishListSvg - Analytics / Stats:
totalAppointmentSvg,bgCardPng - Payment Gateway Logos: constants under
assets/pgwvia_pgwBase(e.g.,anet.svg, others)
- App Branding:
- Static files (optional):
assets/images/logo.svg,assets/images/logo.png,assets/images/small-logo.png,assets/images/fav.png. - Splash handling:
- Runtime Splash Screen: The logo is fetched from the Admin Panel via API and displayed dynamically.
- Native splash (optional): keep minimal (e.g., solid background color) using
flutter_native_splash. Avoid embedding a fixed logo since branding is loaded in-app. - Launcher icon: still static, configure via
flutter_launcher_icons.
- Asset references: update
Tip: After updating logos in the Admin Panel, restart the app to pull the latest branding. If the network
is unavailable, the app will show local fallbacks from AssetsPath. After changing local assets,
clear caches or run a clean build.
Firebase Setup (files only)
Only the platform files/config are included here since other Firebase setup steps are already complete. Follow these quick steps to create a Firebase project and download the platform files/config:
- Create or open Firebase Console: Open https://console.firebase.google.com/ and sign in with a Google account.
- Create a new project: Click Add project, enter a project name, accept the terms, and click Create project. Wait for initialization to finish.
- Before registering your app(s): Verify the Android package name and iOS bundle
identifier in your project and change them now if needed so they match what you will register in Firebase.
See the Naming: Android package & iOS bundle ID section below for exact file paths and quick
change options. Typical locations:
- Android package:
android/app/src/main/AndroidManifest.xmlorandroid/app/build.gradle(applicationId). - iOS bundle ID: Xcode > Runner target > General > Identity > Bundle Identifier (or
ios/Runner/Info.plist>CFBundleIdentifier).
- Android package:
- Register your app(s): From the project overview, click the Android, iOS, or Web icon to register each platform you need. Provide the exact package name / bundle ID for Android and iOS.
- Download platform files:
- Android — after registering Android, download
google-services.json(button shown during the registration flow or from Project settings > Your apps > Android > App nickname > Download config). - iOS — after registering iOS, download
GoogleService-Info.plist(from the registration flow or Project settings > Your apps > iOS > Download config). - Web — after registering Web, copy the Firebase config object (the JavaScript snippet) from the registration flow or from Project settings > Your apps > Web > Firebase SDK snippet.
- Android — after registering Android, download
- Android: Place the downloaded
google-services.jsonat<project>/android/app/google-services.json. Ensure your Android package name matches the one you registered in the Firebase console. - iOS: Add the downloaded
GoogleService-Info.plistto theRunnertarget in Xcode (drag into the project and check “Copy items if needed”). - Web: If you use Flutter web, copy the Firebase config object (apiKey, authDomain,
projectId, etc.) from the console and add it to your web initialization (or use the generated
firebase_options.dartfrom FlutterFire CLI).
Naming: Android package & iOS bundle ID
The package name (Android) and bundle identifier (iOS) you register in Firebase must exactly match the values in your project. Firebase uses these values to identify your app.
- Find Android package name: Open
android/app/src/main/AndroidManifest.xmlor checkandroid/app/build.gradle(applicationId). Typical form:com.example.your_app. - Change Android package (quick): You can use the Flutter package
change_app_package_nameor manually rename package directories and updateapplicationIdinandroid/app/build.gradleand the package attribute inAndroidManifest.xml. After renaming, update any imports that reference the old package structure. - Find iOS bundle identifier: Open
ios/Runner.xcodeprojin Xcode and select the Runner target. Under the General tab → Identity you'll seeBundle Identifier(e.g.,com.example.yourApp). - Alternative (Info.plist): The bundle identifier is also often stored in
ios/Runner/Info.plistunder the keyCFBundleIdentifier. Open that file and look for theCFBundleIdentifierentry. - Quick CLI check (macOS): From your project root you can search the iOS folder for the
bundle id with a grep, for example (macOS terminal):
grep -R "CFBundleIdentifier" ios | head
This prints lines that include where the bundle id appears in project files. - Change iOS bundle ID: Change it directly in Xcode under the Runner target → General →
Identity → Bundle Identifier. After changing it, re-run your app and re-download the
GoogleService-Info.plistfor the new bundle id when registering in Firebase.

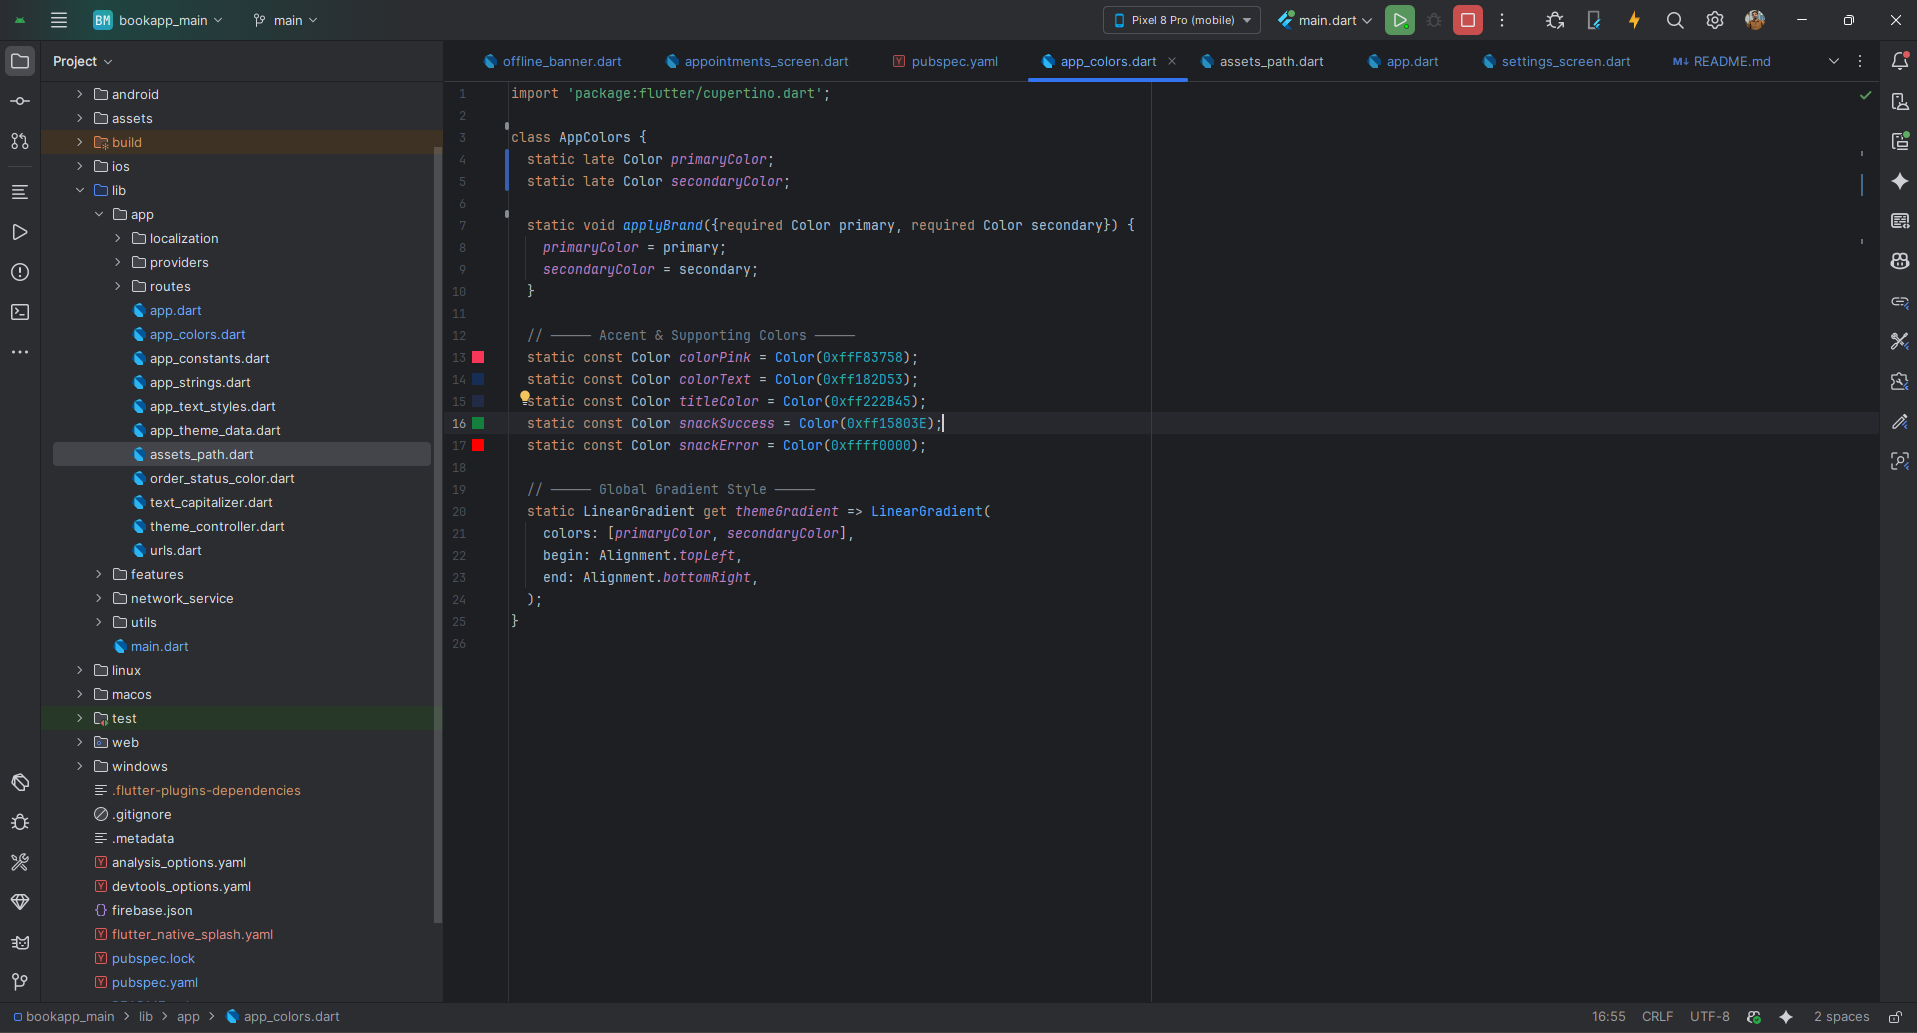
Theme Colors
- Primary & Secondary: Manage these from the Admin Panel settings (recommended). No code change is required.
- Accent & Supporting colors (optional): You can manually override accent/supporting
tones in code if needed. Update
lib/app/app_colors.dart(and, if applicable,lib/app/app_theme_data.dart) for items like success/warning/info colors, chip backgrounds, and rating stars.
Tip: After changing colors from the Admin Panel, restart the app to fetch the latest theme configuration.
- Source Android Studio: https://pub.dev/packages/rename_app
- Source Android Studio: https://pub.dev/packages/flutter_launcher_icons
- Source Android Studio: https://pub.dev/packages/change_app_package_name
Build & Run App
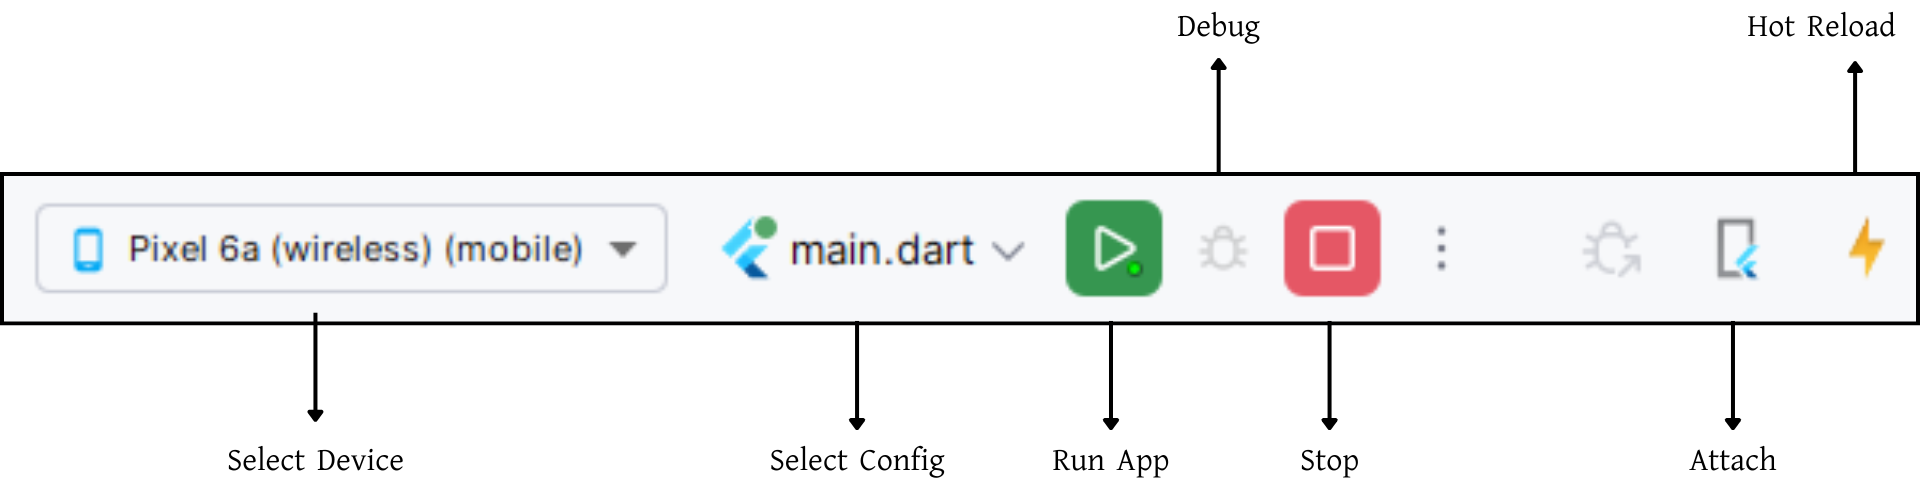
Run the Application:
- In the target selector, select an Android device for running the app. If none are listed as available, select Tools> Android > AVD Manager and create one there. For details, see Managing AVDs.
- If you don't use Android Studio, Vs Code or IntelliJ you can use the command line to run your application using the following command:
Build Release & Publish App
1. Build Release Apk or other file type as your need.
After making all your changes and customizations, save the project. Then open the console, navigate to your project folder, and execute the following command:
⚡ For Play Store deployments, it’s recommended to use App Bundles or split APKs to reduce the final APK size.
Build and Install App:
• Generate App Bundle (recommended):
• Split APKs per ABI:
Signing the App (required for Google Play):
Before uploading, you must sign your app. Generate a signing key by running:
Create a key.properties file inside android/ folder with the following content:
keyPassword = password from previous step
keyAlias = key
storeFile = location of the keystore file (e.g. /Users/username/key.jks)
Then update android/app/build.gradle with:
def keystoreProperties = new Properties()
keystoreProperties.load(new FileInputStream(keystorePropertiesFile))
signingConfigs {
release {
keyAlias keystoreProperties['keyAlias']
keyPassword keystoreProperties['keyPassword']
storeFile file(keystoreProperties['storeFile'])
storePassword keystoreProperties['storePassword']
}
}
buildTypes {
release {
signingConfig signingConfigs.release
}
}
2. Android (Play Store)
Follow the official guidelines to publish your signed app or app bundle to the Google Play Store:
https://flutter.dev/docs/deployment/android3. iOS (App Store)
Follow the official guidelines to publish your app to the Apple App Store:
https://flutter.dev/docs/deployment/iosRun flutter build apk --release for Android.
Run flutter build ios --release for iOS.
Follow Flutter docs for publishing to Play Store / App Store.
Support
📩 For support, customization, or queries, contact us via email.