BookApp - Service Booking Flutter UI Kit (Android, iOS)
The Book App is a feature-rich UI kit built with Flutter, designed to help developers create beautiful and functional reading-related applications quickly. It includes a variety of pre-designed screens and reusable widgets that follow modern design principles, making it easy to build apps for book lovers, digital libraries, or e-learning platforms.
The UI kit offers a wide range of components including book listing screens, book details pages, author profiles, categories, search functionality, onboarding screens, login/signup flows, and customizable navigation elements. Each widget is optimized for performance, responsiveness, and clean visual presentation on both Android and iOS devices.
The codebase is clean, well-structured, and adheres to Flutter best practices, making it simple to customize colors, typography, layouts, and assets to match your brand identity. The modular design ensures that components can be reused across multiple parts of your project, saving development time and effort.
Folder Structure
All you need to follow the lib(Library) Folder for any logical and UI changes in this project.
lib                       # Root directory for all Dart source code.
├── app                   # Core application setup: theme, colors, styles, assets.
├── common                # Widgets, models, and utilities shared across all user roles (customer, vendor, staff).
│   └── ui
│       ├── screens       # Shared screens (e.g., login role selection).
│       └── widgets       # Reusable UI components for all roles.
├── customer              # Feature-specific code for the 'Customer' user role.
│   └── features          # Individual features available to customers.
│       ├── account       # User account, profile, and dashboard.
│       │   ├── models
│       │   └── ui
│       │       ├── screens
│       │       └── widgets
│       ├── appointments  # Viewing and managing appointments.
│       │   ├── models
│       │   └── ui
│       │       └── screens
│       ├── auth          # Authentication: login, registration, password reset.
│       │   └── ui
│       │       ├── screens
│       │       └── widget
│       ├── cart          # Shopping cart functionality.
│       │   └── ui
│       │       └── screens
│       ├── home          # Main home screen, categories, and featured items.
│       │   ├── data
│       │   │   └── models
│       │   └── ui
│       │       ├── screens
│       │       └── widgets
│       ├── nav_bar       # Customer's bottom navigation bar.
│       ├── orders        # Order history and details.
│       │   └── ui
│       │       ├── screens
│       │       │   └── widgets
│       ├── services      # Browse and viewing services.
│       │   └── ui
│       │       ├── screens
│       │       └── widgets
│       ├── services_booking # Service booking process/flow.
│       │   ├── data
│       │   └── ui
│       │       ├── screens
│       │       └── widgets
│       ├── vendors       # Browse and viewing vendors.
│       │   ├── models
│       │   └── ui
│       │       ├── screens
│       │       └── widgets
│       └── wishlist      # User's wishlist functionality.
│           ├── data
│           │   └── models
│           └── ui
│               └── screens
├── staff                 # Feature-specific code for the 'Staff' user role.
│   └── features          # Individual features available to staff members.
│       ├── auth          # Staff authentication.
│       │   └── ui
│       │       └── screens
│       ├── change_password # Functionality to change password.
│       │   └── ui
│       │       └── screens
│       ├── common_widgets # Widgets shared specifically within the staff module.
│       ├── dashboard     # Staff-specific dashboard.
│       │   └── ui
│       │       ├── screens
│       │       └── widgets
│       ├── edit_profile  # Editing staff profile.
│       │   └── ui
│       │       └── screens
│       ├── nav_app_bar   # Staff navigation bar and drawer.
│       │   └── ui
│       │       ├── screens
│       │       └── widgets
│       ├── plugins       # Staff-specific plugins or extensions.
│       │   └── ui
│       │       └── screens
│       ├── service_inquiry # Handling service inquiries.
│       │   └── ui
│       │       └── screens
│       ├── staff_appointment # Managing appointments assigned to the staff.
│       │   └── ui
│       │       ├── screens
│       │       └── widgets
│       └── staff_services # Managing services offered by the staff.
│           └── ui
│               ├── screens
│               └── widgets
└── vendor                # Feature-specific code for the 'Vendor' (Business) user role.
    └── features          # Individual features available to vendors.
        ├── appointments  # Managing all appointments for the business.
        │   └── ui
        │       ├── screens
        │       └── widgets
        ├── auth          # Vendor authentication (login, signup).
        │   └── ui
        │       └── screens
        ├── buy_plan      # Subscription plan purchasing.
        │   ├── data
        │   │   └── models
        │   └── ui
        │       ├── screens
│               └── widgets
│         ├── change_password # Vendor password management.
│         │   └── ui
│         │       └── screens
│         ├── common_widgets # Widgets shared specifically within the vendor module.
│         ├── dashboard     # Vendor's main business dashboard.
│         │   └── ui
│         │       └── screens
│         ├── edit_profile  # Editing business/vendor profile.
│         │   └── ui
│         │       └── screens
│         ├── email         # Email related features.
│         │   └── ui
│         │       └── screens
│         ├── nav_app_bar   # Vendor navigation bar and drawer.
│         │   └── ui
│         │       ├── screens
│         │       └── widgets
│         ├── plugins       # Managing plugins for the vendor's business.
│         │   └── ui
│         │       └── screens
│         ├── products      # Managing products (if any).
│         │   └── ui
│         │       └── screens
│         ├── service_inquiry # Managing incoming service inquiries.
│         │   └── ui
│         │       └── screens
│         ├── services      # Managing the vendor's own services.
│         │   └── ui
│         │       ├── screens
│         │       └── widgets
│         ├── staff         # Managing staff members.
│         │   └── ui
│         │       └── screens
│         ├── subscription_log # History of subscription plans.
│         │   └── ui
│         │       ├── screens
│         │       └── widgets
│         ├── support_tickets # Support ticket system for vendors.
│         │   └── ui
│         │       └── screens
│         ├── transactions  # Viewing business transactions.
│         │   └── ui
│         │       └── screens
│         └── withdrawal    # Managing fund withdrawals.
│             └── ui
│                 └── screens
Screens
Customer App Screens:
1. Splash Screen
2. Sign In Screen
3. Sign Up Screen
4. Home Screen
5. Services Screen
6. Services Details Screen
7. Services Booking Staff Selection Screen
8. Services Booking Time & Date Selection Screen
9. Services Booking Login Screen
10. Services Booking Billing Screen
11. Services Booking Payment Method Selection Screen
12. Booking Confirmation Screen
13. Vendors Screen
14. Vendor Details Screen
15. Appointments Screen
16. Appointments Details Screen
17. Notification Screen
18. Account Screen
19. Edit Profile Screen
20. Dashboard Screen
21. My wishlist Screen
22. Product Orders Screen
23. Orders Details Screen
24. Change Password Screen
Vendor Screens:
1. Login Selection Screen
2. Vendor Login Screen
3. Vendor Sign Up Screen
4. Vendor Dashboard
5. All Services Screen
6. Add Services Screen
7. Edit Services Screen
8. All Staffs Screen
9. Add Staff Screen
10. Service Assignment Screen
11. Time Slots Screen
12. Time Slots Management Screen
13. Holidays Screen
14. Appointment Settings
15. All Appointments Screen
16. Appointments Details Screen
17. Pending Appointments
18. Accepted Appointments
19. Rejected Appointments
20. Service Inquiry
21. Request Withdrawal
22. Transactions
23. Recipient Mail
24. Plugins
25. Subscription Log
26. Support Tickets
27. Ticket Details Screen
28. Add Tickets
29. Buy Plan
30. Buy Plan Checkout Screen
31. Edit Profile
32. Change Password
Staff Screens:
1. Staff Dashboard
2. All Services
3. Add Services
4. Edit Services
5. All Appointments Screen
6. Accepted Screen
7. Pending Screen
8. Appointments Details Screen
9. Service Inquiry
10. Plugins
11. Edit Profile
12. Change Password
Requirements
Download and install Any one from these IDE(Android studio, Vs Code) on your computer.
- Source Android Studio: https://developer.android.com/studio
- Source Android Studio: https://code.visualstudio.com/download
Setup Flutter and Dart SDK in your computer if you want to modify the source code
- Source Android Studio: https://docs.flutter.dev/get-started/install
Must installed Flutter and dart plugin on your IDE
Install Flutter on Windows
Install Flutter on Mac
Installation
After downloading file from CodeCanyon you will get a zip file. Extracting the zip file you will get Documentation Folder and ... installable.zip included in there:
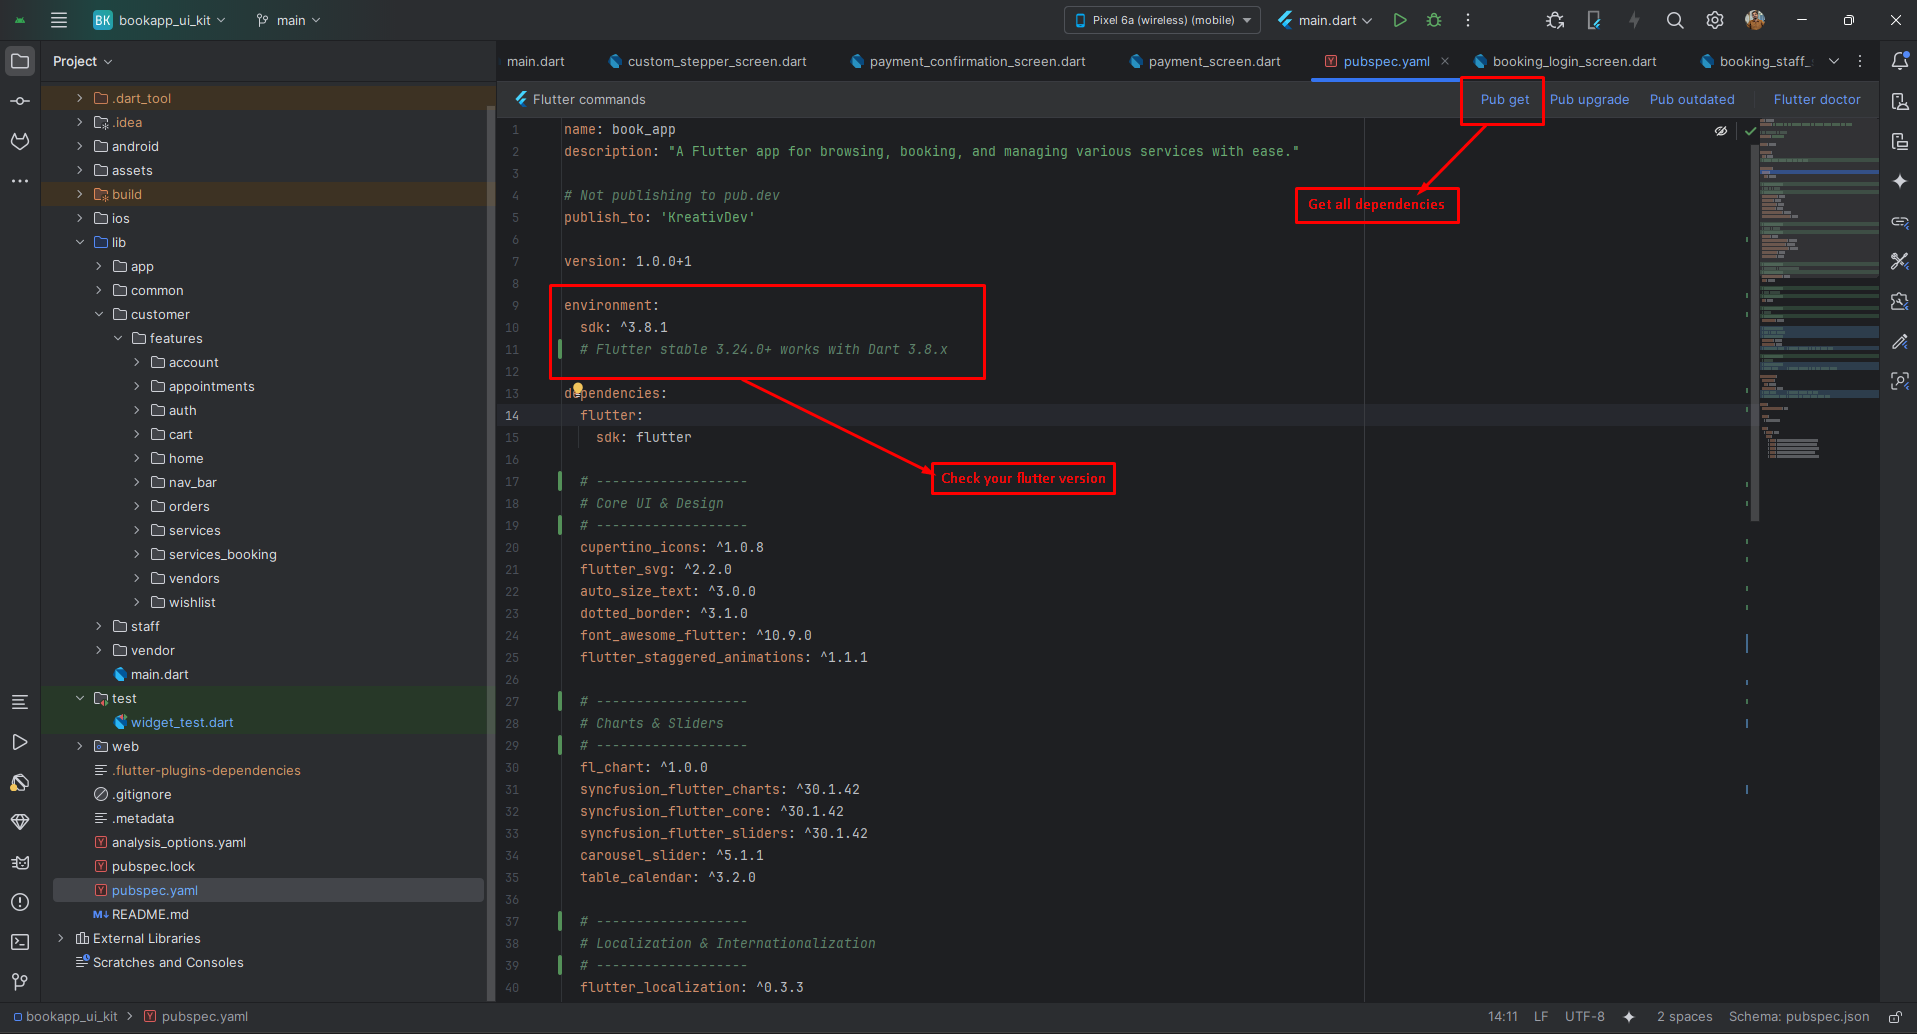
- Unzip the installable and open it in your IDE.
- On your IDE find for pubspecs.yaml file then click on pub get on top right side your IDE.
- Please make sure you are using Flutter version minimum 3.30.0
- Open an emulator or connect a real device and then click on Run Button for compile the project.
Flutter Packages
Core UI & Design
📁 cupertino_icons >> iOS-style icons (Cupertino widgets)
📁 flutter_svg >> Render SVG images in Flutter
📁 auto_size_text >> Text widget that automatically resizes text to fit
📁 dotted_border >> Draws dotted/dashed borders around widgets
📁 font_awesome_flutter >> Font Awesome icons for Flutter
📁 flutter_staggered_animations >> Smooth staggered list/grid animations
Charts & Sliders
📁 fl_chart >> Lightweight charts (line, bar, pie, etc.)
📁 syncfusion_flutter_charts >> Advanced charts from Syncfusion
📁 syncfusion_flutter_core >> Core package required for Syncfusion widgets
📁 syncfusion_flutter_sliders >> Syncfusion advanced sliders/range selectors
📁 carousel_slider >> Image/content carousel slider
📁 table_calendar >> Highly customizable calendar widget
Localization & Internationalization
📁 flutter_localization >> Add multi-language support in Flutter
📁 intl >> Date/number formatting & internationalization
Editors
📁 flutter_quill >> Rich text editor (similar to Medium/Notion)
File & Image Handling
📁 file_picker >> Pick files from device storage
📁 image_picker >> Capture/select images from camera or gallery
Setup Application
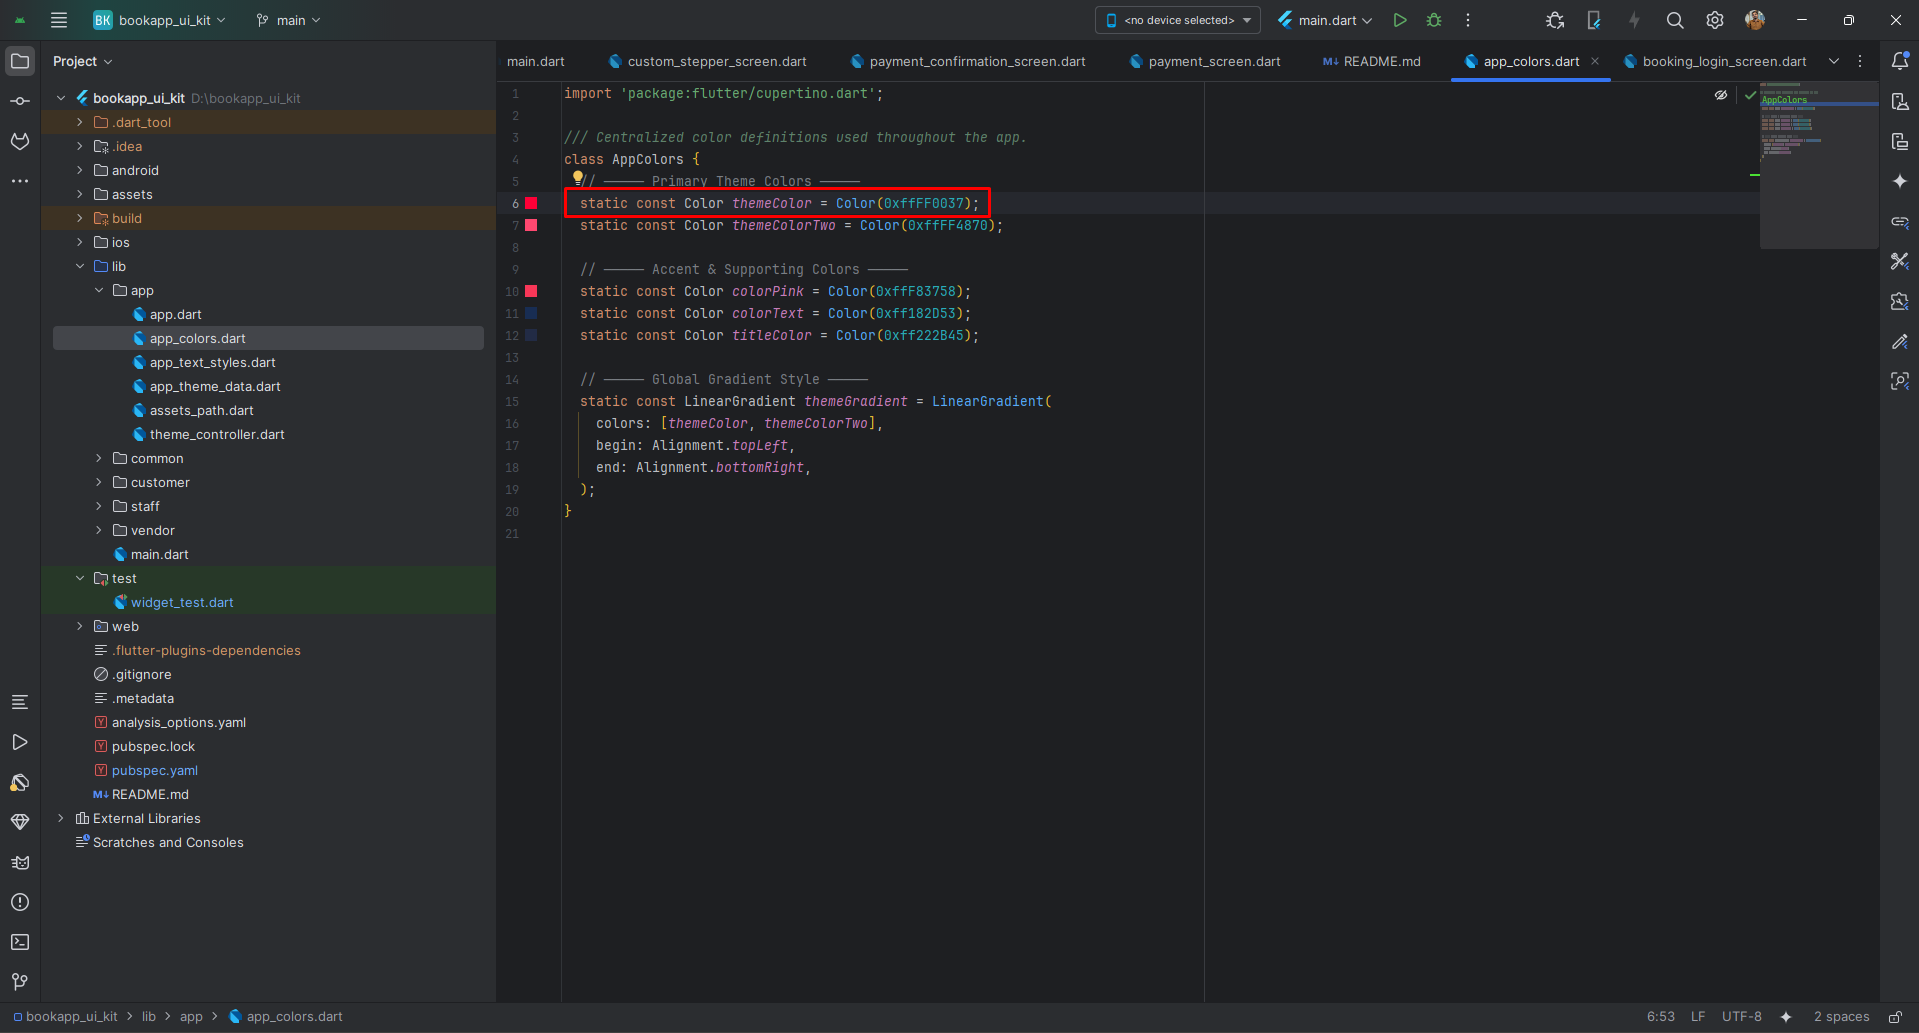
Change App Primary color: Open lib/app/app_colors.dart
Change App Logo: Open lib/app/assets_path.dart
- Source Android Studio: https://pub.dev/packages/rename_app
- Source Android Studio: https://pub.dev/packages/flutter_launcher_icons
- Source Android Studio: https://pub.dev/packages/change_app_package_name
Build & Run App
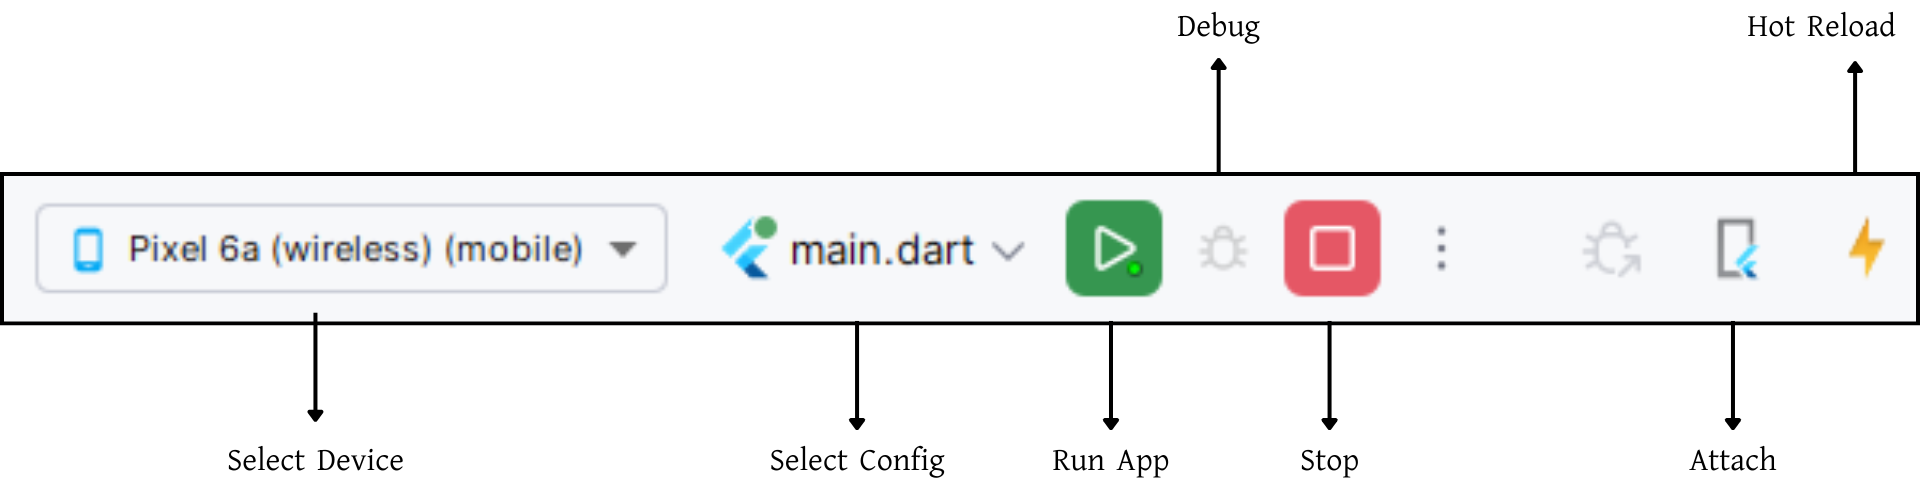
Run the Application:
- In the target selector, select an Android device for running the app. If none are listed as available, select Tools> Android > AVD Manager and create one there. For details, see Managing AVDs.
- If you don't use Android Studio, Vs Code or IntelliJ you can use the command line to run your application using the following command:
Build Release & Publish App
1. Build Release Apk or other file type as your need.
After making all your changes and customizations, save the project. Then open the console, navigate to your project folder, and execute the following command:
⚡ For Play Store deployments, it’s recommended to use App Bundles or split APKs to reduce the final APK size.
Build and Install App:
• Generate App Bundle (recommended):
• Split APKs per ABI:
Signing the App (required for Google Play):
Before uploading, you must sign your app. Generate a signing key by running:
Create a key.properties file inside android/ folder with the following content:
keyPassword = password from previous step
keyAlias = key
storeFile = location of the keystore file (e.g. /Users/username/key.jks)
Then update android/app/build.gradle with:
def keystoreProperties = new Properties()
keystoreProperties.load(new FileInputStream(keystorePropertiesFile))
signingConfigs {
release {
keyAlias keystoreProperties['keyAlias']
keyPassword keystoreProperties['keyPassword']
storeFile file(keystoreProperties['storeFile'])
storePassword keystoreProperties['storePassword']
}
}
buildTypes {
release {
signingConfig signingConfigs.release
}
}
2. Android (Play Store)
Follow the official guidelines to publish your signed app or app bundle to the Google Play Store:
https://flutter.dev/docs/deployment/android3. iOS (App Store)
Follow the official guidelines to publish your app to the Apple App Store:
https://flutter.dev/docs/deployment/iosRun flutter build apk --release for Android.
Run flutter build ios --release for iOS.
Follow Flutter docs for publishing to Play Store / App Store.
Support
Please visit https://kreativdev.freshdesk.com/ and create a support ticket there.
Support for our items includes:- Fixing bugs and reported issues originating from our code.
- Responding to questions or problems regarding the item and its features.
Before submitting a question, please check the live demo, documentation, and item description page — you might find the answer much faster than waiting for a reply.
- Customization services. Any request for features not shown in the live demo, preview images, item description, or title will be considered a customization request.
- Support for third-party software or plugins.
- Issues caused by customized code will be considered outside the scope of support.
Please Note: You have purchased a very affordable UI Kit — not the services of a full-time web design agency. Occasionally, we may help with small tweaks depending on the time required. Please be patient, polite, and respectful in your communication.
Support Response Time & Weekends:
Our official support response time is up to 2 business days (as per Envato policy).
View screenshot.
In most cases, we respond within 24 hours. However, during high ticket volumes or government holidays, it may take longer.
Our Weekends:
- One week: Thursday & Friday
- Following week: Friday only
Customization Request
For custom development or modifications, please contact us on Telegram:
Telegram Username: KreativDev
When contacting us, please include your requirements in detail in your first message (instead of simply saying “Hi” or “Hello”).
Note: Telegram is not used for general support.