Estaty - Real Estate Property Listing Mobile APP (Flutter)
Estaty is a comprehensive Real Estate Property Listing Mobile Application built with Flutter. Users can discover and explore property listings, search for properties, view detailed property information with specifications and images, add properties to wishlist, contact property owners/agents directly, and browse projects through a beautifully designed native mobile experience.
The app features flexible location-based search with support for countries, states, and cities, allowing users to find properties in their area or explore real estate in different regions. Users can filter listings by location, category (property types), price range, property size, amenities, and other criteria to quickly find exactly the property they're looking for.
Key App Features
Featured Property Listings: Featured properties receive prime visibility by being highlighted on both the search page and home page, significantly increasing their exposure to potential buyers/renters through visually distinctive cards and premium placement.
Property Inquiry Feature: The platform includes a powerful property inquiry functionality where interested buyers/renters can submit inquiries directly to property owners/agents through the mobile app, providing necessary contact information through an integrated inquiry form to connect buyers with sellers efficiently.
Real Estate Marketplace: Estaty is built as a comprehensive real estate platform where users can browse properties and projects with beautiful grid layouts, view detailed specifications, add properties to wishlist, and contact property owners/agents for inquiries. The platform supports multiple property attributes including property types, locations, amenities, and property conditions.
Mobile App Features
Advanced State Management: Built with Provider architecture for efficient state management, ensuring smooth performance and real-time updates across all screens with dedicated providers for property listings, filters, property details, property inquiries, projects, and notifications.
Real-time Push Notifications: Integrated with Firebase Cloud Messaging (FCM) and OneSignal for instant push notifications. Notifications are intelligently categorized with automatic detail redirects, new property listing alerts, price drop notifications, and real-time notification counters.
Smart Filtering & Search: Advanced filtering system with location-based filtering (radius search with geolocator), category-based filtering (property types), price range options, property size filtering, amenity filtering, active filter chips for easy management, and instant search results with pull-to-refresh functionality.
Property Details & Specifications: Comprehensive property detail pages featuring high-resolution image galleries with photo view, detailed specifications (size, bedrooms, bathrooms, etc.), price information, property condition status, location details with map integration (flutter_map), and owner/agent contact information.
Projects Section: Browse real estate projects with project details, image galleries, and comprehensive information about upcoming and ongoing property developments.
User Profile & Wishlist: Full user account management including profile editing with image upload and cropping, password change functionality, property wishlist/favorites with easy toggle for saving favorite properties, inquiry history, and notification preferences.
Internationalization (i18n): Multi-language support with RTL (Right-to-Left) layout compatibility, allowing the app to serve global audiences with localized content and proper text direction for languages like Arabic, Hebrew, and others.
Beautiful UI/UX: Modern, responsive design featuring custom color theming, shimmer loading effects, smooth animations and transitions, Material Design 3 components, and optimization for various screen sizes.
The mobile application is built with Flutter for cross-platform compatibility (iOS and Android), offering native performance with a single codebase. It provides a complete solution for anyone looking to launch or manage a real estate property listing mobile application with integrated property marketplace capabilities, allowing users to browse, search, and inquire about properties and projects.
Folder Structure
All you need to follow the lib(Library) Folder for any logical and UI changes in this project.
lib/
├── app/
├── core/
│   ├── network/
│   └── utils/
├── features/
│   ├── auth/
│   │   ├── data/
│   │   └── ui/
│   │       └── screens/
│   ├── bottom_nav/
│   │   └── ui/
│   │       ├── screen/
│   │       └── widget/
│   ├── properties/
│   │   ├── data/
│   │   ├── providers/
│   │   └── ui/
│   │       ├── screens/
│   │       └── widgets/
│   ├── projects/
│   │   ├── data/
│   │   ├── providers/
│   │   └── ui/
│   │       ├── screens/
│   │       └── widgets/
│   ├── common/
│   │   ├── models/
│   │   ├── providers/
│   │   └── ui/
│   │       └── widgets/
│   ├── home/
│   │   ├── data/
│   │   ├── providers/
│   │   └── ui/
│   │       ├── screen/
│   │       └── widget/
│   ├── notifications/
│   │   ├── data/
│   │   ├── providers/
│   │   └── ui/
│   │       └── screens/
│   ├── profile/
│   │   ├── data/
│   │   ├── providers/
│   │   └── ui/
│   │       └── screens/
│   ├── support/
│   │   ├── data/
│   │   ├── providers/
│   │   └── ui/
│   │       └── screens/
│   └── wishlist/
│       ├── data/
│       ├── providers/
│       └── ui/
│           ├── screens/
│           └── widgets/
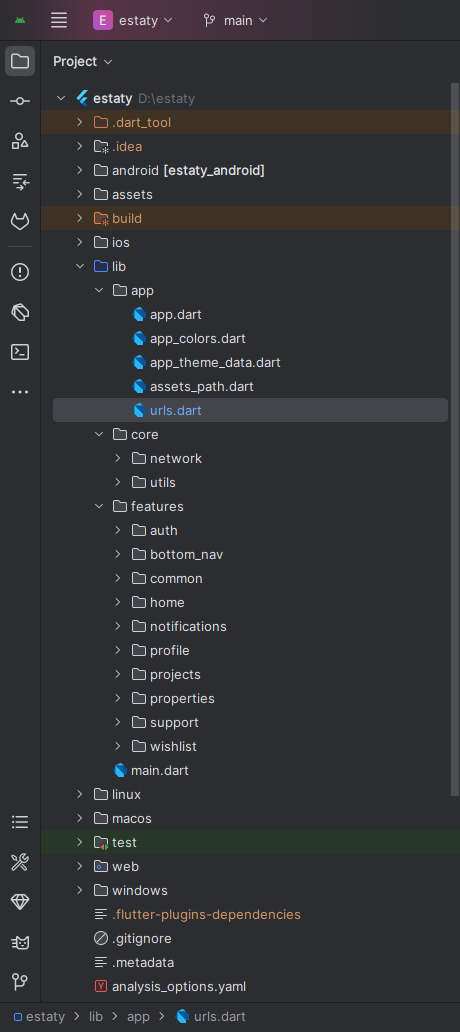
Screens
App Screens:
Auth Screens (auth/ui/screens):
• Splash Screen
• Login Screen
• Register Screen
• OTP Screen
• Forget Password
• Reset Password
• Change Password
Bottom Navigation (bottom_nav/ui/screens):
• Bottom Nav
Home (home/ui/screens):
• Home Screen
Properties (properties/ui/screens):
• All Properties Screen
• Property Details Screen (Property Details with Specifications and Images)
Projects (projects/ui/screens):
• All Projects Screen
• Project Details Screen
• Image Preview Screen
Support (support/ui/screens):
• Support Tickets Screen
• Ticket Details Screen
Wishlist (wishlist/ui/screens):
• Wishlist Screen (Saved Properties)
Profile (profile/ui/screens):
• Profile Screen
• Edit Profile
Dashboard (dashboard/ui/screens):
• Dashboard Screen
Notifications (notifications/ui/screens):
• Notifications Screen
Requirements
Download and install Any one from these IDE(Android studio, Vs Code) on your computer.
- Source Android Studio: https://developer.android.com/studio
- Source Android Studio: https://code.visualstudio.com/download
Setup Flutter and Dart SDK in your computer if you want to modify the source code
- Source Android Studio: https://docs.flutter.dev/get-started/install
Must installed Flutter and dart plugin on your IDE
Install Flutter on Windows
Install Flutter on Mac
Installation
After downloading file from CodeCanyon you will get a zip file. Extracting the zip file you will get Documentation Folder and ... installable.zip included in there:
- Unzip the source code and open it in your IDE.
- On your IDE find for pubspecs.yaml file then click on pub get on top right side your IDE.
- Please make sure you are using Flutter version minimum 3.30.0
- Open an emulator or connect a real device and then click on Run Button for compile the project.
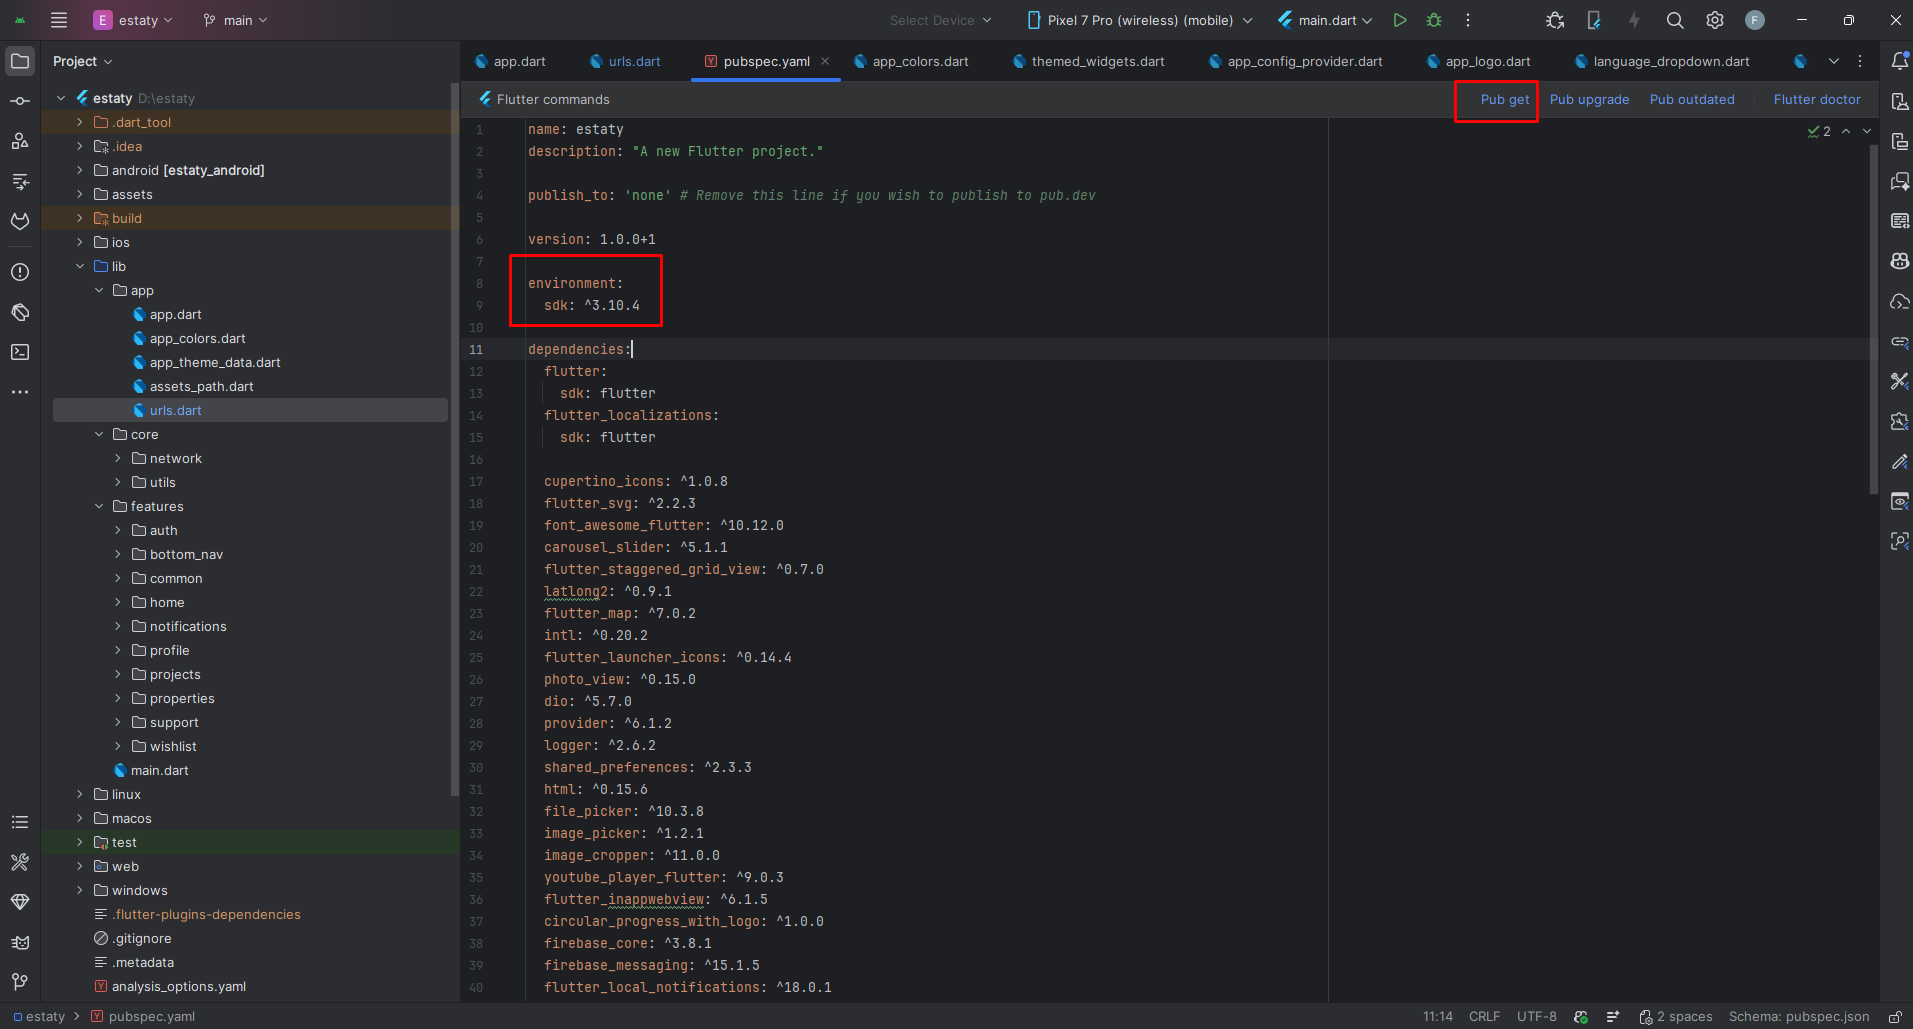
Flutter Packages
Icons & UI Essentials
cupertino_icons: ^1.0.8 >> iOS-style icons
flutter_svg: ^2.2.3 >> SVG rendering
font_awesome_flutter: ^10.12.0 >> Font Awesome icons
UI / Layout / Animations
carousel_slider: ^5.1.1 >> Image/content carousels
flutter_staggered_grid_view: ^0.7.0 >> Masonry / staggered grids for property listings
shimmer: ^3.0.0 >> Shimmer loading placeholders
photo_view: ^0.15.0 >> Zoomable image viewer for property photos
circular_progress_with_logo: ^1.0.0 >> Branded loading indicators
Networking & Data
dio: ^5.7.0 >> HTTP client for API calls
State Management
provider: ^6.1.2 >> Provider state management pattern
Local Storage & Utilities
shared_preferences: ^2.3.3 >> Simple key-value storage
intl: ^0.20.2 >> Internationalization & formatting
logger: ^2.6.2 >> Enhanced logging for debugging
Media & File Handling
image_picker: ^1.2.1 >> Pick images from gallery/camera
image_cropper: ^11.0.0 >> Crop and edit images
file_picker: ^10.3.8 >> Pick files from device
cached_network_image: ^3.4.1 >> Cached network images for property photos
HTML & WebView
html: ^0.15.6 >> Parse HTML content
flutter_inappwebview: ^6.1.5 >> In-app WebView browser
youtube_player_flutter: ^9.0.3 >> YouTube video player integration
Maps & Location
flutter_map: ^7.0.2 >> Interactive map widget for property locations
latlong2: ^0.9.1 >> Latitude/longitude calculations
geolocator: ^14.0.2 >> Get current device location for nearby property search
geocoding: ^4.0.0 >> Convert between coordinates and addresses
Links & URL Launching
url_launcher: ^6.3.1 >> Open URLs, dialer for property owner/agent contact, mail, etc.
Notifications & Push
firebase_core: ^3.8.1 >> Required core for Firebase
firebase_messaging: ^15.1.5 >> FCM push notifications
flutter_local_notifications: ^18.0.1 >> Local notifications
onesignal_flutter: ^5.3.5 >> OneSignal push notifications
App Icons & Splash
flutter_launcher_icons: ^0.14.4 >> Generate app launcher icons
flutter_native_splash: ^2.4.7 >> Native splash screen
Mobile App Setting
Configure your mobile app settings through the admin panel. This section covers all essential configurations including home page content, general settings, and plugin integrations.
Home Page
Customize the content and appearance of your mobile app's home page. Update images, titles, and section headings to match your brand.
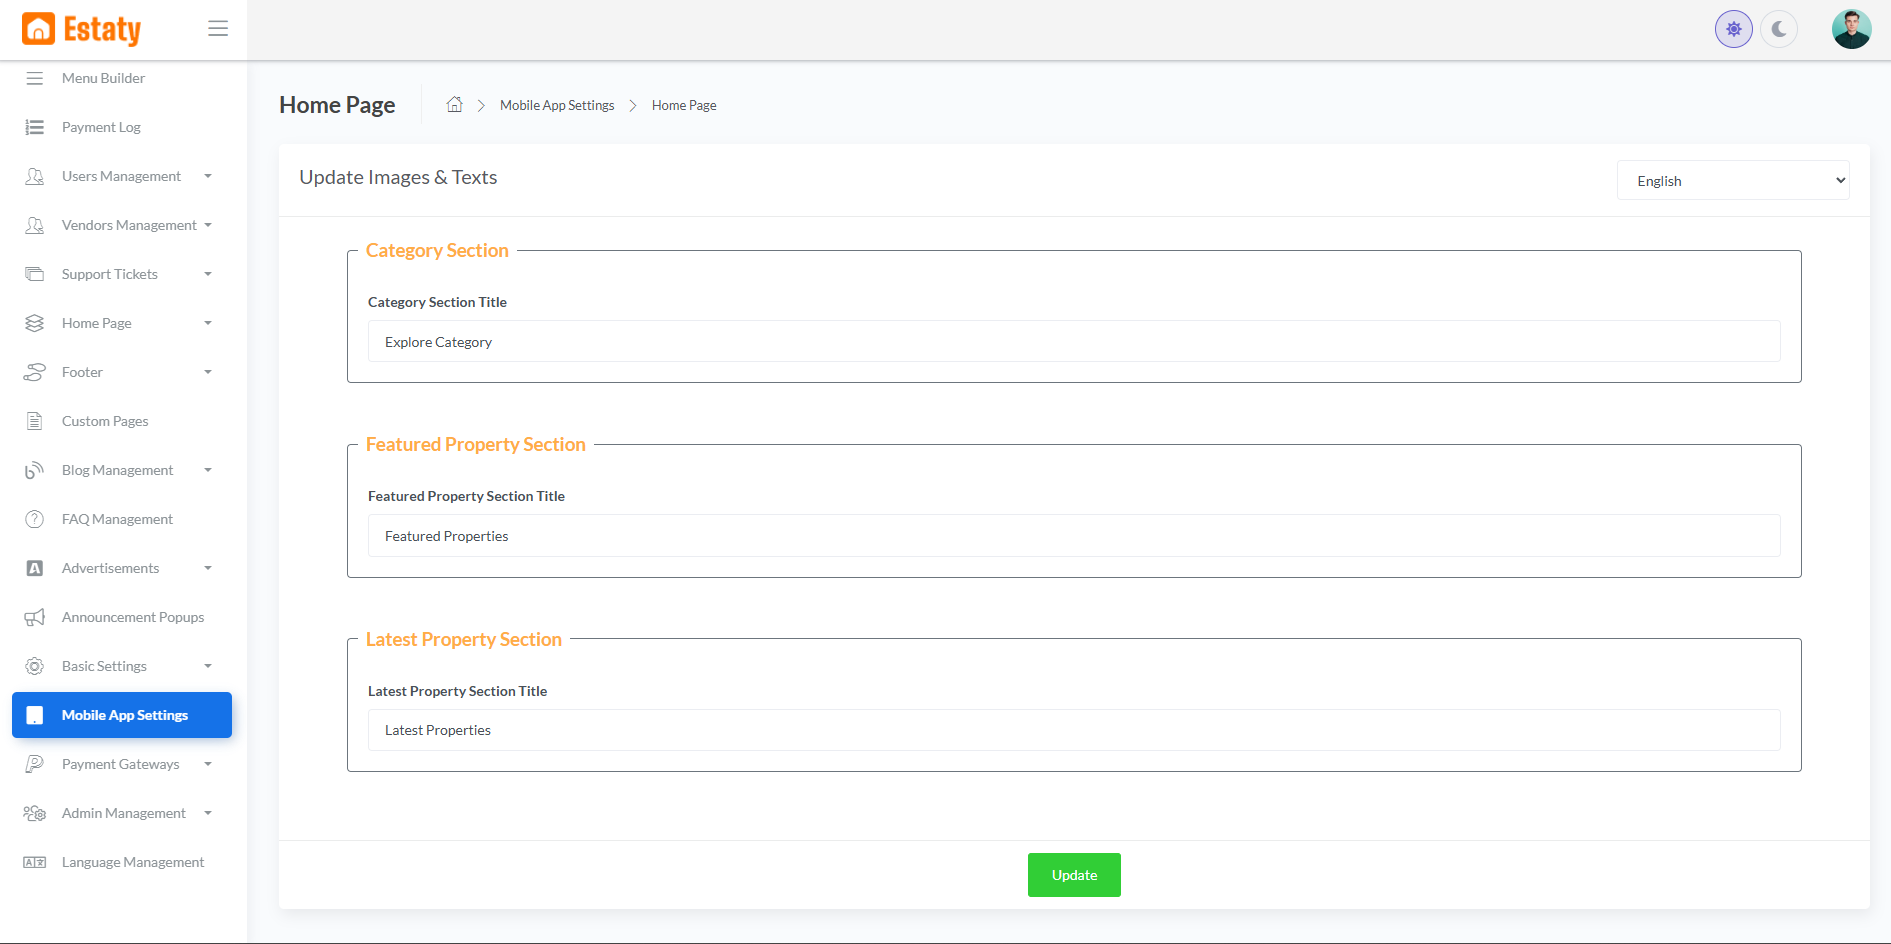
Category Section
| Category Section Title | Property Categories (Example) |
Featured Properties Section
| Featured Properties Section Title | Featured Properties (Example) |
Latest Properties Section
| Latest Properties Section Title | Latest Properties (Example) |
General Settings
Configure core application settings including API base URL, favicon, and logo.
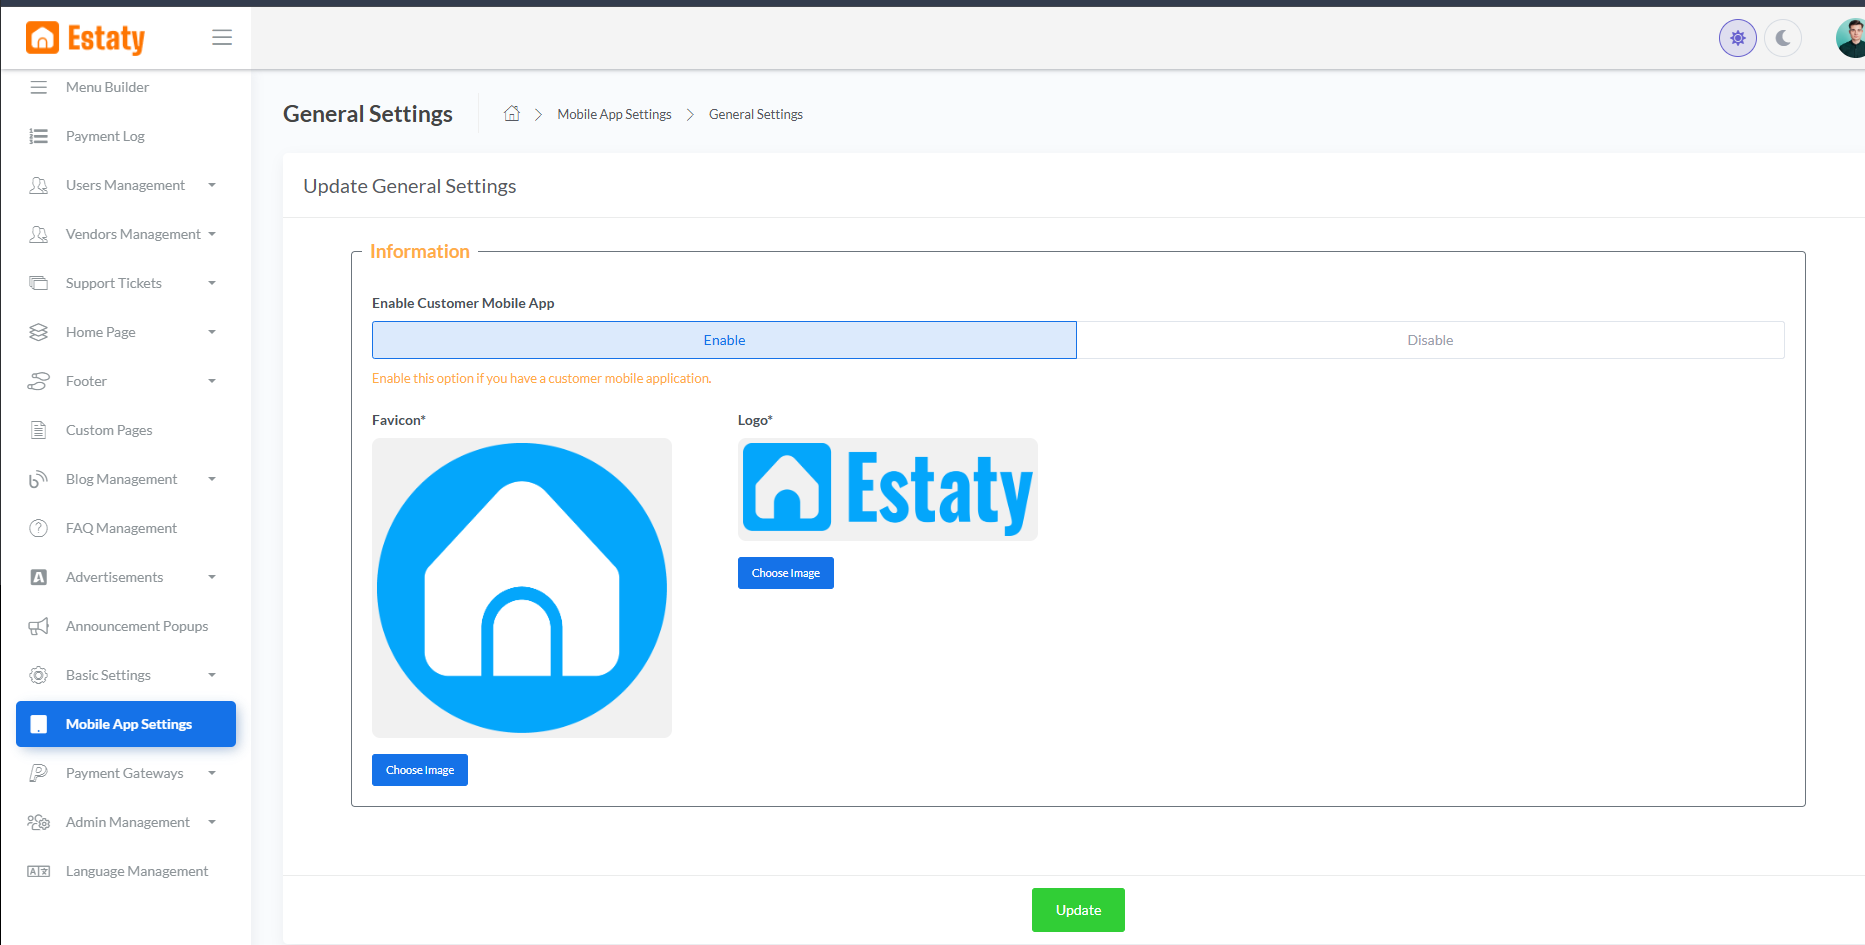
Information
| API Base URL * |
https://codecanyon8.kreativdev.com/estaty (Example)Use this URL for API requests in your mobile application |
| Favicon * | Upload your favicon image (recommended: 32x32px or 64x64px) |
| Logo * | Upload your application logo (recommended: transparent PNG, 512x512px) |
Plugins
Configure third-party integrations and plugins for enhanced functionality.
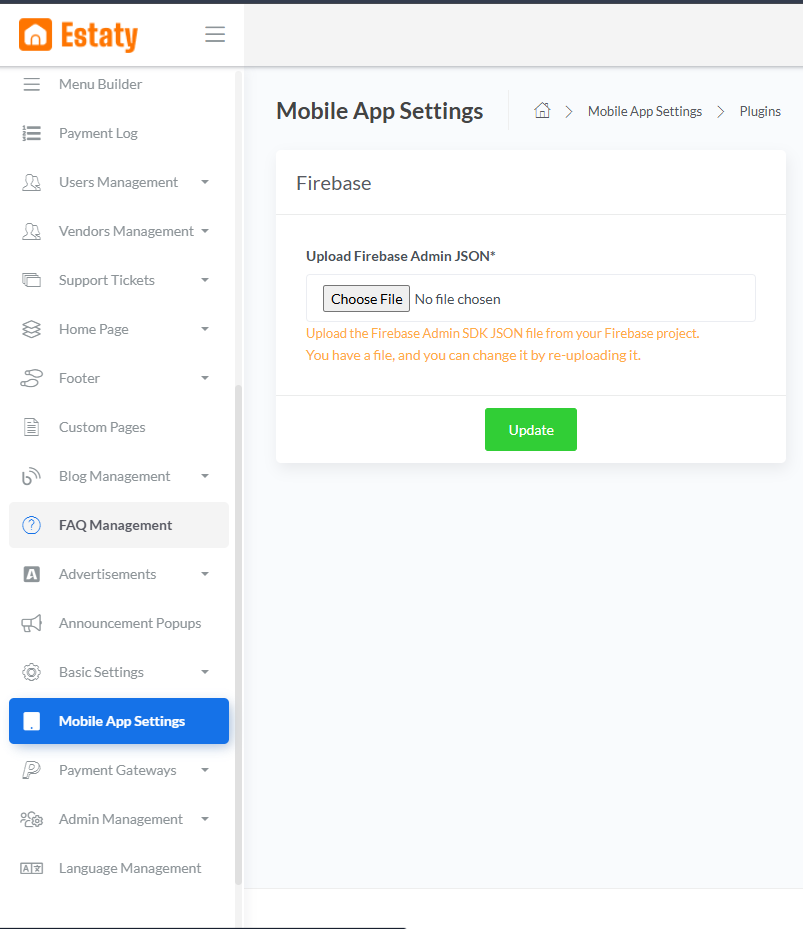
Firebase Configuration
| Upload Firebase Admin JSON * |
Upload the Firebase Admin SDK JSON file from your Firebase project.
Note: You can change the file by re-uploading it if needed. |
How to get Firebase Admin SDK JSON:
- Go to your Firebase Console
- Select your project
- Click on Project Settings (gear icon)
- Navigate to Service Accounts tab
- Click "Generate New Private Key"
- Download and upload the JSON file here
Home Featured List Slider Settings
Configure the featured property list slider settings displayed on your mobile app's home page. Customize the slider behavior and appearance.
API Setup
This mobile application connects to your backend server via API. You only need to change the API URL to connect the app with your server.
Step 1: Open API Configuration File
Navigate to: lib/app/urls.dart
Step 2: Change API Base URL
Find this line in the file (around line 2):
Replace it with your own server URL:
Example URLs:
static const String baseUrl = 'https://myestaty.com';
// Example 2: Subdomain
static const String baseUrl = 'https://api.myestaty.com';
// Example 3: Domain with folder
static const String baseUrl = 'https://example.com/estaty';
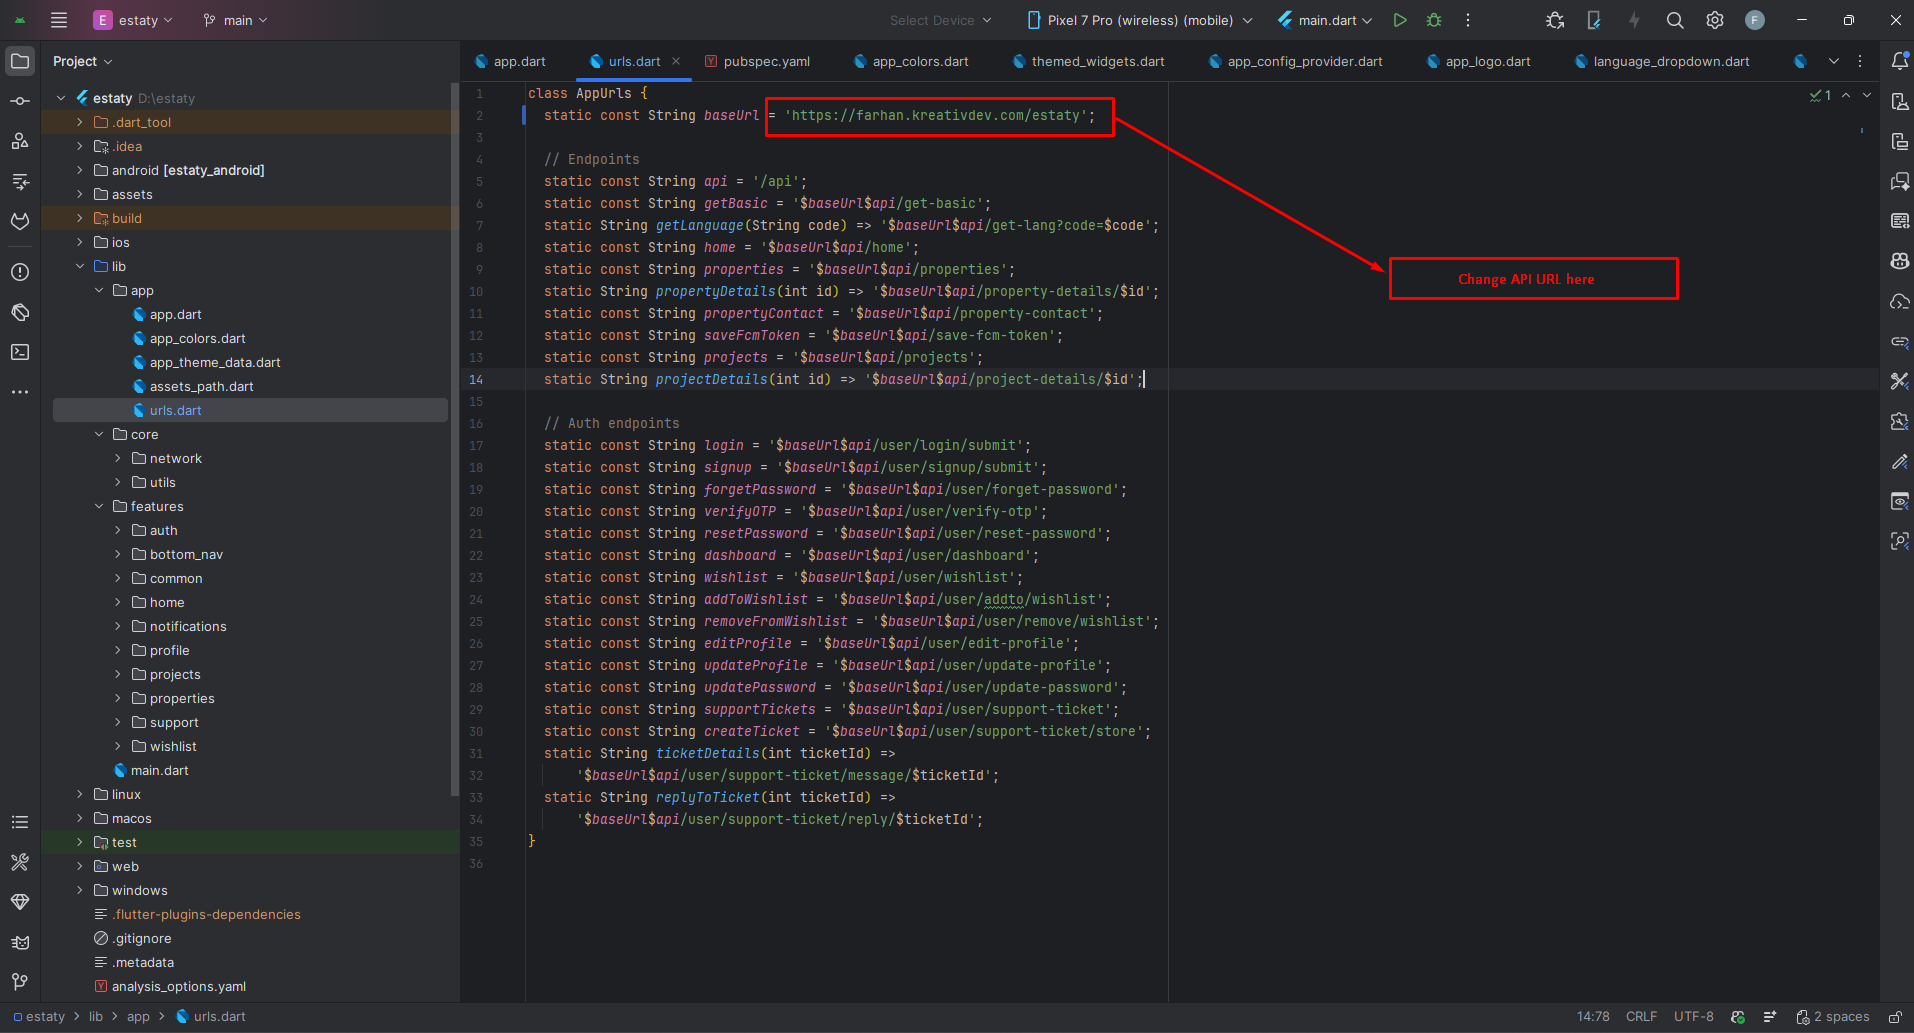
Step 3: Save and Test
- Save the
urls.dartfile after making changes - Run
flutter cleanin terminal - Run
flutter pub getin terminal - Run the app and verify the connection
Important Notes
- The app automatically generates all API endpoints from the base URL
- Make sure your server is running and accessible
- Use HTTPS (not HTTP) for production apps
- Ensure your backend API is properly configured and running
Setup Application
Change App Primary Color
The app's primary color is #F57F4B (orange) by default. The primary color can be configured in two ways:
Option 1: Change Default Fallback Color (Hardcoded)
Open lib/app/app_colors.dart (around line 8) and update the primary color:
// Format: 0xFFRRGGBB where FF is opacity and RRGGBB is the hex color
Option 2: Configure from Admin Panel (Recommended)
The app fetches the primary color from your backend API during app initialization. You can configure the primary color from the admin panel's General Settings, which will dynamically override the default fallback color.
Note: The API-configured color takes priority over the hardcoded default color. The app uses the fallback color only if the API is unavailable or during initial loading.
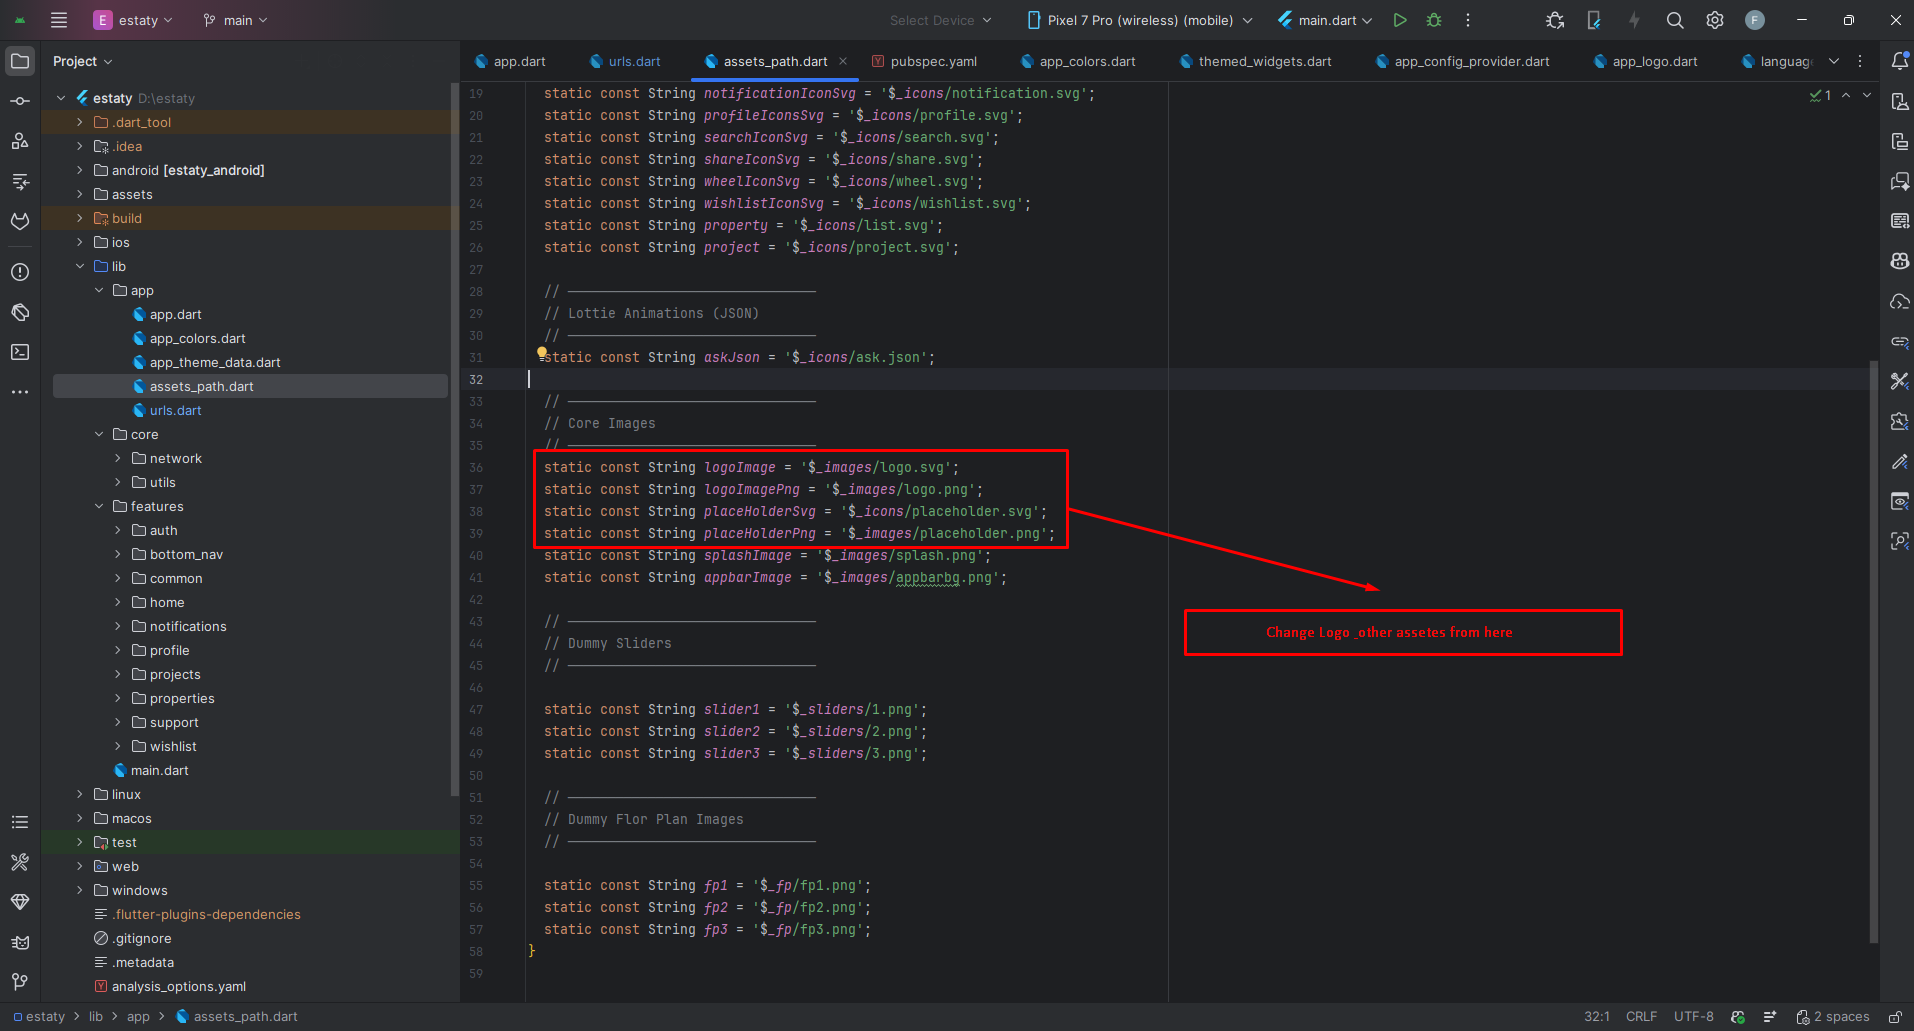
Change App Logo
Open lib/app/assets_path.dart
Change Launcher Icons
The app uses flutter_launcher_icons: ^0.14.4 package (already installed) to generate launcher icons for Android and iOS.
Step 1: Prepare Your Icon
- Create your app icon image (recommended size: 1024x1024 pixels)
- Save it as a PNG file with transparency support
- Navigate to
assets/images/folder in your project
Step 2: Replace Icon Files
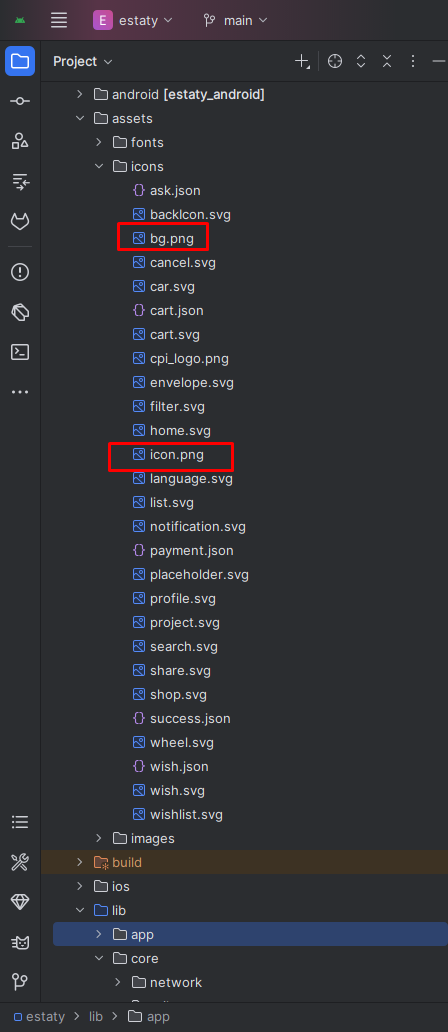
- Replace the existing icon files with your own icons (keep the same file names):
assets/icons/icon.png- Main launcher icon (1024x1024 px recommended)assets/icons/bg.png- Android adaptive icon background
Step 3: Generate Launcher Icons
Run the following command in your terminal to generate launcher icons:
This command will automatically generate all required icon sizes for both Android and iOS platforms.
Step 4: Verify Changes
- Check
android/app/src/main/res/- Android icons generated - Check
ios/Runner/Assets.xcassets/AppIcon.appiconset/- iOS icons generated - Run the app to see your new launcher icon
Additional Resources
- Rename App: https://pub.dev/packages/rename_app
- Flutter Launcher Icons: https://pub.dev/packages/flutter_launcher_icons
- Change Package Name: https://pub.dev/packages/change_app_package_name
Firebase Settings
This app uses Firebase Cloud Messaging (FCM) and OneSignal for push notifications. Follow these steps to configure your own Firebase project and OneSignal account.
Step 1: Create Firebase Project
- Go to Firebase Console
- Click "Add Project" or select an existing project
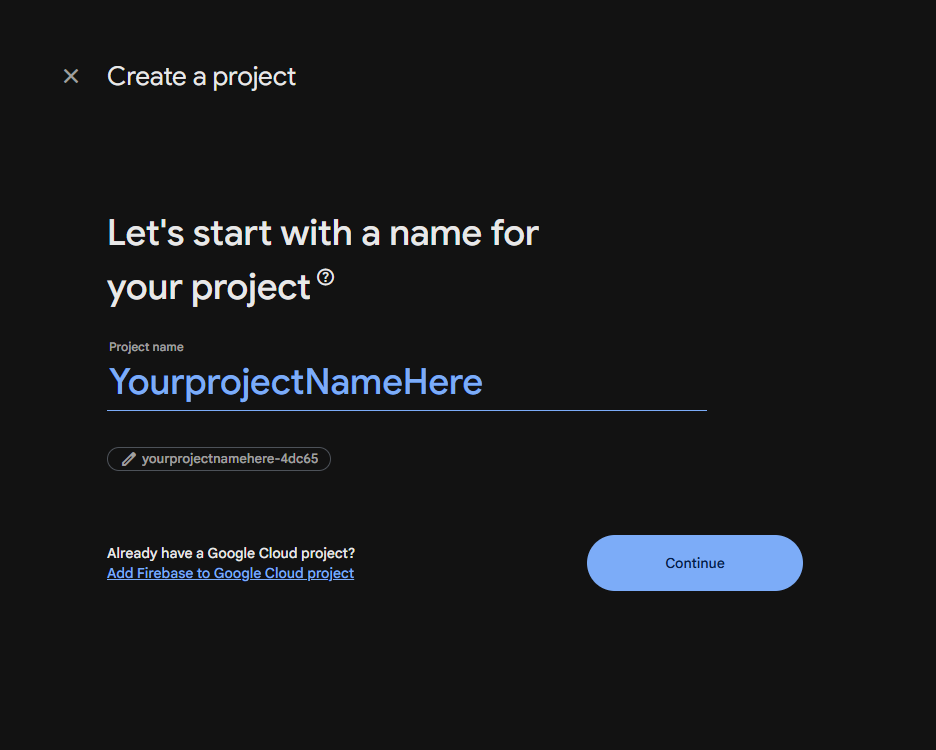
- Enter your project name (e.g., "CarList App")
- Enable Google Analytics (optional but recommended)
- Click "Create Project" and wait for setup to complete
Step 2: Add Android App to Firebase
- In Firebase Console, click the Android icon to add an Android app
- Enter your Android package name:
com.kreativdev.estaty(or your custom package name) - Enter app nickname (optional): Estaty Android
- Click "Register app"
- Download
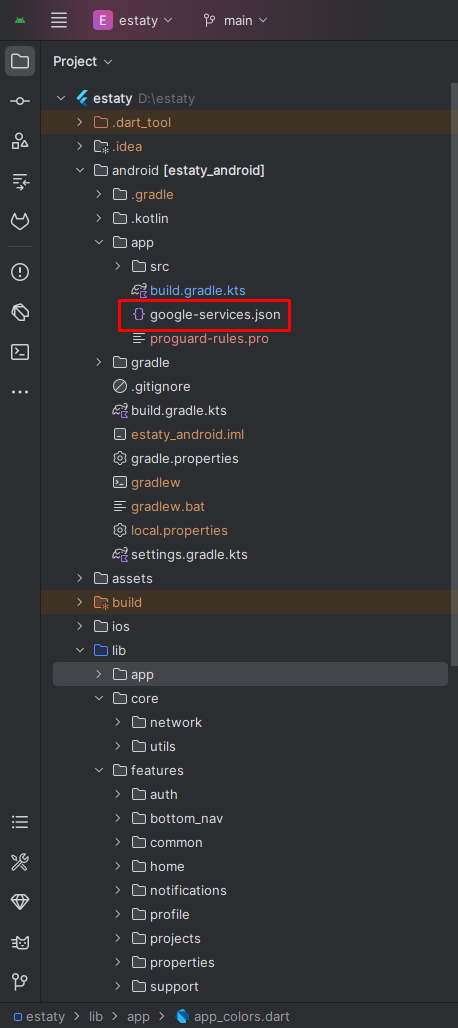
google-services.jsonfile - Replace the file at
android/app/google-services.jsonin your project
Step 3: Add iOS App to Firebase (Optional)
- In Firebase Console, click the iOS icon to add an iOS app
- Enter your iOS bundle ID:
com.kreativdev.estaty(or your custom bundle ID) - Enter app nickname (optional): Estaty iOS
- Click "Register app"
- Download
GoogleService-Info.plistfile - Place the file in
ios/Runner/directory - Open project in Xcode and add the file to Runner target
Step 4: Enable Cloud Messaging API
- In Firebase Console, go to Project Settings (⚙️ icon)
- Select "Cloud Messaging" tab
- Note your Server Key and Sender ID (needed for OneSignal)
- Click "Manage API in Google Cloud Console"
- Ensure "Firebase Cloud Messaging API" is ENABLED
Step 5: Setup OneSignal Account
- Go to OneSignal and create a free account
- Click "New App/Website" in OneSignal dashboard
- Enter app name (e.g., "Estaty") and select platforms (iOS, Android)
- Click "Create"
Step 6: Configure OneSignal for Android
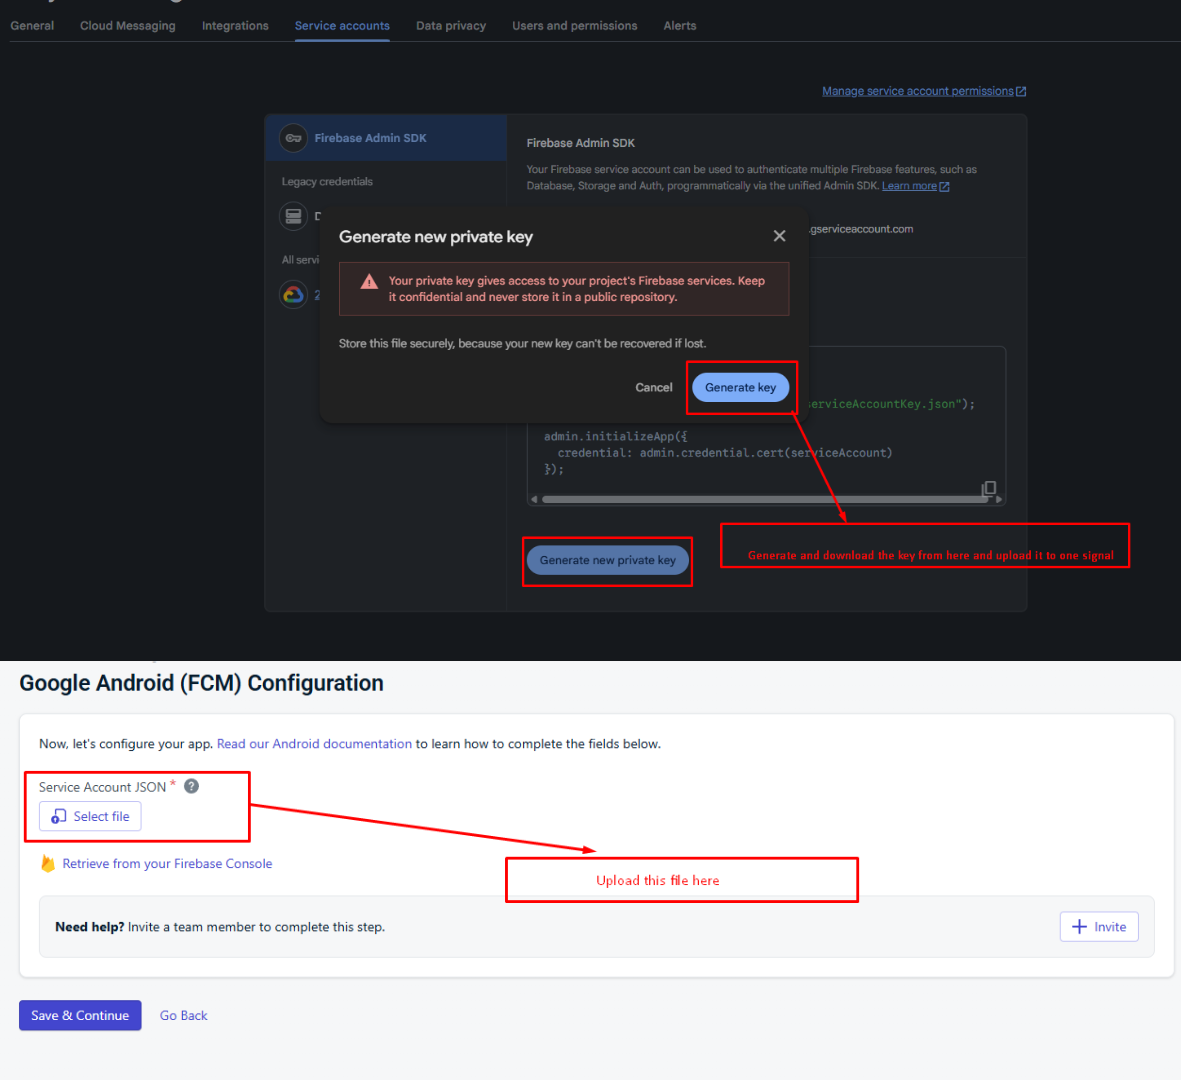
- Select "Google Android (FCM)" configuration in OneSignal
- Enter Firebase Server Key (from Firebase Console → Cloud Messaging tab)
- Enter Firebase Sender ID (from Firebase Console → Cloud Messaging tab)
- Click "Save & Continue"
Step 7: Configure OneSignal for iOS (Optional)
- Select "Apple iOS (APNs)" configuration in OneSignal
- Upload APNs Auth Key (.p8 file) or Certificate (.p12 file) from Apple Developer
- Enter your Team ID and Key ID (for Auth Key option)
- Enter Bundle ID:
com.kreativdev.estaty - Click "Save & Continue"
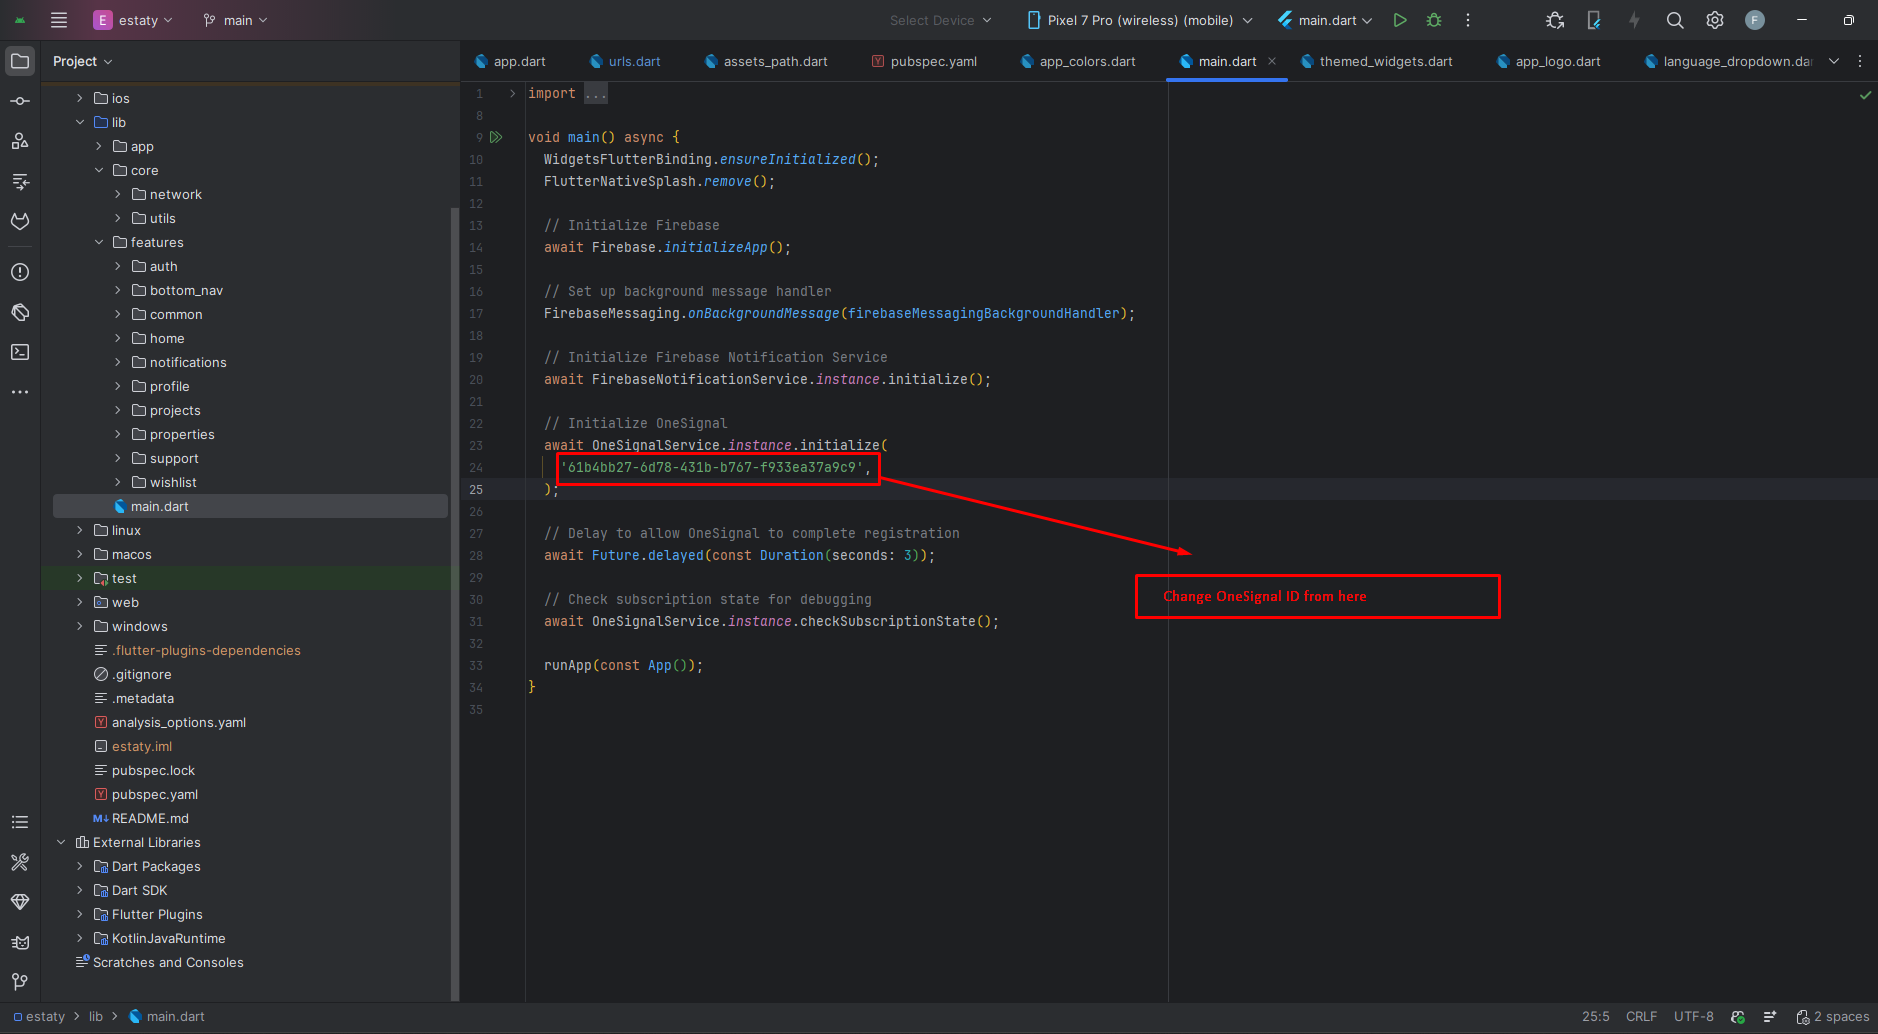
Step 8: Update OneSignal App ID in Code
- In OneSignal Dashboard, go to Settings → Keys & IDs
- Copy your "OneSignal App ID"
- Open
lib/main.dartfile (around line 23) - Replace the App ID in the OneSignalService.instance.initialize() call
- Save the file
Step 9: Test Notifications
- Run the app using
flutter run - Check terminal for FCM Token and OneSignal Player ID
- Test Firebase: Go to Firebase Console → Cloud Messaging → Send test message
- Test OneSignal: Go to OneSignal Dashboard → Messages → New Push → Send to Test Users
- Verify notifications appear on your device
Configuration Files Summary
| File | Location | Source |
|---|---|---|
google-services.json |
android/app/ |
Firebase Console |
GoogleService-Info.plist |
ios/Runner/ |
Firebase Console |
| OneSignal App ID | lib/main.dart (line 43) |
OneSignal Dashboard |
Troubleshooting
- FCM Token is null: Ensure google-services.json is in correct location and Firebase Cloud Messaging API is enabled
- OneSignal Player ID not showing: Verify OneSignal App ID is correct in main.dart and app has internet connection
- Notifications not received: Check device notification settings and verify app notification permissions
- iOS notifications not working: Verify GoogleService-Info.plist is added to Xcode project and APNs certificate is valid in OneSignal
Build & Run App
Run the Application:
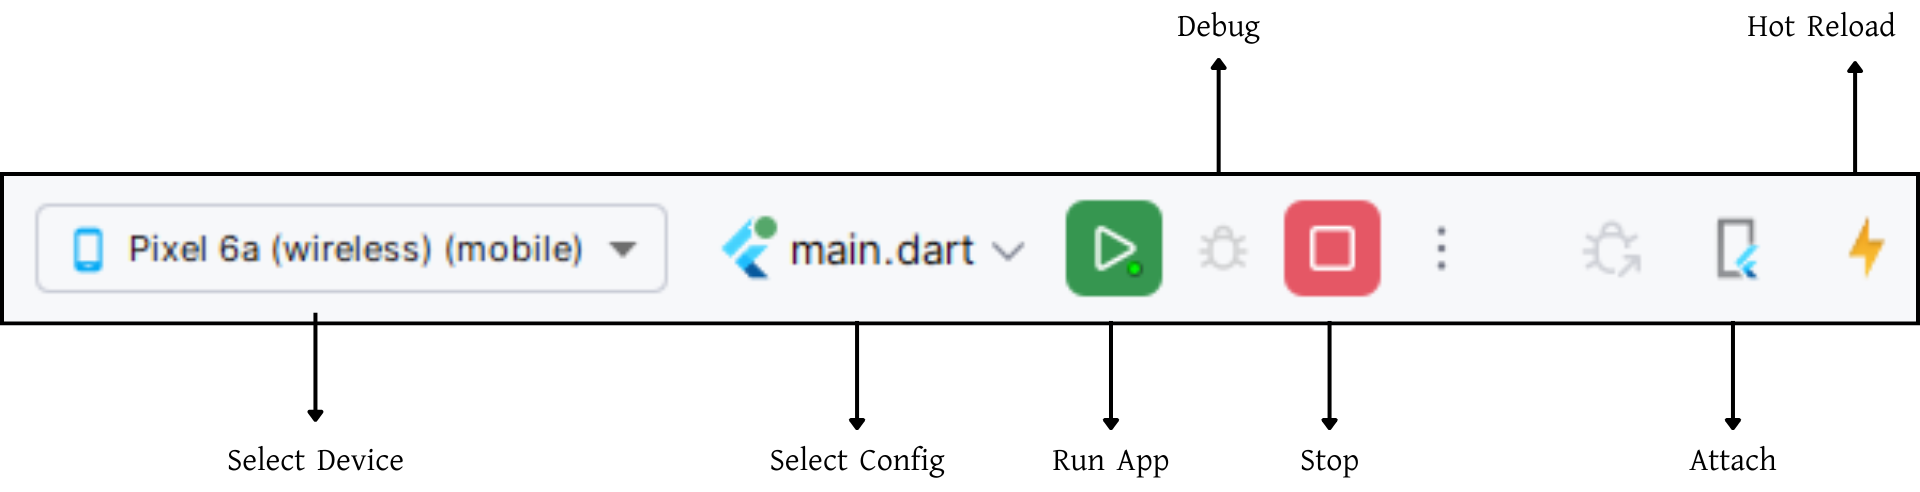
- In the target selector, select an Android device for running the app. If none are listed as available, select Tools> Android > AVD Manager and create one there. For details, see Managing AVDs.
- If you don't use Android Studio, Vs Code or IntelliJ you can use the command line to run your application using the following command:
Build Release & Publish App
1. Build Release Apk or other file type as your need.
After making all your changes and customizations, save the project. Then open the console, navigate to your project folder, and execute the following command:
⚡ For Play Store deployments, it’s recommended to use App Bundles or split APKs to reduce the final APK size.
Build and Install App:
• Generate App Bundle (recommended):
• Split APKs per ABI:
Signing the App (required for Google Play):
Before uploading, you must sign your app. Generate a signing key by running:
Create a key.properties file inside android/ folder with the following content:
keyPassword = password from previous step
keyAlias = key
storeFile = location of the keystore file (e.g. /Users/username/key.jks)
Then update android/app/build.gradle with:
def keystoreProperties = new Properties()
keystoreProperties.load(new FileInputStream(keystorePropertiesFile))
signingConfigs {
release {
keyAlias keystoreProperties['keyAlias']
keyPassword keystoreProperties['keyPassword']
storeFile file(keystoreProperties['storeFile'])
storePassword keystoreProperties['storePassword']
}
}
buildTypes {
release {
signingConfig signingConfigs.release
}
}
2. Android (Play Store)
Follow the official guidelines to publish your signed app or app bundle to the Google Play Store:
https://flutter.dev/docs/deployment/android3. iOS (App Store)
Follow the official guidelines to publish your app to the Apple App Store:
https://flutter.dev/docs/deployment/iosRun flutter build apk --release for Android.
Run flutter build ios --release for iOS.
Follow Flutter docs for publishing to Play Store / App Store.
Support
For support, customization, or queries, contact us via email.