Evento - Multivendor Event Ticket Booking Flutter App
Evento is a production-ready, fully functional and API-integrated Event Ticket Booking application built with Flutter. It ships with a large set of polished screens and reusable widgets, a clean feature-based architecture, and batteries-included integrations (auth, payments, push notifications, maps, localization, theming) so you can launch event booking platforms quickly with confidence on both Android and iOS.
What you get out of the box
- End-to-end ticket booking flow: browse events, view details, select seats/tickets, add to cart, checkout with multiple payment options, and view booking history with QR tickets.
- Modern UI patterns: bottom navigation, event listings with filters, seat plan selection, categories, search, authentication (login/signup/OTP), account/profile, notifications, wishlist, organizer profiles, support tickets, and more.
- Optimized UX: responsive layouts, performant lists (staggered/animated grids), placeholders (shimmer effects), cached images, and graceful offline handling.
Architecture at a glance (feature-first)
lib/app: application layer and cross-cutting concernslocalization/multilingual support with RTL compatibility- Core app files (e.g.,
app_colors.dart,app_theme_data.dart,assets_path.dart,app_strings.dart,app_constants.dart,theme_controller.dart,urls.dart)
lib/features: domain modules with clear boundariesauth/: login, signup, OTP verification, password reset screens and logichome/: home feed with featured events, sections, banners (data/models,providers,ui/screens,ui/sections,ui/widgets)events/: event listing, details, seat plan, ticket selection with variations (data/models,providers,ui/widgets/events,ui/widgets/event_details,ui/widgets/seatplan,ui/widgets/tickets)checkout/: cart, billing, payment integration withpgw_controller/(Stripe, Razorpay)bookings/: booking history, booking details, and QR ticket viewercategories/: event categories with filteringorganizers/: organizer/vendor profiles and event listingsaccount/: profile, dashboard, settings, update profile/passwordwishlist/: favorite events managementsupport/: support tickets and ticket detailscommon/: reusable UI components and shared widgets
lib/network_services: API client and integrationscore/basic/HTTP utilities, interceptors, error handling, connectivity checkspgw_services/payment gateway helpers (Stripe, Razorpay)- Centralized endpoints in
lib/app/urls.dart(base URL + resource paths)
lib/utils: helpers (formatting, validators, extensions) shared across features
Key integrations
- State management with
providerandgetfor efficient state handling. - Networking with
http, image caching withcached_network_image. - Payments via
flutter_stripeandrazorpay_flutter(wired throughcheckout/pgw_controller). - Push notifications using
firebase_messagingandfirebase_analytics. - Local notifications via
flutter_local_notificationsfor booking reminders. - Maps & location using
flutter_map,latlong2,geolocator, andgeocodingfor venue locations. - Web content (
webview_flutter) for payment gateways and HTML rendering (flutter_html). - PDF tickets with
flutter_cached_pdfviewand QR code scanning withpinputfor OTP.
Branding and theming
- Primary and secondary theme colors, event branding, and logos can be dynamically fetched from the Admin Panel at runtime.
- Custom accent colors, typography, and fallback assets are configurable in code (
app_colors.dart,app_theme_data.dart,assets_path.dart).
The result is a maintainable, scalable codebase that adheres to Flutter best practices and promotes reuse. You can customize colors, layouts, assets, event types, ticket variations, and module-level behavior without fighting the structure—making it faster to ship features, support multiple organizers, and iterate on your event booking platform.
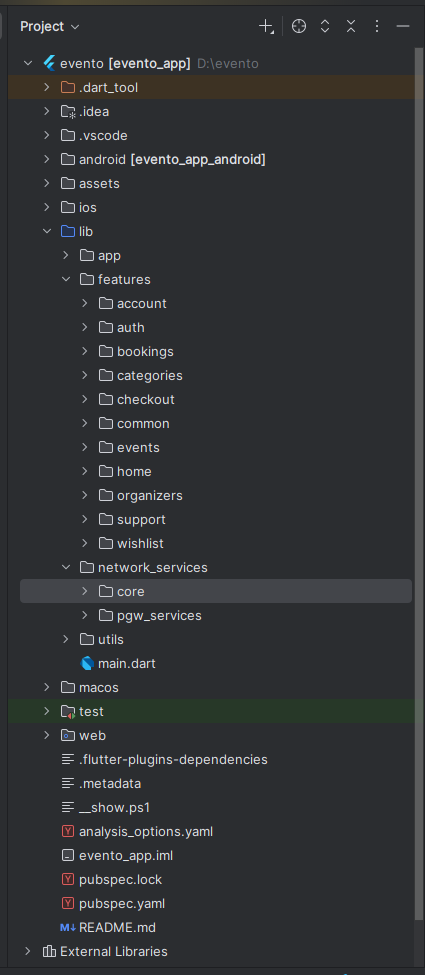
Folder Structure
All you need to follow the lib(Library) Folder for any logical and UI changes in this project.
lib                           # Root directory for all Dart source code.
├── app                       # Core application setup: theme, colors, styles, assets.
│   └── localization          # Localization and language support files.
├── features                  # Main feature modules organized by functionality.
│   ├── account               # User account, profile, and settings management.
│   │   ├── data
│   │   │   └── models        # Data models for account features.
│   │   ├── providers         # State management providers for account.
│   │   └── ui
│   │       ├── screens       # Account-related screens.
│   │       └── widgets       # Reusable account widgets.
│   ├── auth                  # Authentication: login, registration, password reset.
│   │   ├── providers         # Authentication state providers.
│   │   └── ui
│   │       └── screens       # Authentication screens.
│   ├── bookings              # Event booking management and history.
│   │   ├── data
│   │   │   └── models        # Booking data models.
│   │   ├── providers         # Booking state management.
│   │   └── ui
│   │       ├── screens       # Booking screens.
│   │       ├── sections      # Booking screen sections.
│   │       └── widgets       # Booking-related widgets.
│   ├── categories            # Event categories and filtering.
│   │   ├── models            # Category data models.
│   │   ├── providers         # Category providers.
│   │   └── ui
│   │       └── screens       # Category screens.
│   ├── checkout              # Checkout process and payment integration.
│   │   ├── data
│   │   │   └── models        # Checkout data models.
│   │   ├── pgw_controller    # Payment gateway controllers.
│   │   ├── providers         # Checkout state providers.
│   │   └── ui
│   │       ├── screens       # Checkout screens.
│   │       ├── sections      # Checkout sections.
│   │       └── widgets       # Checkout widgets.
│   ├── common                # Shared components across features.
│   │   └── ui
│   │       └── widgets       # Common reusable widgets.
│   ├── events                # Event listing, details, and ticket selection.
│   │   ├── data
│   │   │   └── models        # Event data models.
│   │   ├── providers         # Event state management.
│   │   └── ui
│   │       ├── models        # UI-specific event models.
│   │       ├── screens       # Event screens.
│   │       ├── sections      # Event screen sections.
│   │       └── widgets       # Event-related widgets.
│   │           ├── events            # Event listing widgets.
│   │           ├── event_details     # Event detail widgets.
│   │           ├── seatplan          # Seatmap and seat selection widgets.
│   │           └── tickets           # Ticket selection widgets.
│   ├── home                  # Home screen, featured events, and navigation.
│   │   ├── data
│   │   │   └── models        # Home data models.
│   │   ├── providers         # Home screen providers.
│   │   └── ui
│   │       ├── screens       # Home screens.
│   │       ├── sections      # Home screen sections.
│   │       └── widgets       # Home widgets.
│   ├── organizers            # Event organizers and vendor profiles.
│   │   ├── data
│   │   │   └── models        # Organizer data models.
│   │   ├── providers         # Organizer providers.
│   │   └── ui
│   │       ├── screens       # Organizer screens.
│   │       └── widgets       # Organizer widgets.
│   ├── support               # Customer support and help features.
│   │   ├── data
│   │   │   └── models        # Support data models.
│   │   ├── providers         # Support providers.
│   │   └── ui
│   │       ├── screens       # Support screens.
│   │       └── widgets       # Support widgets.
│   └── wishlist              # Event wishlist and favorites.
│       ├── data
│       │   └── models        # Wishlist data models.
│       ├── providers         # Wishlist providers.
│       └── ui
│           └── screens       # Wishlist screens.
├── network_services          # Network communication and API services.
│   ├── core
│   │   └── basic             # Basic network service implementations.
│   └── pgw_services          # Payment gateway services.
└── utils                     # Utility functions and helper classes.
Screens
Customer App Screens:
1. Splash Screen
2. Login
3. Sign Up
4. Checkout Login
5. Email OTP Send
6. OTP Verification
7. Reset Password
8. Account
9. Dashboard
10. Settings
11. Update Profile
12. Update Password
13. Bottom Navigation
14. Home
15. Notifications
16. Events
17. Event Details
18. Seat Plan
19. Tickets
20. Bookings
21. Booking Details
22. Ticket Viewer
23. Checkout
24. Checkout Success
25. Checkout WebView
26. All Categories
27. Organizers
28. Organizer Details
29. Wishlist
30. Support Tickets
31. Ticket Details
Requirements
Download and install Any one from these IDE(Android studio, Vs Code) on your computer.
- Source Android Studio: https://developer.android.com/studio
- Source Android Studio: https://code.visualstudio.com/download
Setup Flutter and Dart SDK in your computer if you want to modify the source code
- Source Android Studio: https://docs.flutter.dev/get-started/install
Must installed Flutter and dart plugin on your IDE
Install Flutter on Windows
Install Flutter on Mac
Installation
After downloading file from CodeCanyon you will get a zip file. Extracting the zip file you will get Documentation Folder and ... installable.zip included in there:
- Unzip the source code and open it in your IDE.
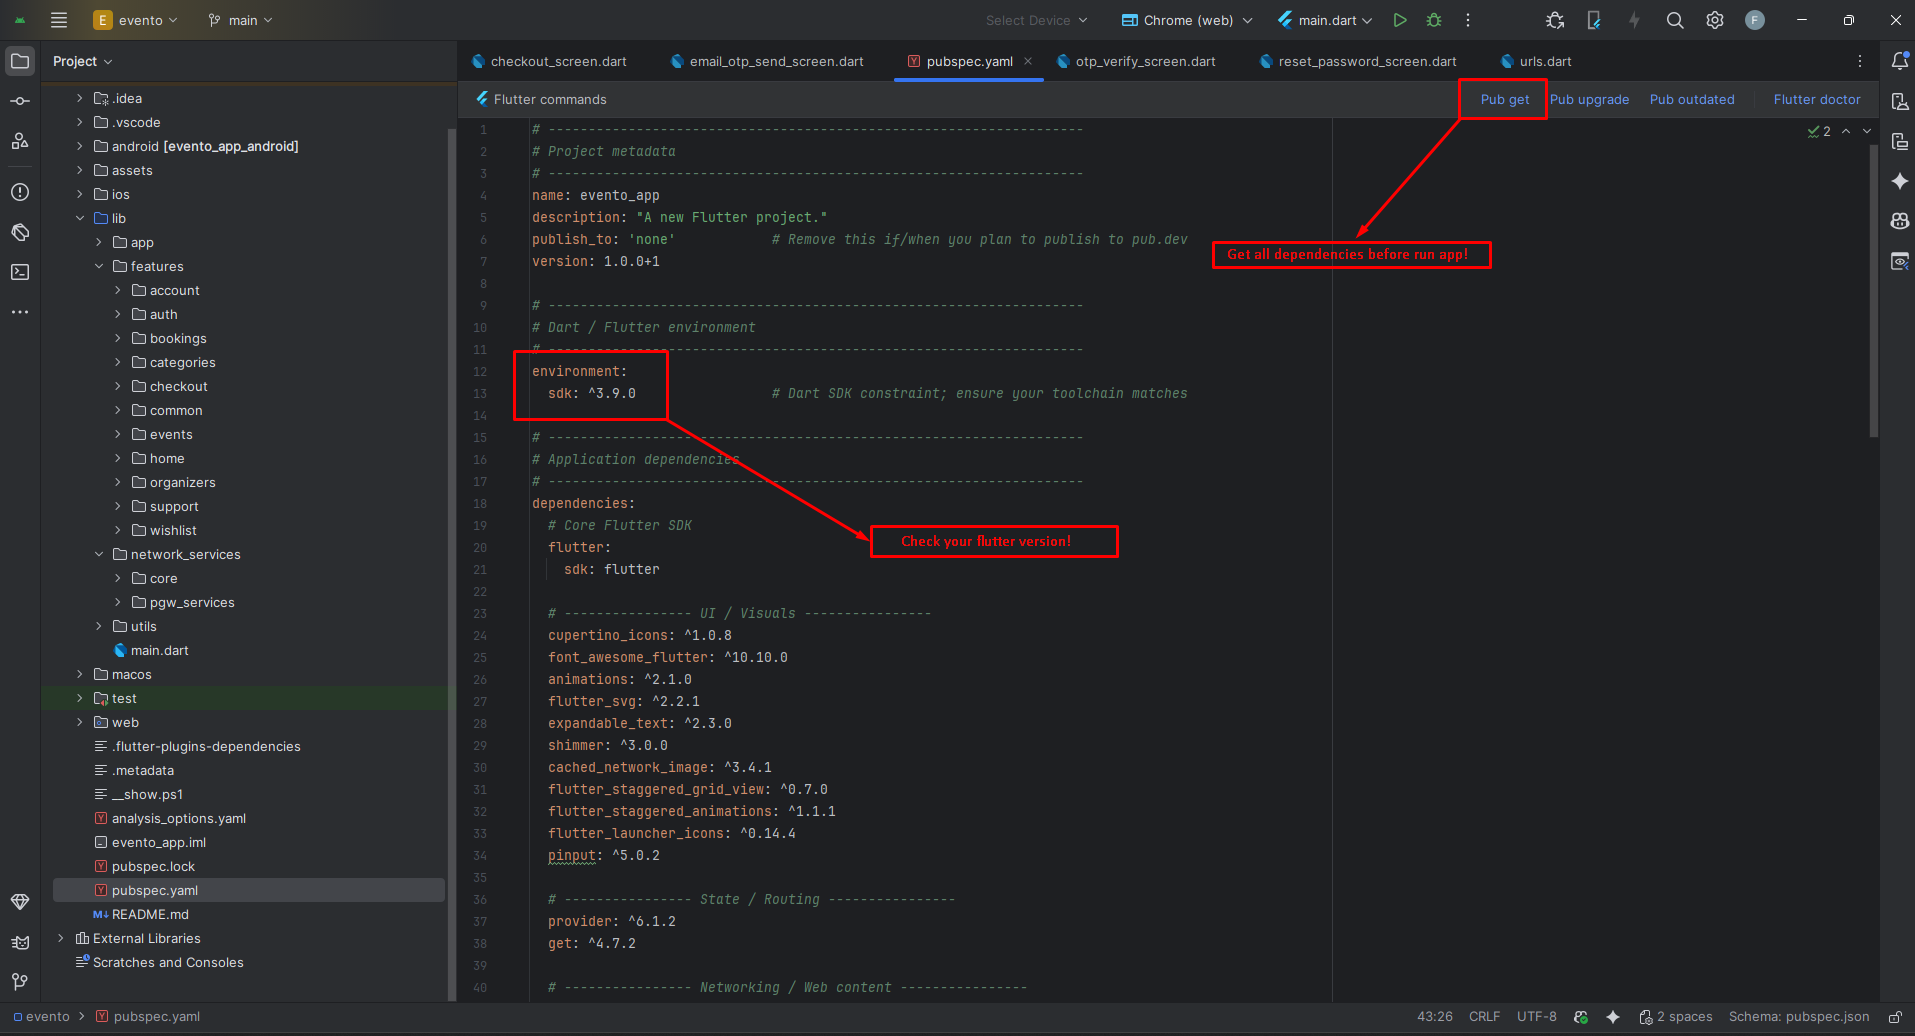
- On your IDE find for pubspecs.yaml file then click on pub get on top right side your IDE.
- Please make sure you are using Flutter version minimum 3.30.0
- Open an emulator or connect a real device and then click on Run Button for compile the project.
Flutter Packages
UI / Visuals
📁 cupertino_icons >> iOS-style icons (Cupertino widgets)
📁 font_awesome_flutter >> Font Awesome icons for Flutter
📁 animations >> Pre-built material motion animations
📁 flutter_svg >> Render SVG images in Flutter
📁 expandable_text >> Expandable text widget with "Read more" functionality
📁 shimmer >> Shimmer effect for loading placeholders
📁 cached_network_image >> Cached network images with loading and error widgets
📁 flutter_staggered_grid_view >> Staggered/masonry grid layouts
📁 flutter_staggered_animations >> Smooth staggered list/grid animations
📁 flutter_launcher_icons >> Configure app launcher icons
📁 pinput >> PIN/OTP input widget
State / Routing
📁 provider >> State management solution
📁 get >> State management, routing, and dependency injection
Networking / Web Content
📁 http >> HTTP requests and API calls
📁 flutter_html >> Render HTML content in Flutter
📁 webview_flutter >> Embed web views in Flutter apps
Maps / Location
📁 flutter_map >> Interactive map widget
📁 latlong2 >> Latitude/longitude calculations
📁 geolocator >> Access device location
📁 geocoding >> Convert addresses to coordinates and vice versa
Storage / Files
📁 shared_preferences >> Persistent key-value storage
📁 path_provider >> Access commonly used file system locations
📁 file_picker >> Pick files from device storage
Notifications / Messaging
📁 flutter_local_notifications >> Local push notifications
📁 firebase_messaging >> Firebase Cloud Messaging integration
Firebase
📁 firebase_core >> Core Firebase SDK
📁 firebase_analytics >> Firebase Analytics integration
Payments
📁 flutter_stripe >> Stripe payment integration
📁 razorpay_flutter >> Razorpay payment gateway integration
Media / Docs / Misc
📁 flutter_cached_pdfview >> Cached PDF viewer
📁 url_launcher >> Launch URLs, emails, and phone calls
📁 intl >> Date/number formatting & internationalization
Mobile App Setting
Configure your Evento mobile app settings through the admin panel. This section covers all essential configurations including home page content, general settings, payment gateways, and plugin integrations.
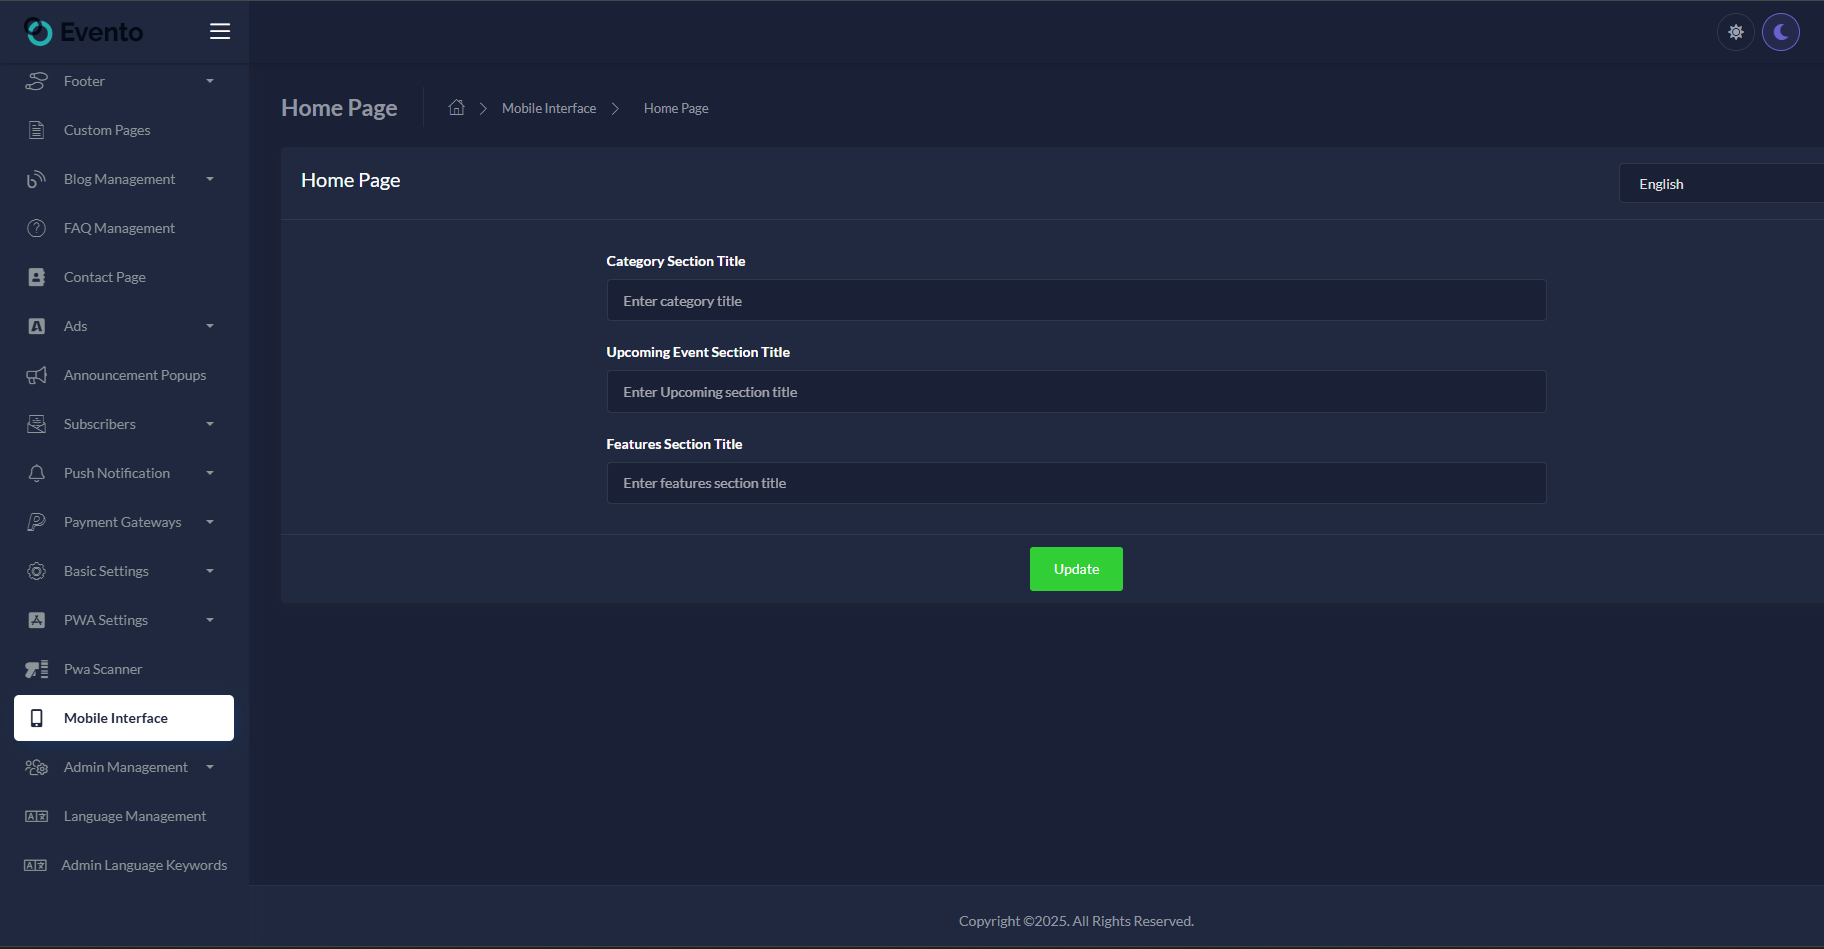
Home Page
Customize the content and appearance of your Evento mobile app's home page. Update images, titles, and section headings to match your brand and event offerings.
Hero Banner Section
| Hero Banner Image | Upload your hero banner image (recommended size: 1200x600px) |
| Hero Banner Title | Find Your Next Event (Example) |
| Hero Banner Subtitle | Browse thousands of events (Example) |
Featured Events Section
| Featured Events Title | Featured Events (Example) |
| Show Featured Events | Toggle ON/OFF to display featured events on home page |
Upcoming Events Section
| Upcoming Events Title | Upcoming Events (Example) |
| Show Upcoming Events | Toggle ON/OFF to display upcoming events |
Event Categories Section
| Categories Section Title | Browse by Category (Example) |
| Show Categories | Toggle ON/OFF to display event categories |
Popular Venues Section
| Popular Venues Title | Popular Venues (Example) |
General Settings
Configure core application settings including API base URL, app logo, favicon, and other essential configurations.

Application Information
| API Base URL * |
https://your-domain.com/evento (Example)Enter your Evento web application URL (v4.0 or higher required). This URL is used for all API requests from the mobile app. |
| App Name | Enter your application name (displays in app header and notifications) |
| Favicon * | Upload your favicon image (recommended: 32x32px or 64x64px, PNG format) |
| App Logo * | Upload your application logo (recommended: transparent PNG, 512x512px) |
App Configuration
| Default Currency | Select the default currency for ticket pricing (e.g., USD, EUR, INR) |
| Date Format | Choose date display format (e.g., DD/MM/YYYY, MM/DD/YYYY) |
| Time Format | Select 12-hour or 24-hour time format |
| Timezone | Set default timezone for event scheduling |
Payment Gateways
Configure multiple payment gateway integrations to accept ticket payments in your Evento app. Each gateway can be enabled/disabled independently and configured with test or live credentials.
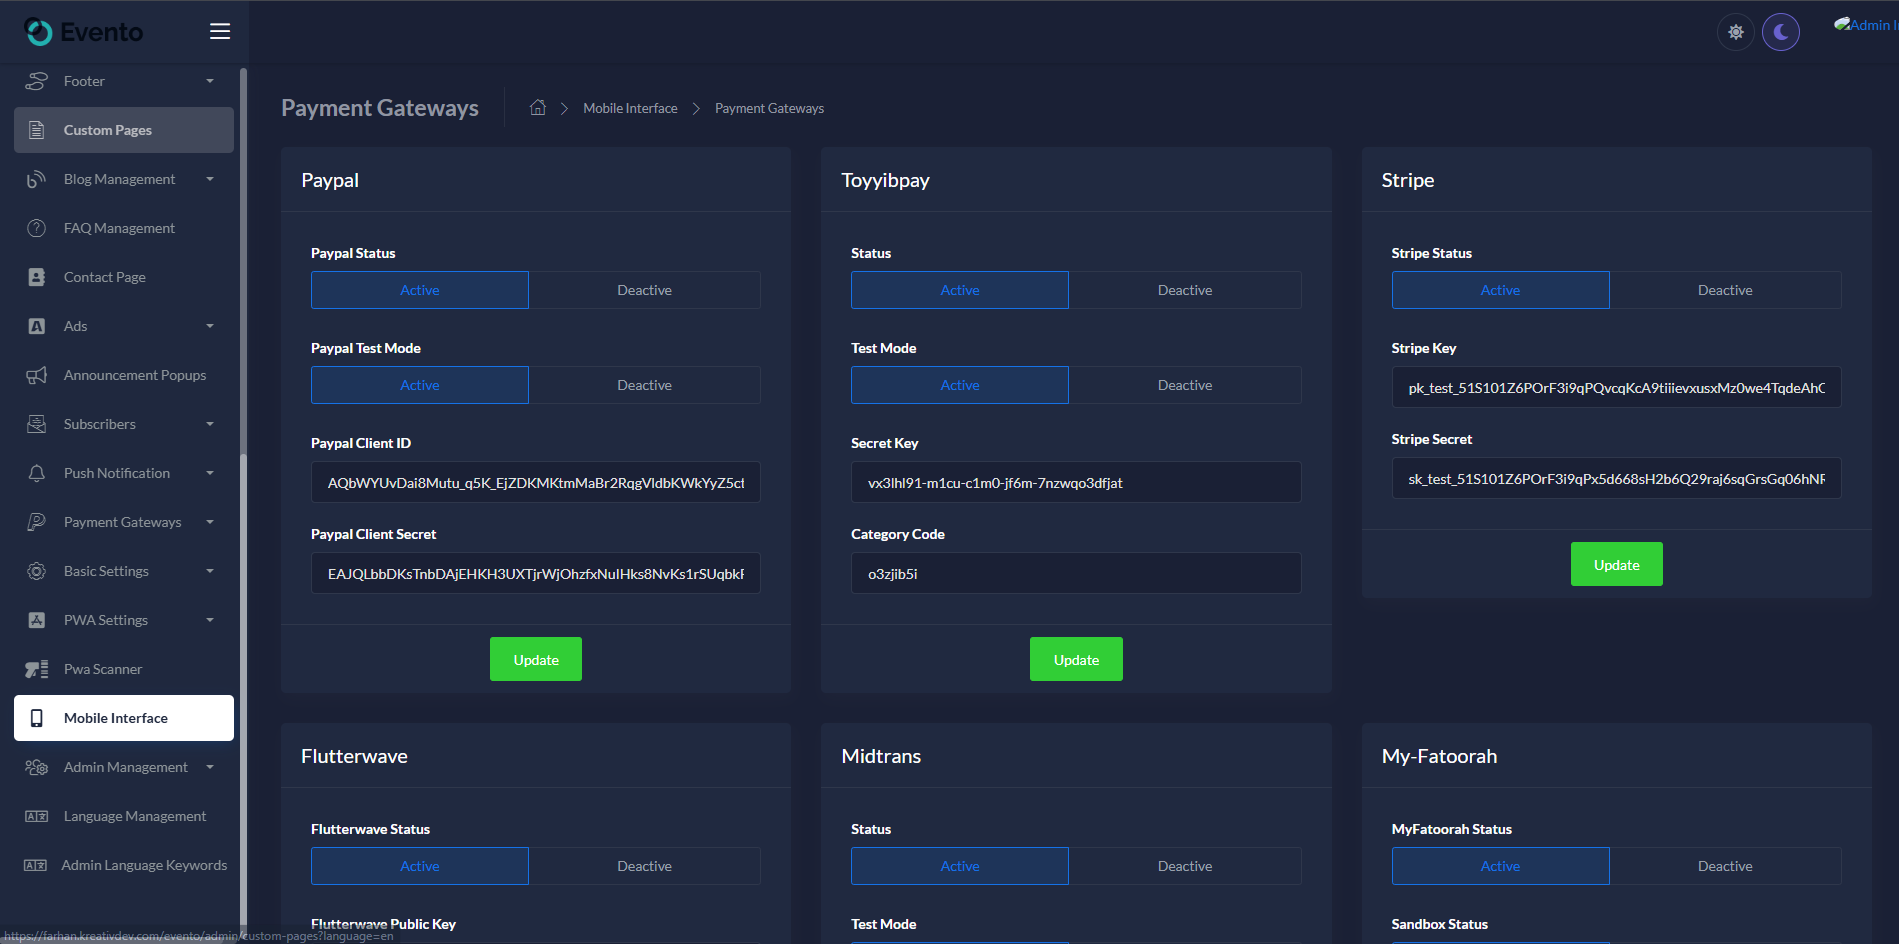
💡 How to Configure Payment Gateways:
- Navigate to Mobile App Setting → Payment Gateways in your admin panel
- Select the payment gateway you want to configure
- Toggle the Status switch to enable/disable the gateway
- Enable Test Mode/Sandbox for testing before processing real payments
- Enter your API credentials (obtain these from your payment gateway dashboard)
- Click Save to apply the changes
Note: You can enable multiple payment gateways. Customers will be able to choose their preferred payment method during ticket checkout.
1. PayPal
Accept payments via PayPal - one of the most widely used payment platforms worldwide for event tickets.
| PayPal Status | Toggle ON to enable PayPal payments |
| PayPal Test Mode | Enable to use PayPal sandbox for testing (recommended during development) |
| PayPal Client ID | Enter your PayPal application Client ID from PayPal Developer Dashboard |
| PayPal Client Secret | Enter your PayPal application Client Secret |
2. Stripe
Popular global payment processor supporting credit/debit cards and various payment methods.
| Stripe Status | Toggle ON to enable Stripe payments |
| Stripe Publishable Key | Enter your Stripe Publishable Key from Stripe Dashboard |
| Stripe Secret Key | Enter your Stripe Secret Key (keep this confidential) |
3. Razorpay
Indian payment gateway supporting UPI, cards, net banking, and wallets.
| Razorpay Status | Toggle ON to enable Razorpay payments |
| Razorpay Key ID | Enter your Razorpay Key ID from Razorpay Dashboard |
| Razorpay Secret Key | Enter your Razorpay Secret Key |
4. Flutterwave
African payment gateway supporting multiple currencies and payment methods.
| Flutterwave Status | Toggle ON to enable Flutterwave payments |
| Flutterwave Public Key | Enter your Flutterwave Public Key |
| Flutterwave Secret Key | Enter your Flutterwave Secret Key |
5. Paystack
Nigerian payment gateway popular across Africa for online payments.
| Paystack Status | Toggle ON to enable Paystack payments |
| Paystack Public Key | Enter your Paystack Public Key |
| Paystack Secret Key | Enter your Paystack Secret Key |
6. Mollie
European payment service provider supporting various payment methods including iDEAL and SEPA.
| Mollie Status | Toggle ON to enable Mollie payments |
| Mollie API Key | Enter your Mollie API Key from your dashboard |
7. Authorize.Net
US-based payment gateway for processing credit card transactions.
| Authorize.Net Status | Toggle ON to enable Authorize.Net payments |
| Test Mode | Enable for sandbox testing |
| API Login ID | Enter your Authorize.Net API Login ID |
| Transaction Key | Enter your Transaction Key |
8. MercadoPago
Latin American payment platform widely used in Argentina, Brazil, Mexico, and more.
| MercadoPago Status | Toggle ON to enable MercadoPago payments |
| Test Mode | Enable for testing before going live |
| MercadoPago Access Token | Enter your MercadoPago Access Token |
💳 Additional Payment Gateways:
The following gateways are also supported. Configure them similarly by enabling the gateway and entering your API credentials:
- Toyyibpay - Malaysian payment gateway
- Midtrans - Indonesian payment gateway
- PhonePe - Indian digital payment platform
- Xendit - Southeast Asian payment gateway
- NowPayments - Cryptocurrency payments
- Monnify - Nigerian payment platform
- My-Fatoorah - Middle Eastern payment gateway
Plugins
Configure third-party integrations and plugins for enhanced functionality in your Evento mobile app.
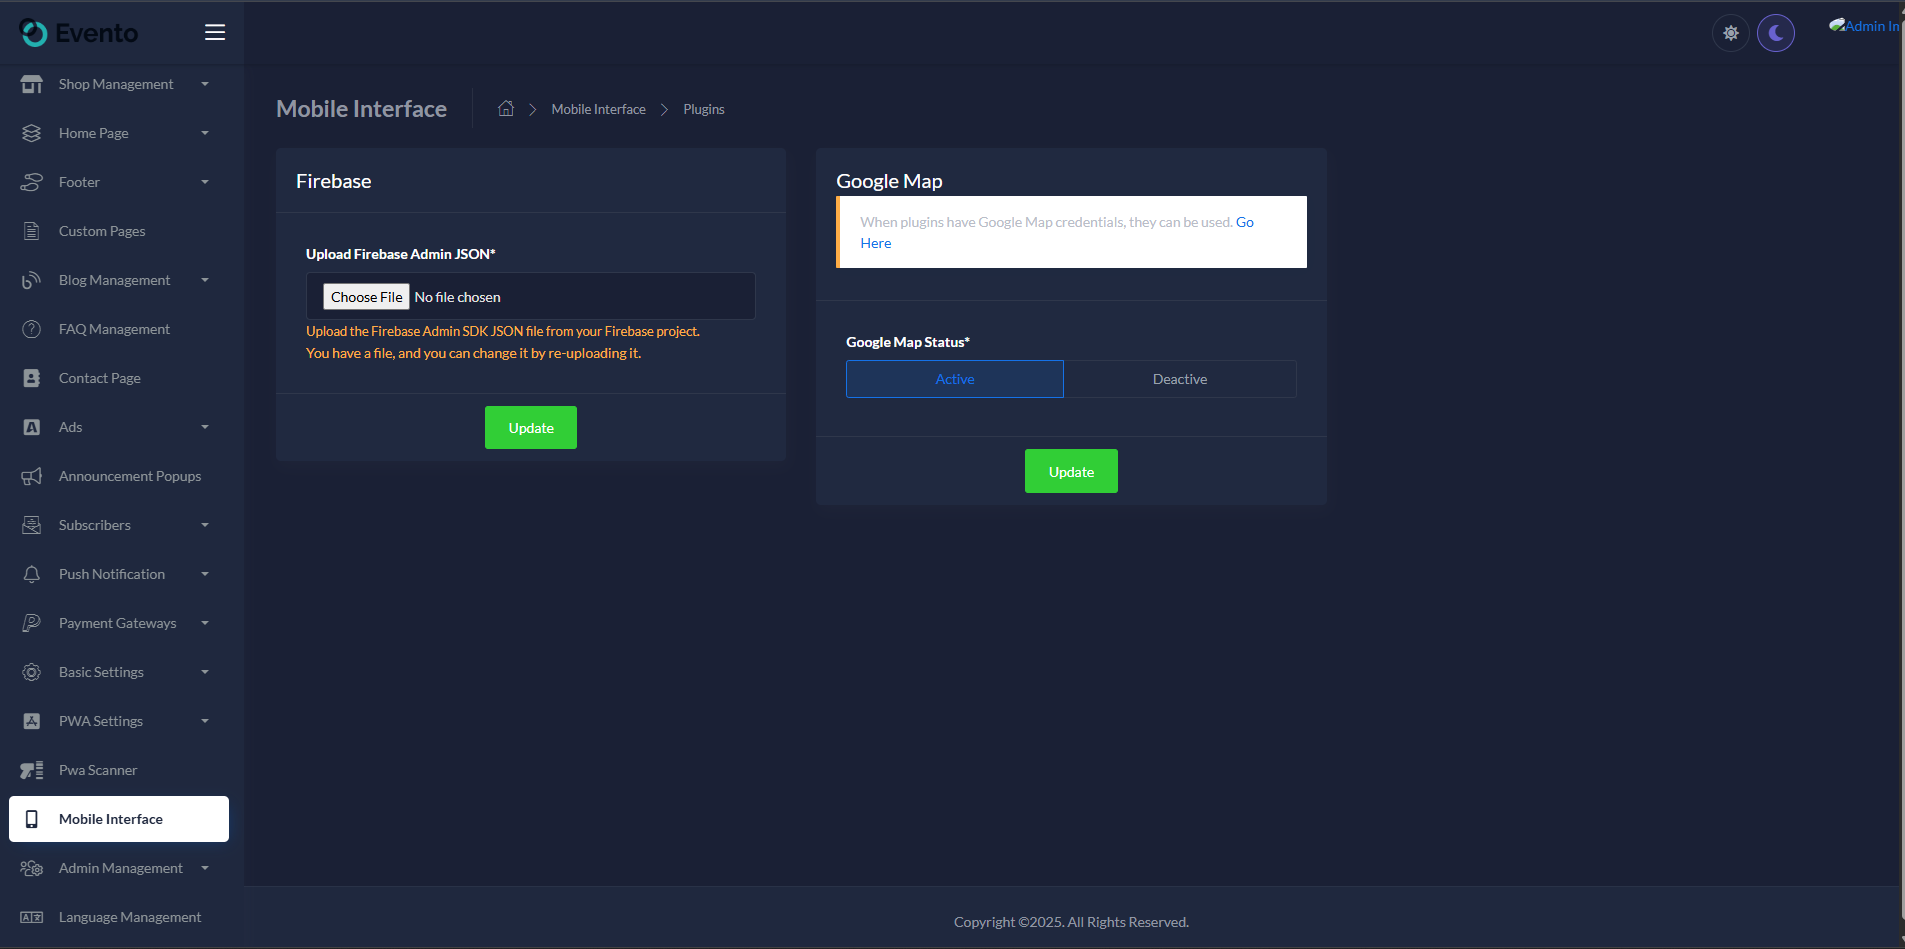
Firebase Configuration
Firebase is required for push notifications, analytics, and crash reporting in your Evento mobile app.
| Upload Firebase Admin JSON * |
Upload the Firebase Admin SDK JSON file from your Firebase project.
Note: You can change the file by re-uploading it if needed. |
📋 How to get Firebase Admin SDK JSON:
- Go to Firebase Console
- Select your Evento project (or create a new one)
- Click on the Project Settings gear icon
- Navigate to the Service Accounts tab
- Click "Generate New Private Key" button
- Download the JSON file and upload it here
Google Maps API
Required for displaying event venue locations and providing directions to users.
| Google Maps API Key |
Enter your Google Maps API Key Get your API key from Google Cloud Console |
| Enable Maps | Toggle ON to show venue locations on maps |
Social Login
Allow users to sign in using their social media accounts for faster registration.
| Google Sign-In | Toggle ON/OFF to enable Google authentication |
| Google Client ID | Enter your Google OAuth Client ID |
| Facebook Sign-In | Toggle ON/OFF to enable Facebook authentication |
| Facebook App ID | Enter your Facebook App ID |
Analytics & Tracking
| Google Analytics | Toggle ON to enable Google Analytics tracking |
| Tracking ID | Enter your Google Analytics Tracking ID (e.g., UA-XXXXXXXXX-X) |
Setup Application
Change App Name
Android
- Open
<project>/android/app/src/main/AndroidManifest.xml - Update the
android:labelvalue inside the<application>tag:
<application
    android:label="Evento"
    android:icon="@mipmap/ic_launcher">

</application>
iOS
- Open
<project>/ios/Runner/Info.plist - Change
CFBundleName:
<key>CFBundleName</key>
<string>Evento</string>
Optional: Some setups also use CFBundleDisplayName for the home screen name.
Reinstall after rename
- Uninstall the previously installed app from the device/emulator, then rebuild and run.
- Optional (Android): uninstall via package id:
Change App Launcher Icons (flutter_launcher_icons:)
- Update the
flutter_launcher_iconsconfig in yourpubspec.yaml(package already added):
flutter_launcher_icons:
  android: true
  ios: true
  image_path: "assets/icons/icon.png"
  adaptive_icon_foreground: "assets/icons/icon.png"
  adaptive_icon_background: "assets/icons/background.png"
- Place your icons at:
assets/icons/icon.png(square, 1024x1024 recommended)assets/icons/background.png(solid/simple background for Android adaptive icon)
- Generate icons:
- Rebuild the app. If icons don't update, clear build caches and run again.
Notes
- Android uses adaptive icons; prefer a simple, solid background and a centered foreground with padding.
- iOS uses a single raster icon automatically generated from
image_path(adaptive fields are ignored on iOS). - The runtime splash logo is loaded from the Admin Panel via API; launcher icons remain static and are generated with this package.
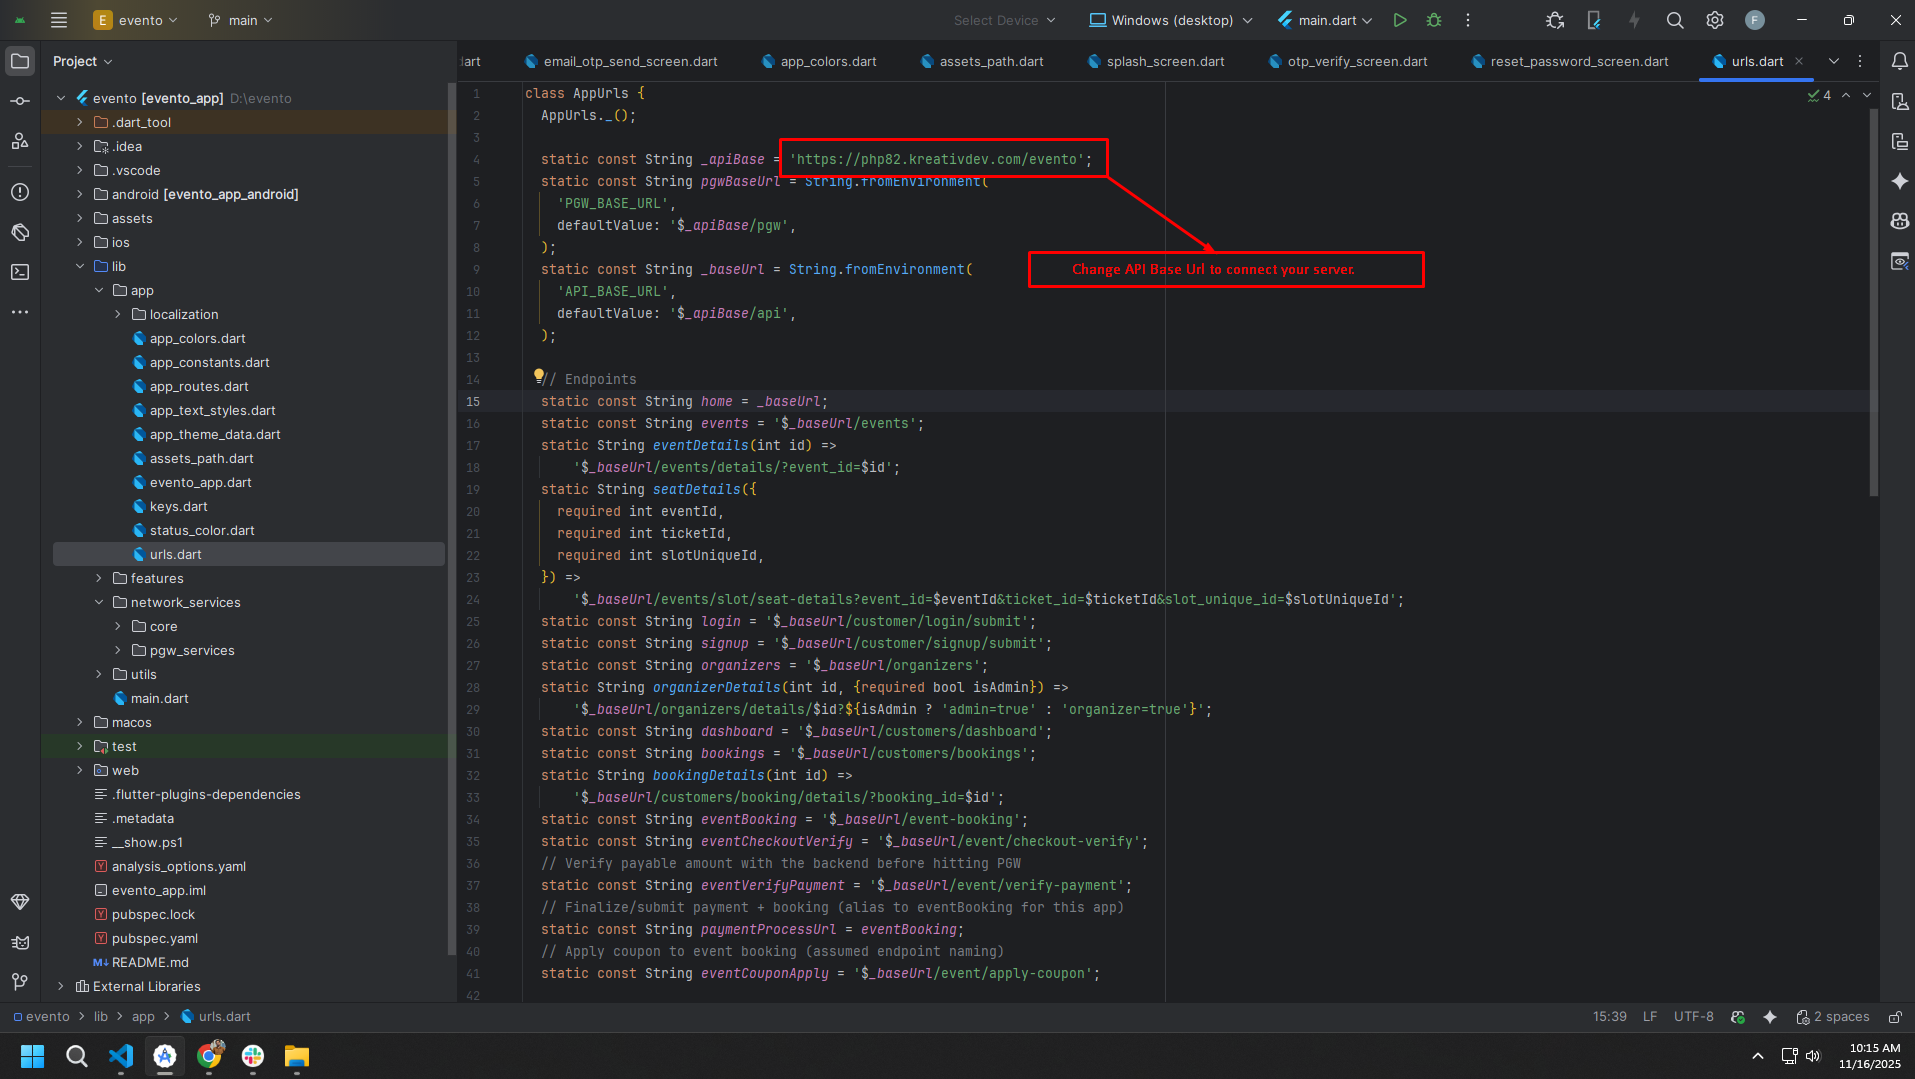
Change API URL
- Open
lib/app/urls.dart - Update the base URL constant to your server URL (no trailing slash):
class Urls {
  // Base API URL
  static const String _baseUrl = 'https://your-domain.com'; // ← no trailing slash
  static const String _apiBaseUrl = '$_baseUrl/api';

  // ...other endpoints
}
- Do not add a trailing
/to_baseUrl(it's appended in_apiBaseUrl). - If your API path is different (e.g.,
/v1), adjust_apiBaseUrlaccordingly. - After changing the URL, restart the app. If you still see old data, clear app storage or log out to refresh tokens.
App Logo & Branding
- Primary App Logos & Splash: Managed from the Admin Panel (recommended). The app fetches and displays the latest logo variants automatically, including the Splash Screen logo shown at runtime. No code change is required.
- Supporting assets (optional): You may override fallback and auxiliary images in code if
needed:
- Asset references: update
lib/app/assets_path.dart(classAssetsPath). Common entries you can swap:- App Branding:
topBgPng,opsPng,errPng - Common Icons:
notificationIconSvg,searchIconSvg,markerSvg,backIconSvg,cancelSvg,filterSvg,ticketSvg,calendarSvg,languageSvg,clockSvg,walletSvg - Home / Navigation:
homeSvg,eventsSvg,bookingsSvg,accountSvg - User & Profile:
userEdit,userPlaceholderPng,defaultOrganizer - Dashboard / Menu:
wishListSvg,categoriesSvg - Events:
seatPlanSvg,qrCodeSvg,downloadTicketSvg - Payment Gateway Logos: constants under
assets/pgwvia_pgwBase(e.g.,stripe.svg,razorpay.svg)
- App Branding:
- Static files (optional):
assets/images/logo.svg,assets/images/logo.png,assets/images/small-logo.png,assets/images/fav.png. - Splash handling:
- Runtime Splash Screen: The logo is fetched from the Admin Panel via API and displayed dynamically.
- Native splash (optional): keep minimal (e.g., solid background color). Avoid embedding a fixed logo since branding is loaded in-app.
- Launcher icon: still static, configure via
flutter_launcher_icons.
- Asset references: update
Tip: After updating logos in the Admin Panel, restart the app to pull the latest branding. If the network
is unavailable, the app will show local fallbacks from AssetsPath. After changing local assets,
clear caches or run a clean build.
Firebase Setup (files only)
Only the platform files/config are included here since other Firebase setup steps are already complete. Follow these quick steps to create a Firebase project and download the platform files/config:
- Create or open Firebase Console: Open https://console.firebase.google.com/ and sign in with a Google account.
- Create a new project: Click Add project, enter a project name, accept the terms, and click Create project. Wait for initialization to finish.
- Before registering your app(s): Verify the Android package name and iOS bundle
identifier in your project and change them now if needed so they match what you will register in Firebase.
See the Naming: Android package & iOS bundle ID section below for exact file paths and quick
change options. Typical locations:
- Android package:
android/app/src/main/AndroidManifest.xmlorandroid/app/build.gradle(applicationId). - iOS bundle ID: Xcode > Runner target > General > Identity > Bundle Identifier (or
ios/Runner/Info.plist>CFBundleIdentifier).
- Android package:
- Register your app(s): From the project overview, click the Android, iOS, or Web icon to register each platform you need. Provide the exact package name / bundle ID for Android and iOS.
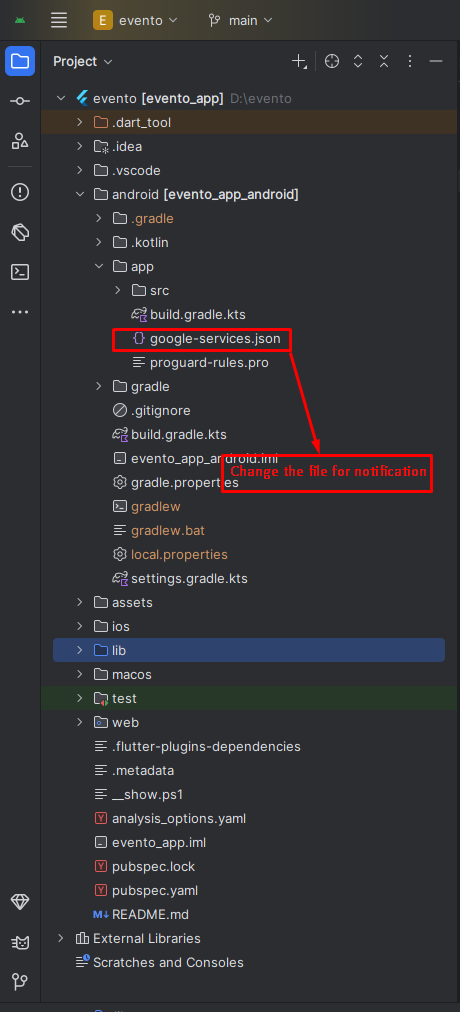
- Download platform files:
- Android — after registering Android, download
google-services.json(button shown during the registration flow or from Project settings > Your apps > Android > App nickname > Download config). - iOS — after registering iOS, download
GoogleService-Info.plist(from the registration flow or Project settings > Your apps > iOS > Download config). - Web — after registering Web, copy the Firebase config object (the JavaScript snippet) from the registration flow or from Project settings > Your apps > Web > Firebase SDK snippet.
- Android — after registering Android, download
- Android: Place the downloaded
google-services.jsonat<project>/android/app/google-services.json. Ensure your Android package name matches the one you registered in the Firebase console. - iOS: Add the downloaded
GoogleService-Info.plistto theRunnertarget in Xcode (drag into the project and check “Copy items if needed”). - Web: If you use Flutter web, copy the Firebase config object (apiKey, authDomain,
projectId, etc.) from the console and add it to your web initialization (or use the generated
firebase_options.dartfrom FlutterFire CLI).
Naming: Android package & iOS bundle ID
The package name (Android) and bundle identifier (iOS) you register in Firebase must exactly match the values in your project. Firebase uses these values to identify your app.
- Find Android package name: Open
android/app/src/main/AndroidManifest.xmlor checkandroid/app/build.gradle(applicationId). Typical form:com.example.your_app. - Change Android package (quick): You can use the Flutter package
change_app_package_nameor manually rename package directories and updateapplicationIdinandroid/app/build.gradleand the package attribute inAndroidManifest.xml. After renaming, update any imports that reference the old package structure. - Find iOS bundle identifier: Open
ios/Runner.xcodeprojin Xcode and select the Runner target. Under the General tab → Identity you'll seeBundle Identifier(e.g.,com.example.yourApp). - Alternative (Info.plist): The bundle identifier is also often stored in
ios/Runner/Info.plistunder the keyCFBundleIdentifier. Open that file and look for theCFBundleIdentifierentry. - Quick CLI check (macOS): From your project root you can search the iOS folder for the
bundle id with a grep, for example (macOS terminal):
grep -R "CFBundleIdentifier" ios | head
This prints lines that include where the bundle id appears in project files. - Change iOS bundle ID: Change it directly in Xcode under the Runner target → General →
Identity → Bundle Identifier. After changing it, re-run your app and re-download the
GoogleService-Info.plistfor the new bundle id when registering in Firebase.
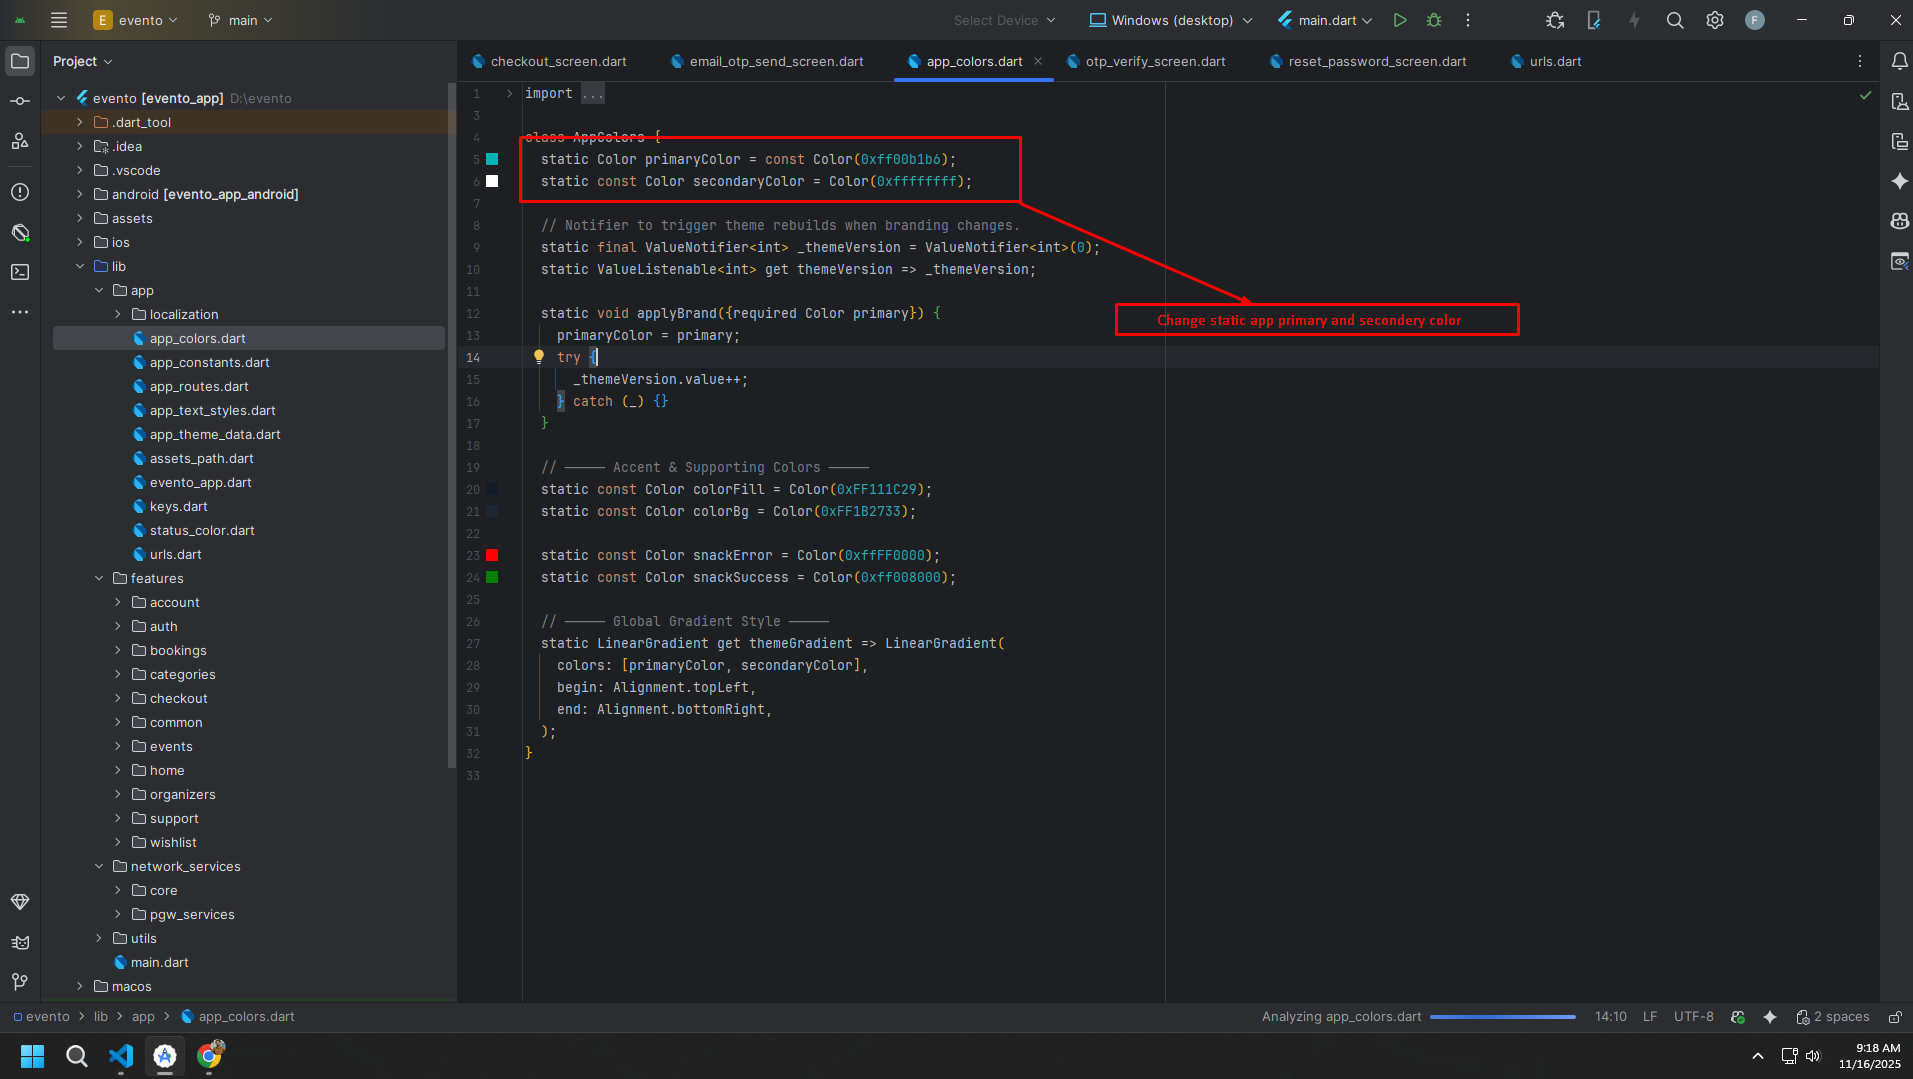
Theme Colors
- Primary & Secondary: Manage these from the Admin Panel settings (recommended). No code change is required.
- Accent & Supporting colors (optional): You can manually override accent/supporting
tones in code if needed. Update
lib/app/app_colors.dart(and, if applicable,lib/app/app_theme_data.dart) for items like success/warning/info colors, chip backgrounds, and rating stars.
Tip: After changing colors from the Admin Panel, restart the app to fetch the latest theme configuration.
Build & Run App
Run the Application:
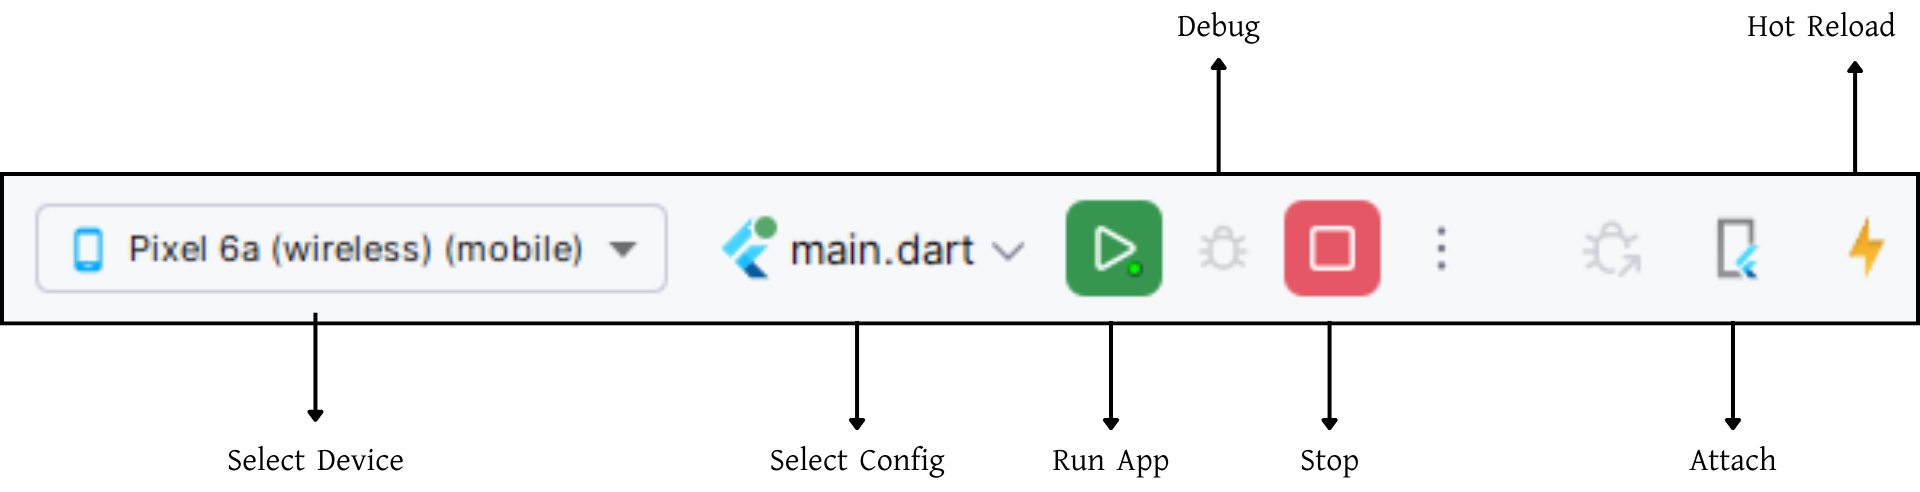
- In the target selector, select an Android device for running the app. If none are listed as available, select Tools> Android > AVD Manager and create one there. For details, see Managing AVDs.
- If you don't use Android Studio, Vs Code or IntelliJ you can use the command line to run your application using the following command:
Build Release & Publish App
1. Build Release Apk or other file type as your need.
After making all your changes and customizations, save the project. Then open the console, navigate to your project folder, and execute the following command:
⚡ For Play Store deployments, it’s recommended to use App Bundles or split APKs to reduce the final APK size.
Build and Install App:
• Generate App Bundle (recommended):
• Split APKs per ABI:
Signing the App (required for Google Play):
Before uploading, you must sign your app. Generate a signing key by running:
Create a key.properties file inside android/ folder with the following content:
keyPassword = password from previous step
keyAlias = key
storeFile = location of the keystore file (e.g. /Users/username/key.jks)
Then update android/app/build.gradle with:
def keystoreProperties = new Properties()
keystoreProperties.load(new FileInputStream(keystorePropertiesFile))
signingConfigs {
release {
keyAlias keystoreProperties['keyAlias']
keyPassword keystoreProperties['keyPassword']
storeFile file(keystoreProperties['storeFile'])
storePassword keystoreProperties['storePassword']
}
}
buildTypes {
release {
signingConfig signingConfigs.release
}
}
2. Android (Play Store)
Follow the official guidelines to publish your signed app or app bundle to the Google Play Store:
https://flutter.dev/docs/deployment/android3. iOS (App Store)
Follow the official guidelines to publish your app to the Apple App Store:
https://flutter.dev/docs/deployment/iosRun flutter build apk --release for Android.
Run flutter build ios --release for iOS.
Follow Flutter docs for publishing to Play Store / App Store.
Support
📩 For support, customization, or queries, contact us via email.