Evento Complete UI - Customer and Organizer in One Flutter Project
Evento Complete UI is one Flutter app with two modules inside the same codebase: customer and organizer. It uses one shared root project, one shared asset system, and separate customer and organizer code under the same lib directory.
This combined documentation is based on the actual project structure currently present in the complete app: a root launcher, a selector screen, a dedicated customer entry point, and a dedicated organizer entry point. The structure below treats both sides as parts of the same app instead of two independent products.
Project Entry Points
lib/main.dartis the default app entry point and is intended to open the selector flow.lib/selector.dartcontains the module picker that lets the user continue as Customer or Organizer.lib/customer/customer_main.dartlaunches only the customer app directly.lib/organizer/org_main.dartlaunches only the organizer app directly.
What this merged doc covers
- The actual single-project folder structure from the combined Flutter app.
- Customer and organizer module breakdowns as two parts of the same app.
- Shared installation, package, branding, build, and publishing steps for the combined project.
Combined Project Structure
The current combined app is a standard Flutter project root with Android, iOS, assets, and a unified lib folder that contains both modules. Customer-specific code lives under lib/customer, organizer-specific code lives under lib/organizer, and the selector logic lives at the top level of lib.
evento_complete_ui/
├── android/
├── ios/
├── assets/
│   ├── fonts/
│   ├── icons/
│   └── images/
├── lib/
│   ├── main.dart
│   ├── selector.dart
│   ├── customer/
│   │   ├── customer_main.dart
│   │   ├── app/
│   │   ├── features/
│   │   └── utils/
│   └── organizer/
│       ├── org_main.dart
│       ├── app/
│       └── features/
├── pubspec.yaml
├── analysis_options.yaml
└── test/
Shared root project
- One
pubspec.yamlmanages dependencies for both modules. - Assets are shared from the root
assets/folder. - Android and iOS platform folders are maintained once for the whole codebase.
Selector flow
lib/selector.dartroutes the user into either the customer or organizer module.- The customer route opens
EventoApp. - The organizer route initializes theme and locale providers before opening
EventoOrganizer.
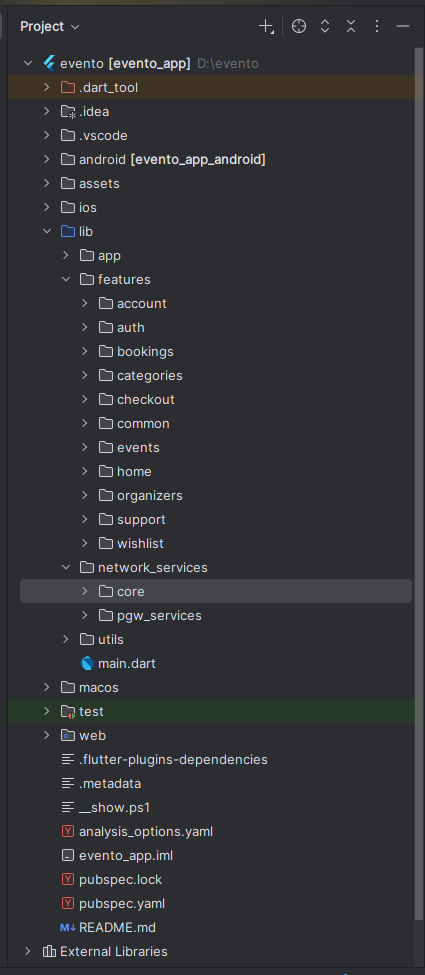
Customer tree
lib/customer/appfor theme, colors, assets, routes, navigation, and language support.lib/customer/featuresfor bookings, checkout, home, events, organizers, support, and account flows.lib/customer/utilsfor shared helper utilities.
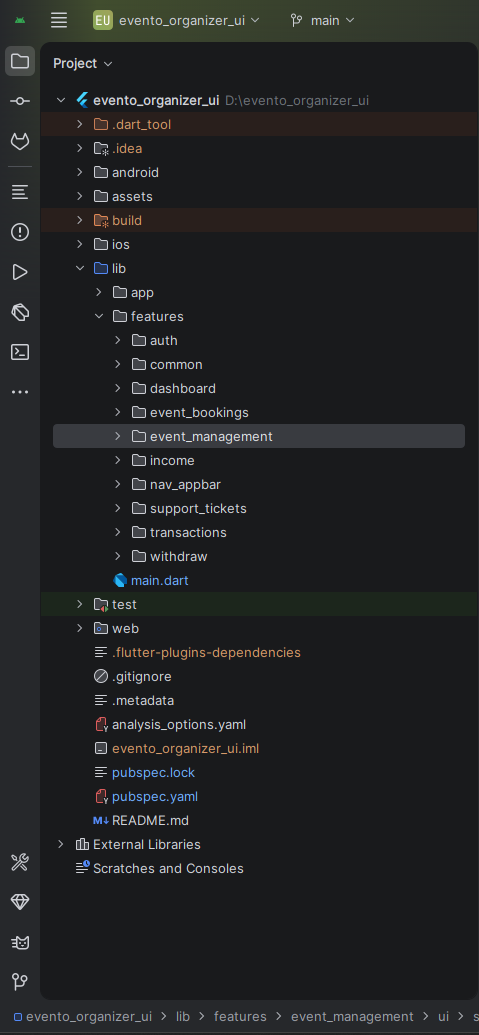
Organizer tree
lib/organizer/appfor theme, locale, routes, and organizer app shell configuration.lib/organizer/featuresfor dashboard, event management, bookings, income, transactions, withdrawals, and support.- Dark mode and locale state are persisted at the organizer app layer.
Customer structure reference
Organizer structure reference
Customer Module
The customer module is the user-facing side of the same app. In the combined project, it is launched by lib/customer/customer_main.dart or through the selector flow. The main app widget is EventoApp, which configures routes, theme, locale handling, and directionality for customer-facing screens.
Customer Highlights
- Event browsing, filtering, organizer details, and category-based discovery.
- End-to-end booking flow from event details to ticket selection, checkout, and booking history.
- OTP-based auth flows, support tickets, wishlist support, QR ticket viewing, and map/location features.
- RTL-aware directionality through the customer language service.
- Web preview support through the device-frame wrapper in
customer_main.dart.
Customer Module Files
lib/customer/app/evento_app.dartbuilds the customer app shell and route flow.lib/customer/app/app_colors.dartandlib/customer/app/app_theme_data.dartdefine the customer theme.lib/customer/app/language_service.dartcontrols language state and text direction.lib/customer/app/assets_path.dartmaps the customer branding and image assets.
Customer Screens (Total: 30)
ACCOUNT
- Account Screen
- Dashboard Screen
- Settings Screen
- Update Password Screen
- Update Profile Screen
AUTH
- Splash Screen
- Login Screen
- Signup Screen
- Checkout Login Screen
- Email OTP Send Screen
- OTP Verify Screen
- Reset Password Screen
BOOKINGS
- Bookings Screen
- Booking Details Screen
- Ticket Viewer Screen
CATEGORIES
- All Categories Screen
CHECKOUT
- Checkout Screen
- Checkout Success Screen
EVENTS
- Events Screen
- Event Details Screen
- Seat Plan Screen
- Tickets Screen
HOME
- Bottom Navigation Screen
- Home Screen
- Notifications Screen
ORGANIZERS
- Organizers Screen
- Organizer Details Screen
SUPPORT
- Support Tickets Screen
- Support Ticket Details Screen
WISHLIST
- Wishlist Screen
Customer Homepage Reference
Customer Branding Reference
Organizer Module
The organizer module is the management side of the same app. In the combined project, it is launched by lib/organizer/org_main.dart or through the selector screen. The main organizer app widget is EventoOrganizer, which uses provider-based theme and locale management, supports multiple locales, and handles RTL layout when needed.
Organizer Highlights
- Online and venue event creation, editing, ticket management, and seat mapping workflows.
- Dashboard analytics, monthly income charts, booking reports, transactions, and withdrawal flows.
- Dark mode persistence through
ThemeProviderand language control throughLocaleProvider. - Support for English, Arabic, and Spanish locales with RTL-aware layout handling.
- Rich text editing, image upload, charts, and admin-focused reusable widgets.
Organizer Module Files
lib/organizer/app/app.dartbuilds the organizer app shell with provider setup.lib/organizer/app/app_colors.dartandlib/organizer/app/theme_data.dartdefine organizer themes.lib/organizer/app/theme_provider.dartpersists light and dark mode.lib/organizer/app/locale_provider.dartmanages language selection and RTL state.lib/organizer/app/assets_path.dartmaps organizer brand assets.
Organizer Screens (Total: 32+)
AUTH (5 Screens)
- Splash Screen
- Login Screen
- Signup Screen
- Edit Profile Screen
- Change Password Screen
DASHBOARD (1 Screen)
- Dashboard Screen
EVENT MANAGEMENT (13 Screens)
- Choose Event Type Screen
- All Events Screen
- Online Events Screen
- Venue Events Screen
- Add Online Event Screen
- Edit Online Event Screen
- Add Venue Event Screen
- Edit Venue Event Screen
- Tickets Screen
- Add Tickets Screen
- Edit Ticket Screen
- Tickets Settings Screen
- Seat Mapping Screen
EVENT BOOKINGS (6 Screens)
- All Bookings Screen
- Pending Bookings Screen
- Completed Bookings Screen
- Rejected Bookings Screen
- Booking Details Screen
- Report Screen
INCOME (1 Screen)
- Monthly Income Screen
TRANSACTIONS (1 Screen)
- Transactions Screen
WITHDRAW (2 Screens)
- Withdraw History Screen
- Withdrawal Request Screen
SUPPORT TICKETS (3 Screens)
- All Support Tickets Screen
- Add Support Ticket Screen
- Support Ticket Details Screen
NAVIGATION
- App Home with Bottom Navigation and Drawer
Organizer Structure Reference
Organizer Theme Reference
Requirements
Use the complete combined Flutter project root when setting up the app. Install one supported IDE, configure Flutter and Dart, and make sure your local environment can build Android and iOS targets from the same codebase.
- Android Studio: https://developer.android.com/studio
- VS Code: https://code.visualstudio.com/download
- Flutter setup guide: https://docs.flutter.dev/get-started/install
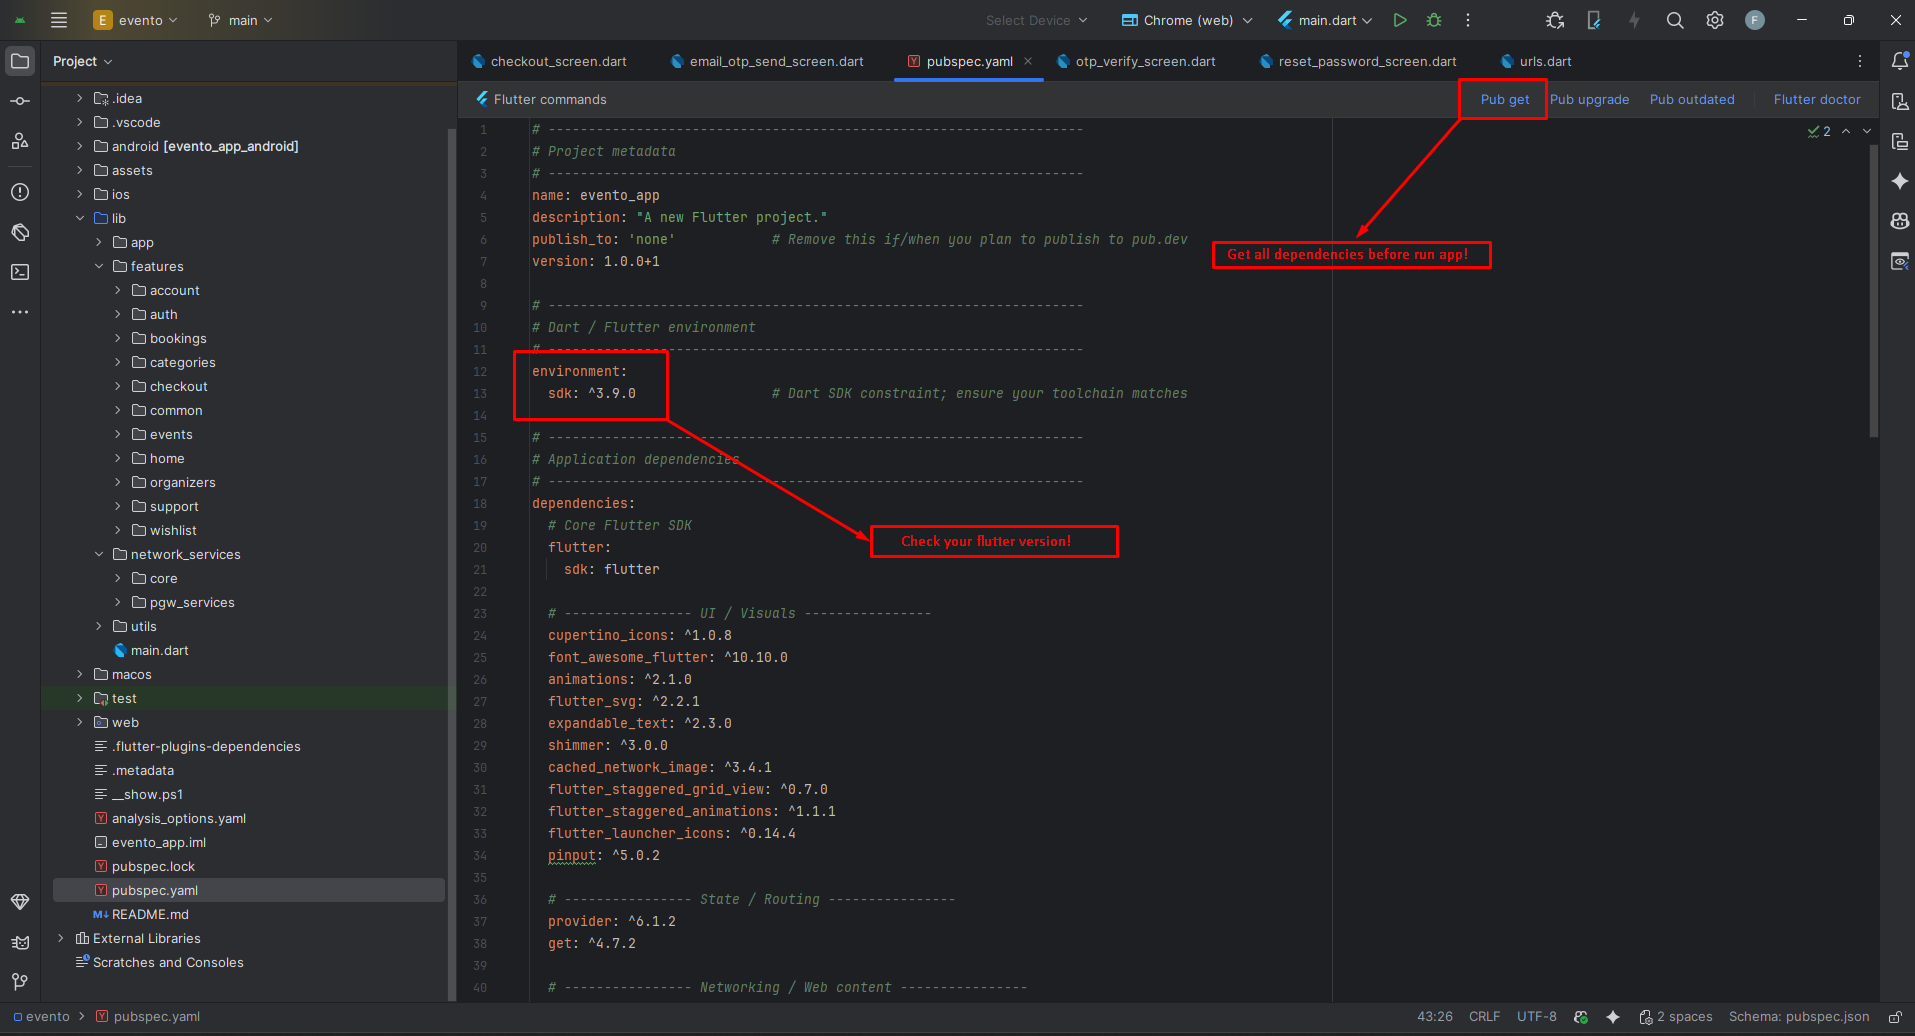
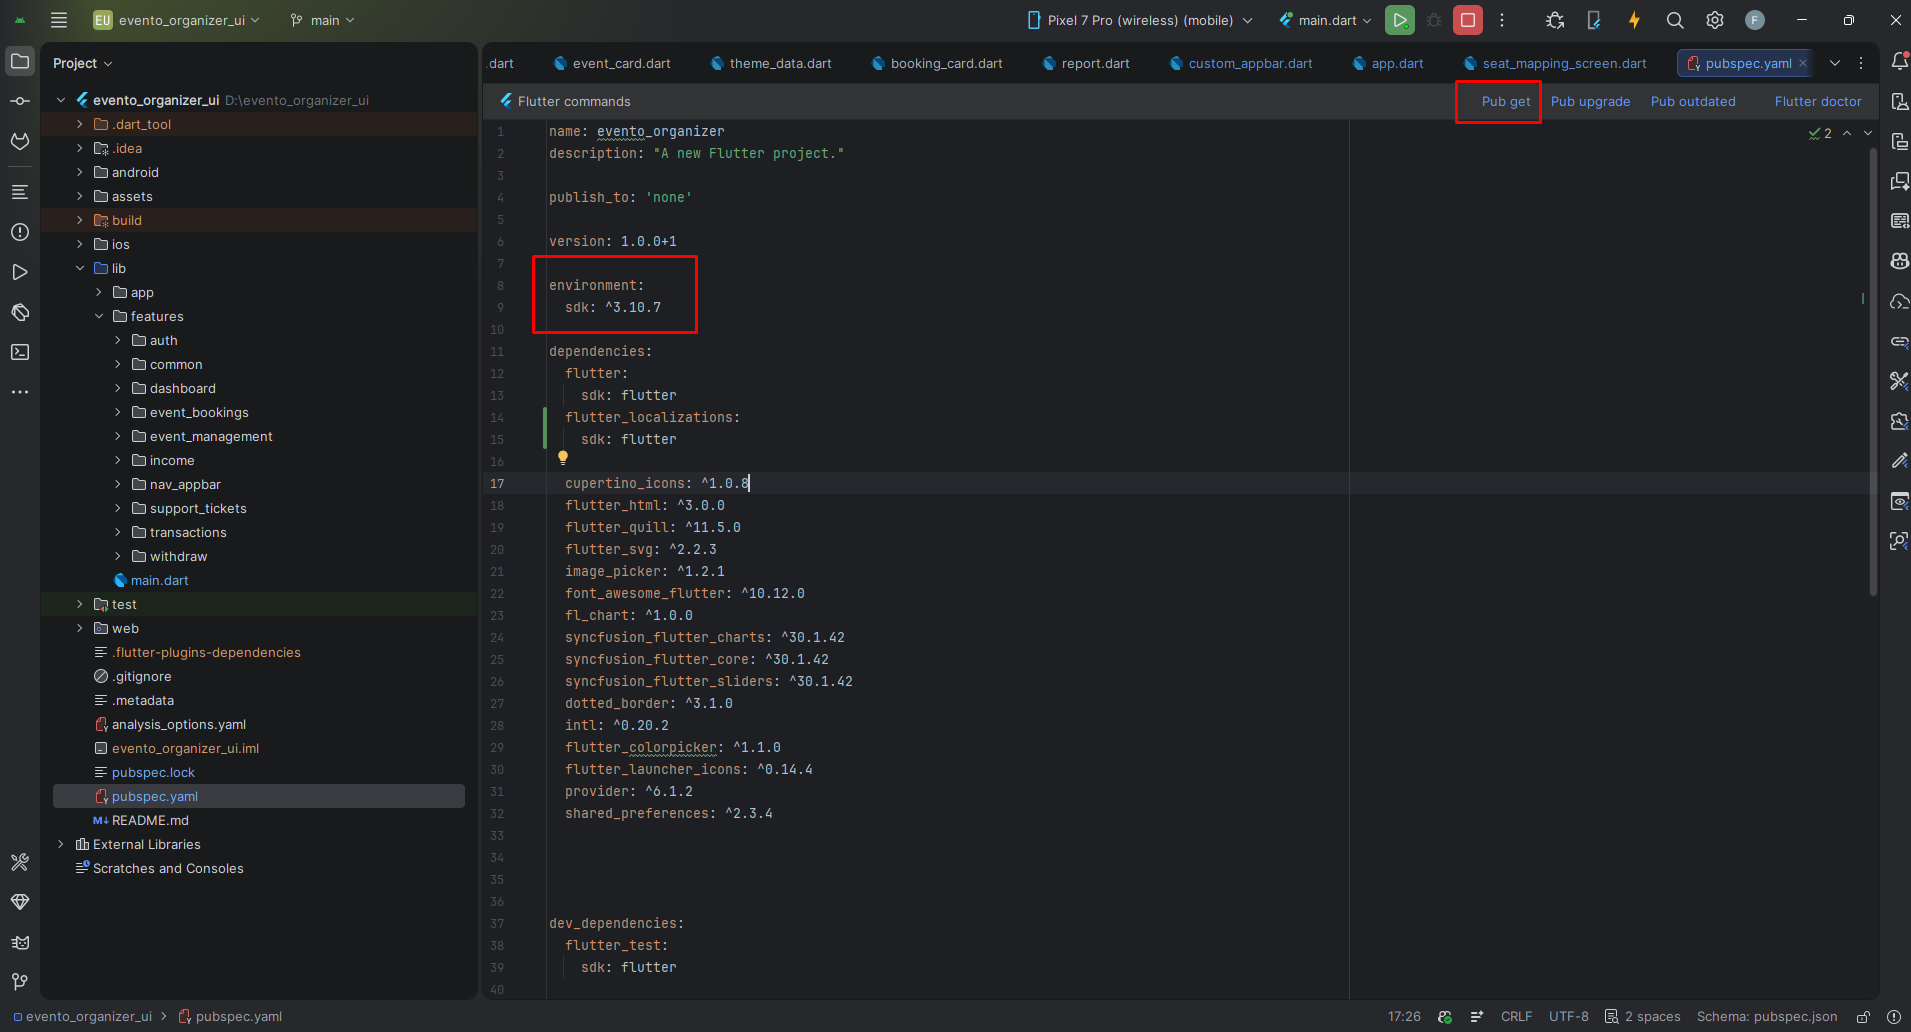
The combined project currently targets Dart SDK ^3.11.4 in pubspec.yaml. Use a Flutter release compatible with that Dart SDK and keep Flutter, Dart, and plugins aligned across your setup.
Make sure the Flutter and Dart IDE plugins are installed before you open the project.
Install Flutter on Windows
Install Flutter on Mac
Installation
After extracting the package, open the combined project root in your IDE, not the individual documentation folders. This is now a single Flutter app that contains both the customer and organizer modules.
- Open the complete root project that contains
android,ios,assets,lib, andpubspec.yaml. - Run
flutter pub getor use the IDE package resolution action onpubspec.yaml. - Connect a device or open an emulator before launching the app.
- Use the selector entry point for the combined experience, or the module-specific entry points for direct testing.
Customer installation reference
Organizer installation reference
Launch Options
Run selector flow
Use this to open the customer / organizer selector experience first.
Run customer only
Launch the customer module directly for focused development and QA.
Run organizer only
Launch the organizer module directly with its theme and locale initialization.
Flutter Packages
Shared Runtime
📁 flutter_localizations >> Localization support for the combined app
UI / Visuals
📁 cupertino_icons: ^1.0.8 >> iOS-style icons
📁 font_awesome_flutter: ^10.10.0 >> Font Awesome icons
📁 animations: ^2.1.0 >> Material motion animations
📁 flutter_svg: ^2.2.1 >> Render SVG assets
📁 expandable_text: ^2.3.0 >> Expandable text widgets
📁 shimmer: ^3.0.0 >> Shimmer placeholders
📁 flutter_staggered_grid_view: ^0.7.0 >> Staggered grid layouts
📁 flutter_staggered_animations: ^1.1.1 >> Animated list and grid transitions
📁 flutter_launcher_icons: ^0.14.4 >> App launcher icon generation
📁 pinput: ^5.0.2 >> OTP and PIN input UI
📁 dotted_border: ^3.1.0 >> Dotted outline widgets
📁 flutter_colorpicker: ^1.1.0 >> Color picker support
📁 intl: ^0.20.2 >> Date and number formatting
Web / Rich Content
📁 flutter_html: ^3.0.0 >> Render HTML content
📁 flutter_quill: ^11.5.0 >> Rich text editor support
Maps / Location
📁 flutter_map: ^6.0.0 >> Interactive map support
📁 latlong2: ^0.9.0 >> Latitude and longitude calculations
📁 geolocator: ^14.0.2 >> Device location access
📁 geocoding: ^2.1.0 >> Address conversion utilities
Storage / Files
📁 shared_preferences: ^2.2.3 >> Persistent local storage
📁 path_provider: ^2.1.5 >> File system location access
📁 file_picker: ^10.3.3 >> Device file picker
Media / Documents / Analytics
📁 flutter_cached_pdfview: ^0.4.3 >> PDF viewing
📁 url_launcher: ^6.3.2 >> Open URLs, phone calls, and emails
📁 image_picker: ^1.2.1 >> Pick images from gallery or camera
📁 fl_chart: ^1.0.0 >> Chart widgets
📁 syncfusion_flutter_charts: ^30.1.42 >> Advanced charting
📁 syncfusion_flutter_core: ^30.1.42 >> Syncfusion core support
📁 syncfusion_flutter_sliders: ^30.1.42 >> Range sliders and selectors
📁 provider: ^6.1.2 >> State management for organizer theme and locale
Setup Application
Module Selector and Entry Flow
- The selector screen is defined in
lib/selector.dartand is the gateway between Customer and Organizer. - The customer route opens
EventoAppdirectly. - The organizer route initializes
ThemeProviderandLocaleProviderbefore openingEventoOrganizer. - Use direct entry points during development when you want to skip the selector and work on one module only.
Change App Name
Android
- Open
<project>/android/app/src/main/AndroidManifest.xml - Update the
android:labelvalue inside the<application>tag.
<application
    android:label="Evento"
    android:icon="@mipmap/ic_launcher">
    <!-- ... -->
</application>
iOS
- Open
<project>/ios/Runner/Info.plist - Change
CFBundleNameand optionallyCFBundleDisplayName.
<key>CFBundleName</key>
<string>Evento</string>
If you plan to publish customer and organizer as separate store apps from the same codebase, define separate display names, icons, and platform identifiers before release.
Change App Launcher Icons (flutter_launcher_icons)
- Update the launcher icon config in the combined root
pubspec.yaml. - Replace
assets/icons/icon.pngandassets/icons/bg.pngwith your own assets. - Run icon generation again from the project root.
flutter_launcher_icons:
  image_path: "assets/icons/icon.png"
  android: true
  ios: true
  adaptive_icon_background: "assets/icons/bg.png"
  background_color_ios: "#ffffff"
App Logo & Branding
- Selector branding is handled in
lib/selector.dart. - Customer branding references are maintained in
lib/customer/app/assets_path.dart. - Organizer branding references are maintained in
lib/organizer/app/assets_path.dart. - Replace shared root assets under
assets/imagesandassets/iconswhen needed. - After replacing images or icons, run a clean rebuild if cached assets still appear.
Customer branding assets
Organizer branding assets
Theme Colors, Localization, and Dark Mode
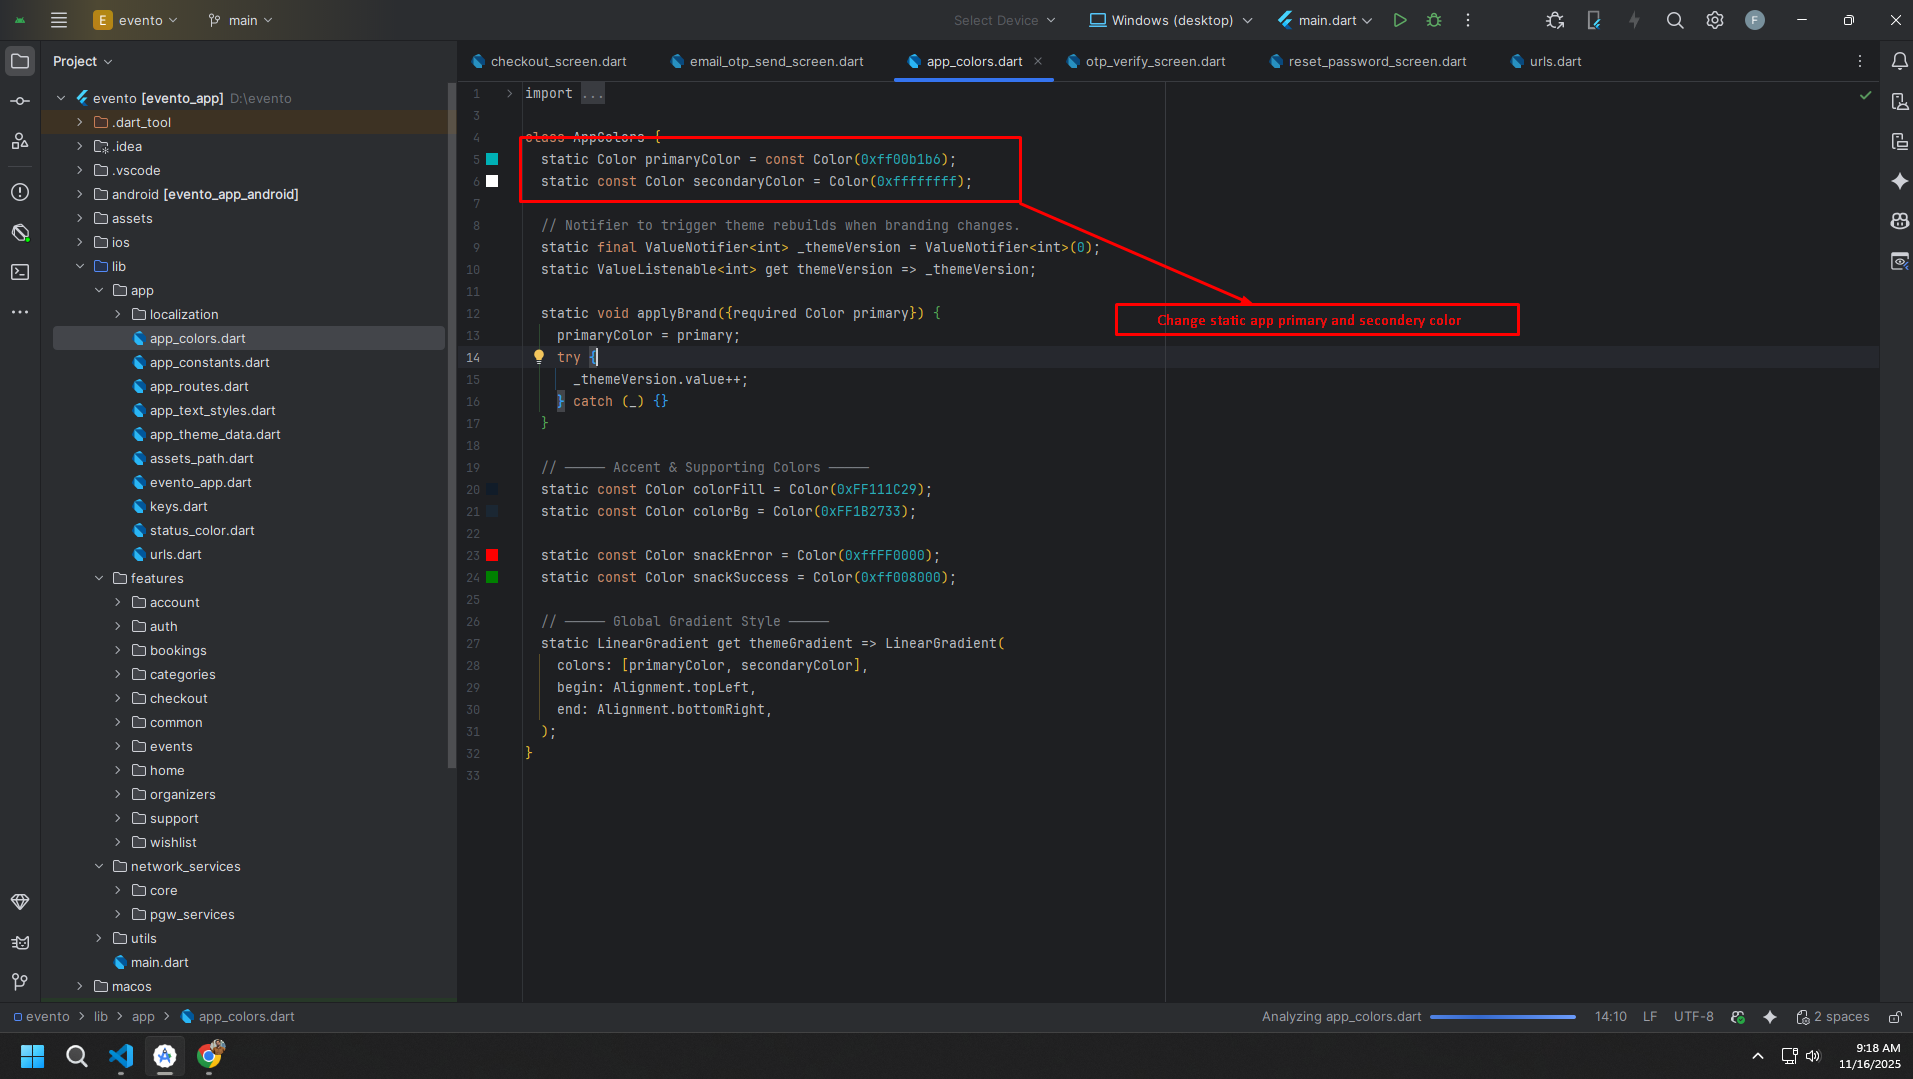
- Customer theme colors are managed from
lib/customer/app/app_colors.dartandlib/customer/app/app_theme_data.dart. - Customer directionality and language switching are controlled by
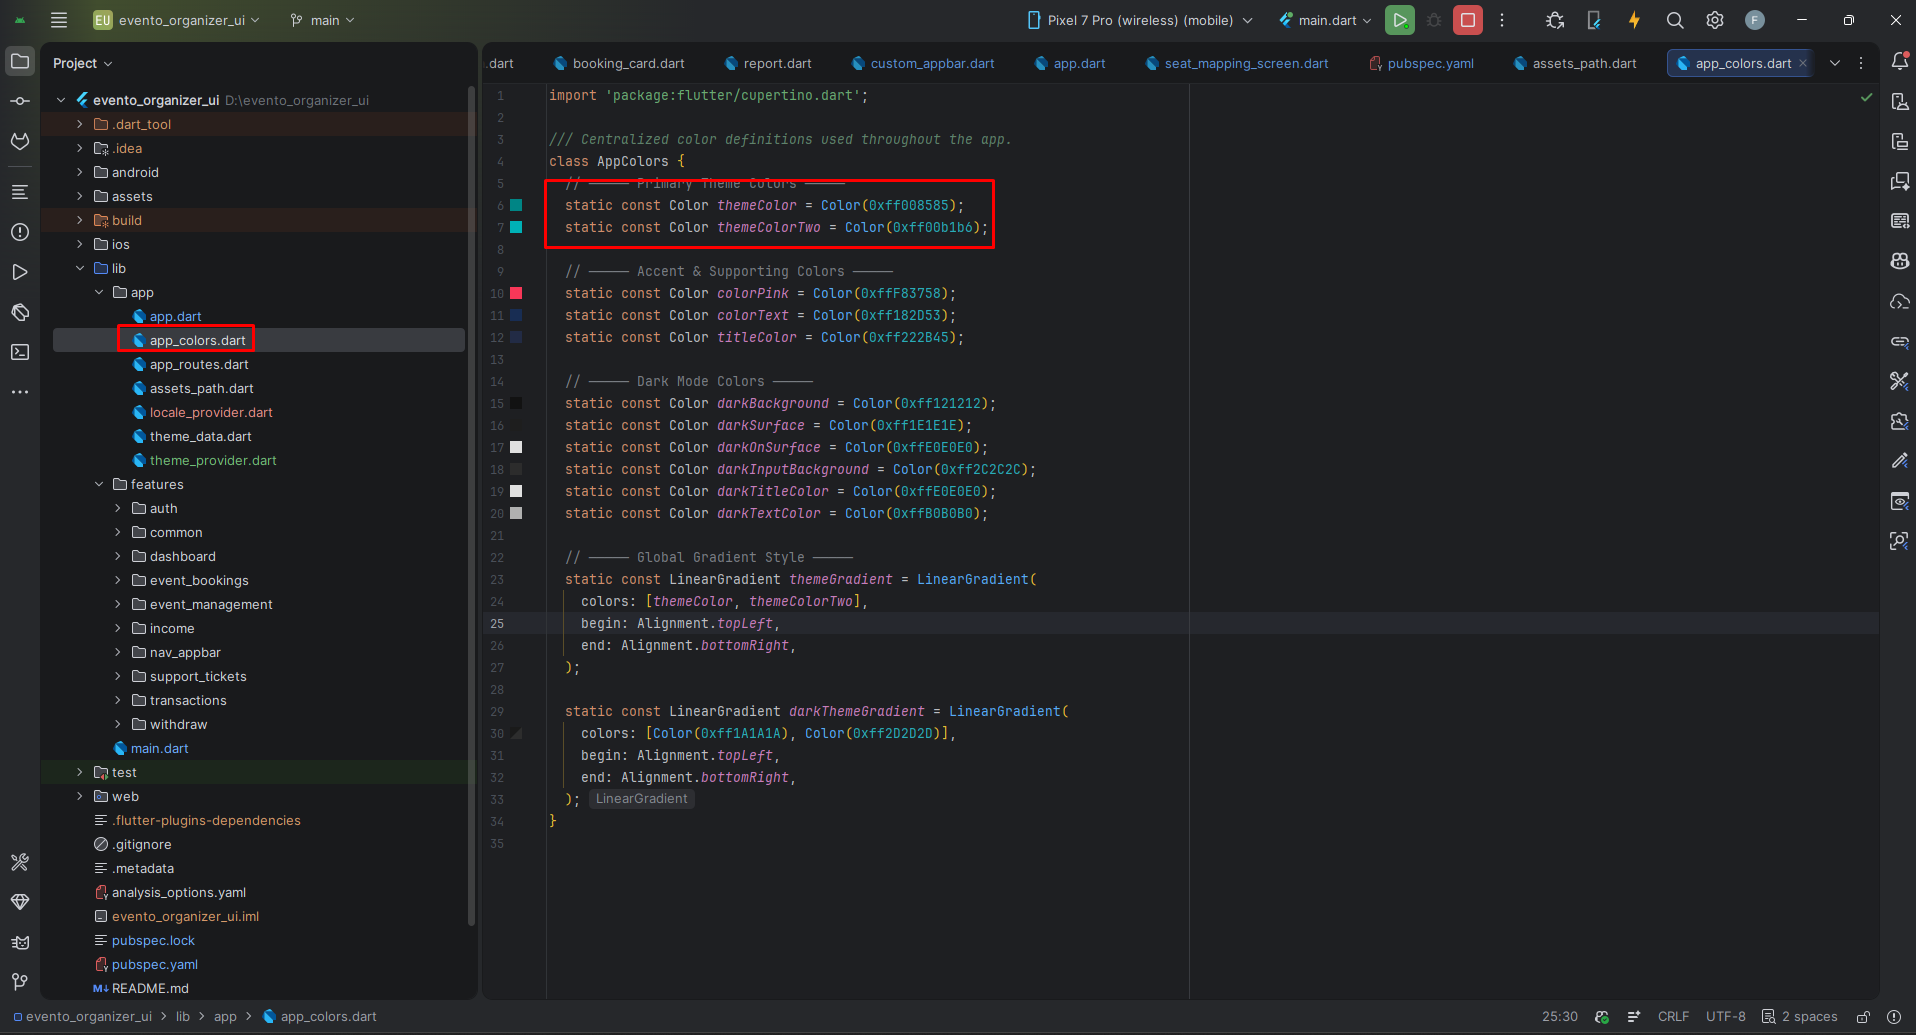
lib/customer/app/language_service.dart. - Organizer theme colors are managed from
lib/organizer/app/app_colors.dartandlib/organizer/app/theme_data.dart. - Organizer dark mode persistence is handled by
lib/organizer/app/theme_provider.dart. - Organizer locale switching and RTL behavior are handled by
lib/organizer/app/locale_provider.dart.
Customer colors
Organizer colors and dark mode
Build & Run App
Run the Application
- Select an Android emulator or connected device from your IDE.
- If none are available, create one from Android Studio AVD Manager.
- Use the combined selector entry point for normal app switching, or the module-specific entry points for focused testing.
- The customer web launcher wraps the app in a fixed device frame when running on web.
- The organizer launcher initializes saved theme and locale values before building the app shell.
Default combined launch
Customer direct launch
Organizer direct launch
Customer run reference

Organizer run reference

Build Release & Publish App
Use the same Flutter root project for release generation. Build from the project root after you finish branding, package configuration, assets, and platform-specific identifiers.
Release note for the combined codebase
- If customer and organizer will be distributed as separate apps, configure unique package IDs, bundle IDs, app names, and launcher assets before store submission.
- Keep store branding separate even if both modules are maintained from the same repository.
1. Build Release Artifacts
After finishing all customizations, open the terminal in the project root and run the release command you need.
Build and Install Variants
Generate an Android App Bundle for Play Store release:
Generate split APKs per ABI:
Signing the App
Before uploading to Google Play, generate a signing key and configure the release signing information.
Create a key.properties file inside the android/ folder with the required key values, then wire it into android/app/build.gradle.
keyPassword = password from previous step
keyAlias = key
storeFile = location of the keystore file
Store Publishing
Follow the official Flutter guides for Android and iOS publishing.
Support
For support, customization, or product-specific questions, use the same vendor support contact that came with the original package. This combined page is only a unified reference for the customer and organizer modules inside the single complete app.